How to Store Your Woodworking Clamps
Let’s imagine for a moment that the old woodworking adage, “You can never have enough clamps,” isn’t true. If you really did have enough clamps, where would you put them all?
Fortunately, that’s a problem none of us will have to worry about, but what about the clamps we do have? If you’re like me, even though you don’t have enough clamps, you do have quite a lot. And with a lot of clamps of varying sizes and types, the key to storing clamps is accessibility.
Here are several clamp storage solutions.
When I need a specific size or type of clamp, I want it to be within reach and easy to identify at a glance, so there’s no fumbling around finding the right one when doing a critical glueup. For me, that means one of two things: Get them up and easy-to-grab on a wall, or put them on wheels to go where I go. Let’s take a look at both options.
Rack ’em and Stack ’em
The most common way of holding clamps on a wall is a simple rack. While the sizes and materials used for clamp racks will vary, most share a basic design. Incorporating openings sized and shaped to accommodate a particular clamp type and a horizontal surface that the clamp heads or pads rest on, these racks are basically slotted shelves.
Designing and building shop-made racks is straightforward, and we’ll get to those in a moment, but the fastest and easiest way to get started is with the a manufactured clamp rack, such as one of the Rockler wall-mounted clamp racks. Typically made of stamped steel, ready-to-use racks only need to be screwed or bolted into place. Slots and a resting surface are already there; you just need to purchase the correct size. Overall size of commercial racks will vary, and the number of slots depends on the clamp sizes – racks for small clamps will have more slots; those for large clamps will have fewer. Clamps can be heavy, especially pipe and parallel clamps, so it’s always best to hang racks with bolts or screws driven solidly into wall studs. These commercial racks are ready for that, with mounting holes set on 16" centers.
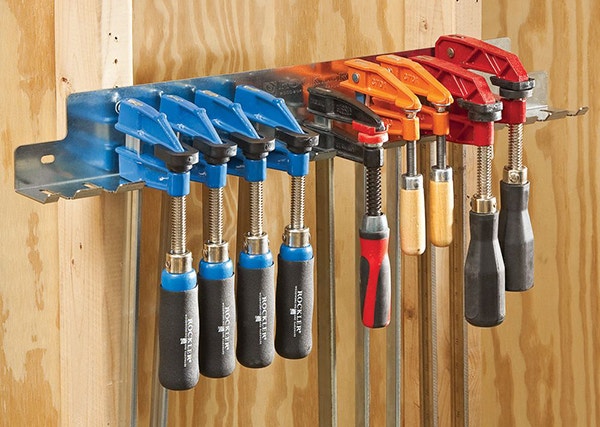
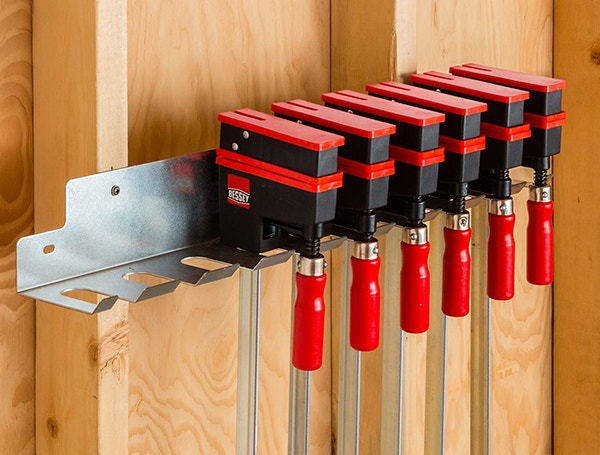
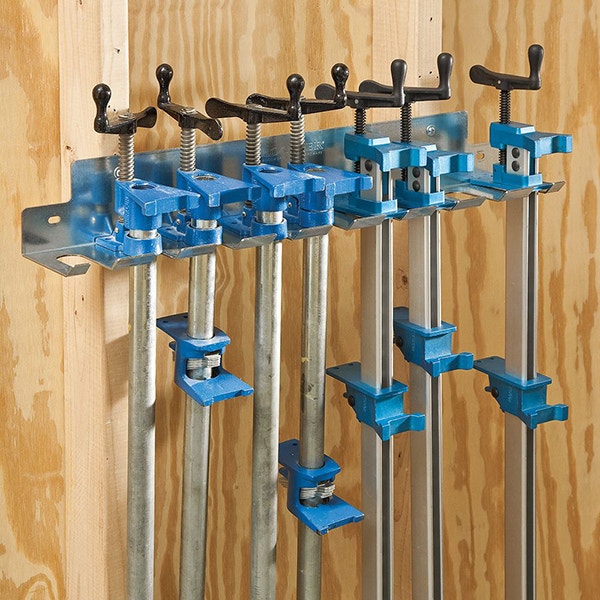
Need more storage capacity than these offer? No problem, just mount them in series, butting one rack end-to-end with another. You’ll find that the racks and mounting holes line up perfectly with wall studs to create a row as long as your wall can handle.
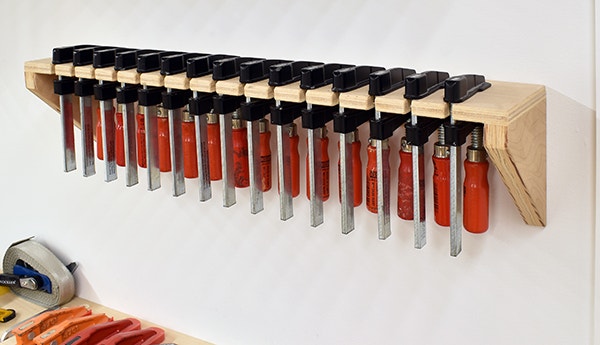
Shop-Made Racks
Designing and building your own wall-mount clamp rack system is not difficult, but it can be tedious if you have a lot of clamps: You’ll have a lot of slots to cut. The parts for shop-made racks are pretty basic. A pair of right-angled end pieces are connected with a back piece, typically a piece of 1-by material, to form a frame. That, in turn, is topped with the slotted “shelf” to create a sturdy rack. Drill through the back piece on 16" centers, and then drive in screws or bolts to anchor the rack to the wall studs. Take into account how heavy your clamps are when selecting the type of fastener you will use to anchor the rack to the wall. F-style clamps are thinner and lighter, and regular screws are fine for anchors. Pipe clamps and parallel clamps can be very heavy, especially if you have a lot of them, so consider lag bolts for a solid attachment.
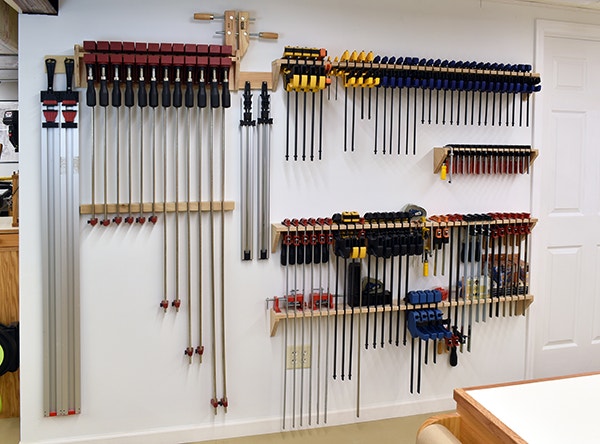
Cutting the slots can be done a couple ways. You can use a dado cutter on a table saw to cut the slots on racks of any length in a single pass per slot. Lacking a table saw or dado cutter, you can instead drill a series of holes in the rack shelf spaced and sized for the intended clamps, and then use a jigsaw to make perpendicular cuts to the holes to create the slots, or cut to the holes on the band saw if your machine has the capacity.
Before mounting your racks, use a sanding block to ease the edges of the slots. Getting clamps off the rack and returning them can be punishing to those slots, and rounding the edges a bit can help prevent splintering.

Make it Mobile
It’s great to have the bulk of your clamps in one spot, but if you’re working in another area of the shop, or maybe away from your main work area – such as on the patio or deck, out in the driveway of a garage shop, or just in a more remote corner of a large workshop – having the clamps with you saves steps and increases efficiency. For that, a mobile clamp cart can be an efficient helper.
Shop-made carts need not be large. The one shown (below) has slots for nine small F-style or quick-release clamps on each side, an open area on top for hand tools and supplies, and a lift-out tray on the bottom. If I’m going to be working in the back of the shop, I’ll load up whatever clamps I expect to use, fill the tray with other tools or smaller clamps, and the top tray with anything else I might need. (In truth, my shop vacuum fittings tend to live there semi-permanently.) Once loaded up, I just roll it to wherever I’m working.

For larger projects requiring beefier clamps, you could make a bigger cart. However, some commercially available clamp carts not only handle larger, heavier clamps, they can be reconfigured to match the specific clamps you need to port around. The Rockler Pack Rack, offer not only reconfigurable hanging bars for clamps, but also a series of optional add-ons with various functions. Mobile and mighty, the Rockler Pack Rack clamp cart system can be customized in numerous ways with add-on accessories.
Options for the Rockler Pack Rack include shelves and tool holders, steel pegboard side panels that can be outfitted with hooks to accommodate a range of tools and supplies, and even a mounting plate for a small dust collector.

Video: Learn More about the Pack Rack Clamp Rack Cart
A Couple More Options
Part of the beauty of clamps is that their squeezing function means you can attach them to almost anything all by themselves.

I like to keep a few individual clamps, or maybe a pair or two, scattered around my shop at all times. For example, while not always a necessity I sometimes use clamps as hold-downs on my drill press. Rather than go hunting for clamps on the odd occasion I need them, I just keep a pair of quick-release clamps attached to the back corner of the drill press table
.Finally, small spring clamps and ratchet clamps only need a small area for storage. Creating a dedicated rack for spring clamps seems, to me, a lot of effort for little return. And, since you typically use a lot of spring clamps at a time for most tasks for which they’re suited, you need a means of carrying a couple handfuls to where you’re working without dropping them all over the place.


Keep the inspiration coming!
Subscribe to our newsletter for more woodworking tips and tricks