How to Make Picture Frames with a Router

When it comes to creating picture frames on a router table, the options become nearly overwhelming — after all, a picture frame is simply a molding mitered to surround art of some sort.
Framing a piece of art, be it an original oil painting by an established artist, a favorite photo, or even a masterpiece from the hand of a grandchild, requires making some choices. Do you want a classic-looking frame with major molded accents and multiple shadow lines built in? Or would simple lines and basic shapes set off the art in a more pleasing way? The choices are highly subjective and will vary from one person to the next. Curiously, that same level of subjectivity is in play when it comes to making a picture frame. Which is one reason that, when it came to designing a couple of picture frames, it was a very difficult effort. Everyone in the room had good ideas, strong opinions and arguments in their favor. Which, of course, meant that nothing was agreed upon.
So, with that in mind we decided to just go into the shop and proceed with two main goals. The first, to come up with two attractive but very different styles of picture frames. The second was that they should not require a builder to purchase 10 additional router bits just to make them.
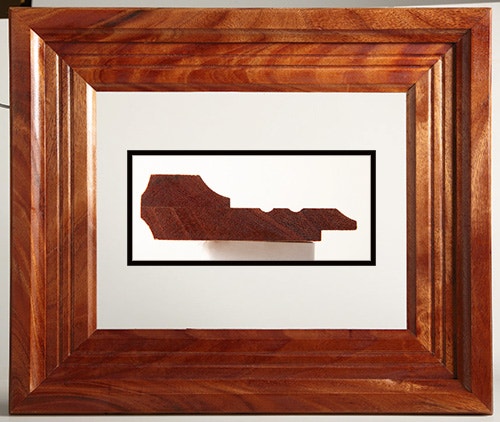
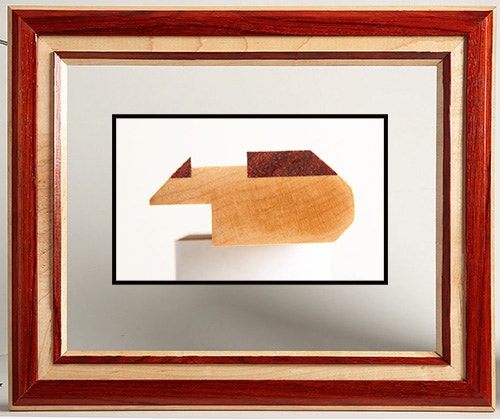
After a few false starts and several mock-ups, those goals were achieved in the two frames you see: one a more traditional-looking frame made from mahogany, and one more modern-looking, made from maple and padauk. In total, they use four different router bits. The "classic" picture frame uses three cutters and the "contemporary" uses only two.
Wood species choice is another variable that is fairly subjective. If the padauk stock in the contemporary picture frame looks a tad too orange for you, perhaps by substituting cherry you can achieve a nice contrast with a more subdued hue. Or maybe you like a strong contrast but would prefer it to be domestic walnut — that's your call.
In the same way, you may prefer walnut over mahogany in the classic frame, or red oak, ash or cherry, to name a few. Some might make the picture frame from yellow poplar and paint it.
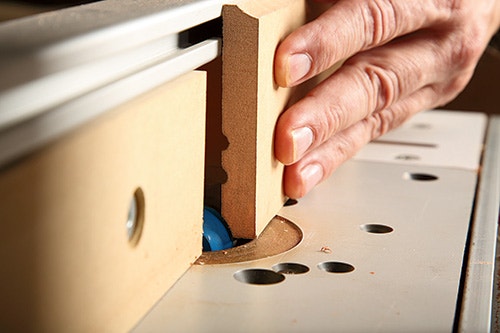
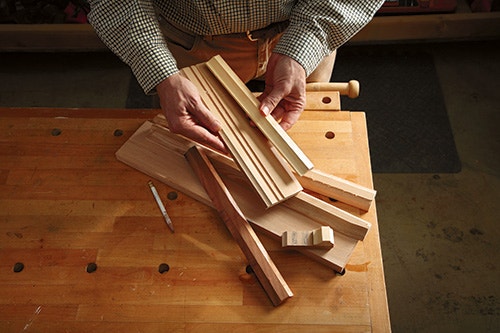
The main molding of the classic frame is formed in six steps. See the Drawings for details. With the 1/2"-thick stock cut to width, set up a 3/4" radiused cove bit in your router table. As you can see in the photos, how you hold the stock against the fence will affect the shape of the cove you form on the wood. Start with the wide face of the stock held against the face of the fence and run the length of the stock through the bit. Although not shown in the photos, a featherboard (or even two) will give you added control if you are shaping long pieces of stock. How much stock you need to shape will be determined by the size of the photo or piece of art that you will be framing. It's a good idea to figure that out before you get started. Now before you get worried, the photos above were shot to show you proper stock orientation. The bit was not spinning and the guards are removed so you can see things clearly. (No fingers were injured during the making of these moldings.)

The next cut will form the back (outside) edge of the main molding. Make this with the face of the wood flat against the router table top. Take a minute to inspect the cuts you have made, to be certain that you did not waver in your cut. You can go back and fix any high spots if you need to.

Now grab the accent molding stock, which you will need to have cut to width from 1/2"-thick stock as well. Again, look to the photos and the Drawings on the next page for details. For the last cut, you will need to drop the router bit just a hair to get the shape right. With that done, chuck a core box bit in the router and shape the flutes into the main molding. Take some time to sand your pieces and then get ready to glue them together. This is best done on a workbench. Your last routing step is to use a straight bit to form the rabbet for the back of the frame, which will capture the art. The depth of the rabbet will be determined by how the art will be mounted and whether there will be glass in front of the art. You will need to figure that out before you cut the rabbet.

Miter-cut the frame molding you've just completed to length. A miter saw works well for this precise task. Now glue and clamp the pieces together, and you are nearly done. Give the frame a final sanding and apply your choice of finish to complete the project. A hanger strip is a good way to make the task of hanging the frame on the wall easier.
Contemporary Frame

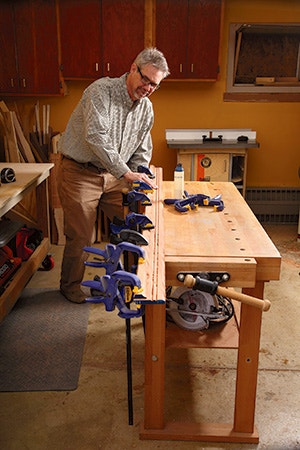
With the 3/4"-thick stock ripped to its proper width, form the first of three rabbets in the wood, using the Drawings as a guide. When you've completed all the rabbets, rip the 1/4"-thick accent stock to width and glue it in place. When the glue on the last piece has cured, chuck the chamfer bit in the router table and shape the three edges as shown in the Drawing. Once again, some sanding before you cut the pieces to length is a good idea, then step to the miter saw to cut your miters. Miter-cut the molding pieces to length, dry fitting the joints to test the accuracy of the miters. A band clamp is one preferred method for gluing and clamping up miter joints.
When the glue has cured, remove the squeeze-out and do a final sanding. Apply your finish, and the project is complete. Picture frames make great gifts and are fun projects to do. And they are well-suited to a small shop environment.
The process of making the contemporary frame is even easier than making the classic frame. You only need a 3/4"-diameter straight bit and a piloted 45° chamfer bit.
Router Bits
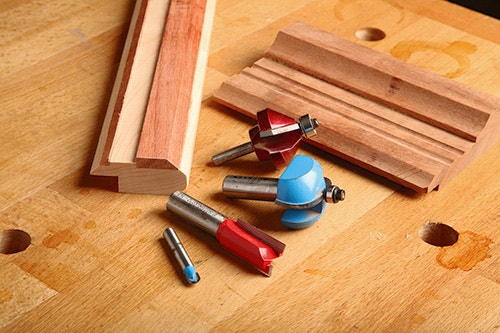
A total of four router bits were used to make the two picture frames above. The contemporary frame used only a straight bit and a chamfering bit. The classic frame used the core box bit, straight bit and the bearing-guided cove bit.


Keep the inspiration coming!
Subscribe to our newsletter for more woodworking tips and tricks