How to Make Book-Matched Panels
A properly tuned band saw and the right resawing technique can reveal the inner beauty of a piece of wood.
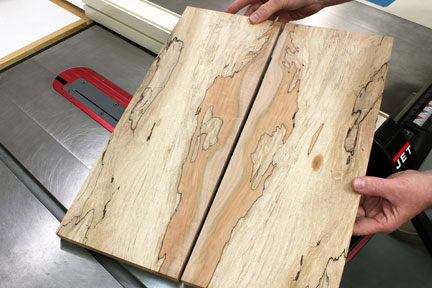
There are lots of ways to make the wood you use in your projects more beautiful, and they all vary in the amount of work they require. But sometimes nature does all the hard work for you, with spectacular results. That's the case with book-matching, named for the way you "open up" a piece of wood resawn down the middle to reveal a perfectly mirrored pattern on each piece. Just about any wood with a distinctive grain is attractive when book-matched, but workpieces with unusual markings — burl, quilting, tiger-striping, bird's-eye — can be astonishing when given this mirroring treatment. For a small cabinet I'm building, I want book-matched doors, and a chunk of wonderfully spalted maple I bought seemed the perfect choice to create the two distinctive 8" x 16" panels I wanted.
STEP 1: There are two essential keys to a perfectly resawn workpiece, with the first being the blade on your band saw. You can resaw with just about any blade, but you'll get the best results with a blade with a pitch of 3 or 4 teeth per inch. The reason is that when resawing, that blade is cutting through a lot of wood — far more than for regular ripping or crosscutting — resulting in tons of sawdust. The wider spacing of a 3- or 4-TPI blade easily moves that dust out of the kerf. Blades with lots of teeth can't do that, and will quickly bog down resulting in poor cuts.
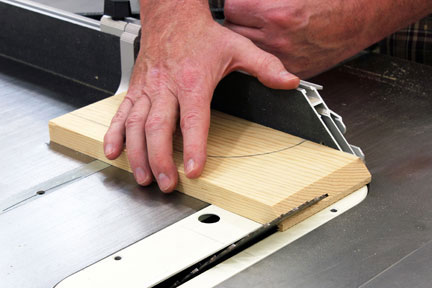
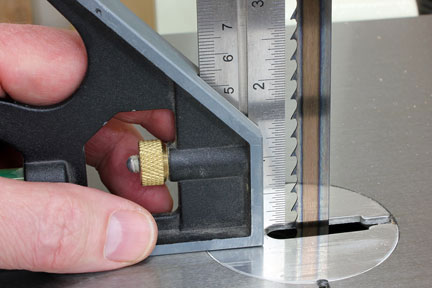
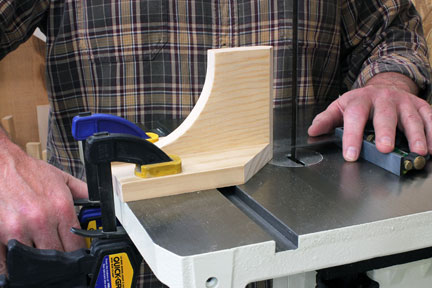
STEP 2: The second essential is twofold: keeping your workpiece perfectly vertical and staying exactly on your cutline as you feed the stock. Any fence will ensure vertical cuts, but band saws have a peculiar trait called "drift," where the blade tends to move off a straight line. Worse, the amount of drift is different from blade to blade and can even change during a cut depending on the varying density inside a particular piece of wood (a common thing with spalted, burl or highly figured wood). The ideal solution is a jig that allows you to slightly alter the feed angle on-the-fly. These go by a number of names — pivot guide or fence, fence point, pivot point or simply resaw fence — but they function the same way by keeping the stock vertical along a single point of contact, allowing you to make slight angle adjustments as you push the stock through. You can make one from any piece of square scrap by first beveling the pivot point with 45-degree cuts on your table saw.
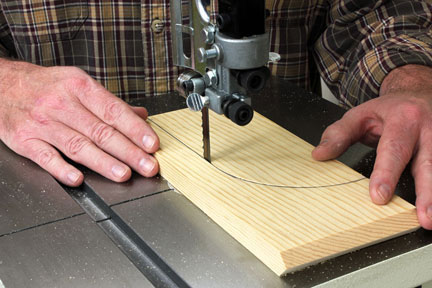
STEP 3: To facilitate clamping the guide to the band saw table, and to minimize obstruction, taper the rear portion of the guide to about an inch in height. Cut tapers on the front edges of a pair of clamping surfaces, and glue and clamp them to each side of the guide to form a stable base for the guide.

STEP 4: Mill your workpiece square, and then mark the exact center line on the top edge. For best results, use a dark ink marker for good visibility. Measure the exact distance from your cut line to the edge of the workpiece to determine the guide position.
STEP 5: Adjust the guide post on your band saw to accommodate the height of your stock, and then clamp the pivot guide so the distance from the blade matches the measurement from the center line to the edge. The tip of the pivot guide should be slightly ahead of the blade; the idea is that you want your workpiece to register against the guide before the teeth reach it. By the way, it doesn't matter which side you clamp the guide. I'm right-handed, so I prefer it on the front of the table, but place it the way that works most comfortably for you.

STEP 6: Hold the workpiece flat against the table and position the leading end carefully against the pivot guide. Then, with slow, even force, feed the workpiece into the blade. I'm keeping the blade exactly on my cut line by angling the stock as needed using the pivot guide as a fulcrum.

STEP 7: Continue feeding slowly, following your cut line. As you near the end of the workpiece get a sacrificial push block ready. As the cut nears completion, you don't want your hand on the trailing edge.

STEP 8: Reach around and support the workpiece on the outfeed side of the table. Don't pull the workpiece through — not only can this affect how well you're able to keep the blade riding the cut line, but you can also squeeze the kerf shut, binding the blade unnecessarily. The goal here is to lightly support the stock, while letting the push block do the work until the stock clears the blade. Note, here, that this is why I prefer the pivot block on the right-hand side of the blade. I'm using my dominant hand to control the push block, so the left side of the blade is clear and open to reach my left arm through to support the workpiece.
STEP 9: The blade will leave milling marks on the cut faces of your two book-matched panels. Smooth these out with a quick trip through the planer or with a sander, taking care not to remove too much stock from the cut faces or you can alter the book-matched appearance. The mirrored effect is best with the least amount of wood taken off these faces. If you need to reduce the thickness of the panels further, be sure to mill the faces opposite the book-matching only.


Keep the inspiration coming!
Subscribe to our newsletter for more woodworking tips and tricks