How to Build a Custom Platform Bed Frame
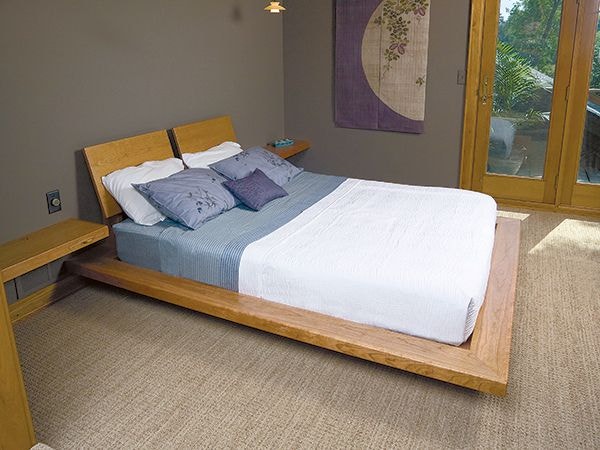
A cantilevered frame with a hidden platform creates the illusion of a floating bed.
Getting from where my clients and I started, to arriving at this design, was a long process, but it was worth the effort. Initially, my clients knew they wanted a bed that looked like it was floating with a framed ledge all around. They showed me magazine and catalog images of beds with elements they liked. I knew what they wanted, but I didn’t know how to do it. So, it was off to my computer to start designing. After many revisions in which I progressively moved the legs, and then a base, farther and farther inward, it finally hit me: a cantilever supported frame was the perfect solution. My clients were ecstatic, and I was off to the races.
The cherry lumber I used looks rich, which is good — it's not inexpensive. It will darken with time and become even better-looking. My clients wanted the base made out of cherry, too, which added to the cost. You could save money by using a cherry-stained wood (birch or poplar) for the base, as it's not very visible.
Click Here to Download the Drawings and Materials List.
Build the Project to Fit Your Mattress
The dimensions given in the Material List are for making a bed using a 10"-thick queen-size mattress without a box spring. There's a 3/4" space all around between the mattress and platform frame. I suggest you spend a little money, and a little time, confirming the fit using your mattress and bedding. Adjust the dimensions to suit your needs. You can do that by making a crude test frame using 1x2s. Start large and slowly trim and make your test frame smaller until you get the size you want. You may also need to adjust the size and shape of the fill blocks (pieces 21).
Construction Notes
Don't be lulled into thinking that this is an entirely easy piece to build just because it looks simple. Getting the mitered corners of the platform frame joined tight and constructing the base are a bit more challenging than they appear — simple things often are.
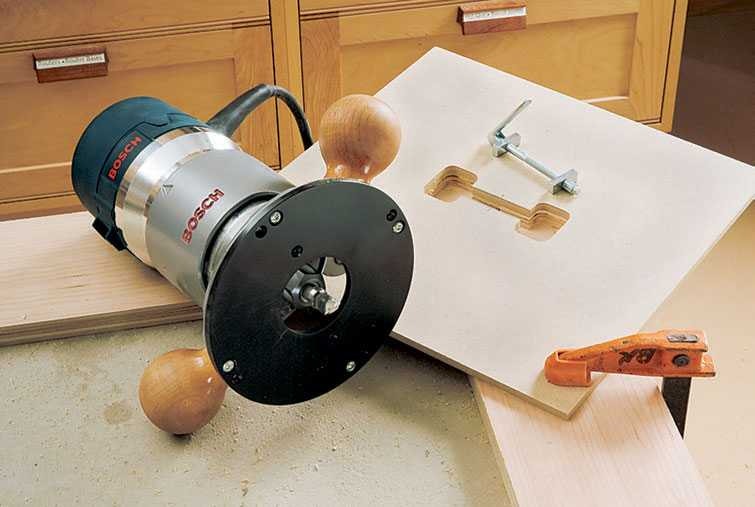
All the exposed edges of the platform and headboards are rounded over with a 1/4" radius. Only the corners of the base need be rounded over. The mitered corners of the frame are aligned flush with #20 biscuits.
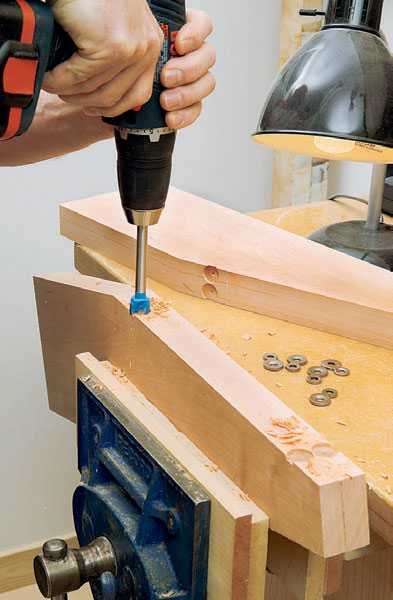
Laying out the holes in the platform plywood (pieces 20) was a lot of work. I did it on my computer, and a drawing is included in the PDF above. There are 82 holes to drill! About half of them are countersunk from one side, and the rest from the other side. And to confuse matters even more, the two plywood pieces are mirrored images of each other when the drilling is done. Follow the layout, and you'll be fine.
Making the Base
Cut the base parts (pieces 1 through 7) to size. Lay out and cut the half-lap joints of the base's foot-end cantilevers (one piece 5, both pieces 6). Use a table saw or miter saw to cut the beveled ends of the cantilevers. Cut the grooves for the biscuits that join the short cantilevers and the second-from-the-end long cantilever.
Lay out and cut the notches in the base sides and base end for the cantilevers. There are various ways to make these cutouts, but given the size of the parts, I suggest you use a router jig and router with a flush-trim bit. Rough-cut the openings with a jigsaw, rout the shape and square up the corners with a hand file.
Cut the grooves for the plywood in the base sides, ends and support. Make the width of the groove match the thickness of your plywood. Machine the grooves for the biscuits that join the support and base ends. Carefully cut mitered corners on the base sides and ends.
Dry-fit (no glue) the base together to make sure the plywood is not so large as to prevent the base's mitered corners from closing tightly. You'll also want to confirm that the cantilevers seat properly in their notches. Make any necessary adjustments, and then finish sand the exposed surfaces of the base sides and ends before proceeding.
Making the Base
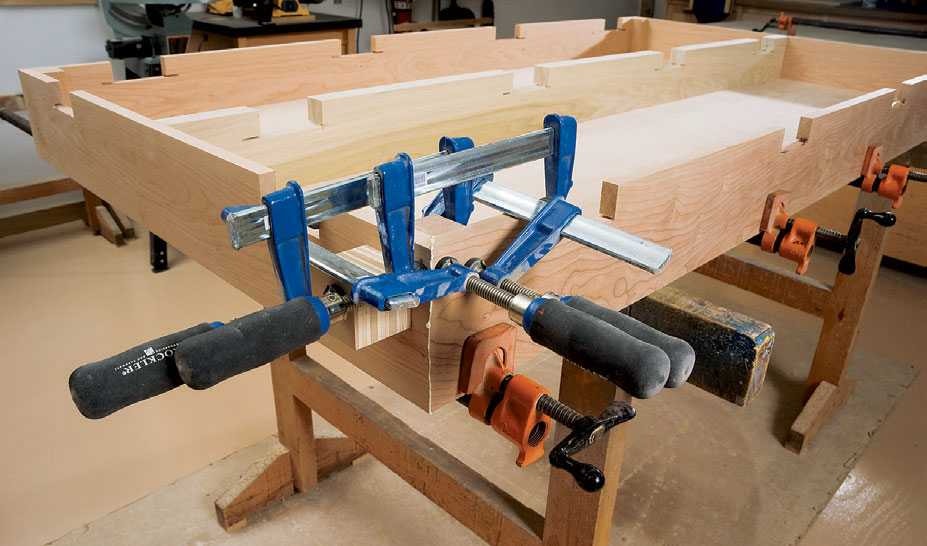
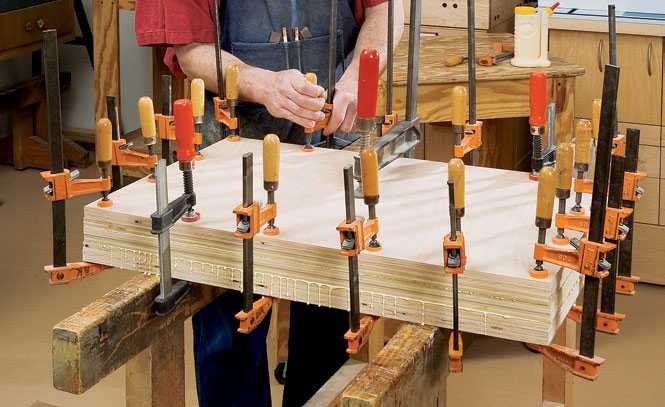
First glue and clamp one base end to the center support piece. Glue and clamp one of the plywood panels to the assembly, then add the other plywood panel. Next, add the other base end. Now, all that's left is to add the base sides. Here's where it gets a bit tricky. My band clamps were not long enough to clamp the mitered corners, so I used the corner blocks (pieces 7) as clamping blocks instead. Do a dry fit to figure out your clamping setup before you go further, and then glue and clamp one base side at a time to the assembly.
Round over the base corners. Lay out and drill the cantilever-to-cantilever half-lap screw holes, and the cantilever-to-base screw holes. Align the cantilevers to the base and drill pilot holes for the assembly screws. Install all the base assembly screws. Set the assembled base aside for now.
Building the Platform
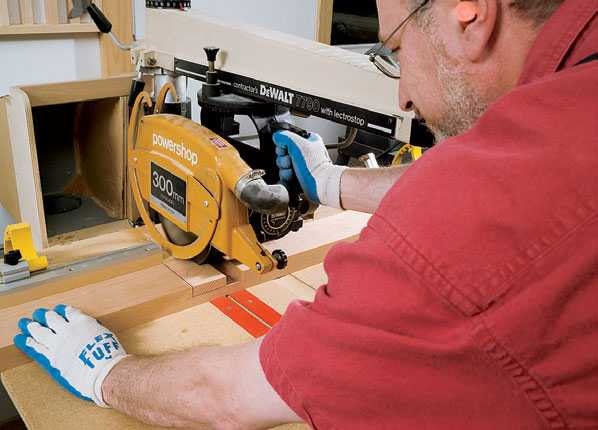
The 6"-wide frame sections are built up (three pieces per frame section) slightly long, and then mitered to their finished lengths. Be very careful when you cut the mitered ends. You could easily goof up the ends by not cutting the miters perfectly at 45°. Test your machining setups thoroughly on scrap wood before proceeding. My 10" miter saw was too small to cut the mitered ends, so I used my table saw with a sliding table attachment. I trimmed a little bit at a time until the finished lengths were perfect. Before making the cuts, I placed a 3/4" spacer under the shorter inside edging piece to bring its height up equal to the outside edging. That way I could make the cuts face-up to reduce tearout.
Cut the frame pieces 11 through 18 to size plus 1/4" longer. Miter the ends, but leave the pieces long. Rout the 1/2"-deep cavities in the ends of the frame plywood pieces 11 and 12. Use a short-top bearing flush-trim bit or a template guide bushing and straight bit for the routing. Glue and clamp the frame edging pieces to the frame plywood pieces. Make the headboard cleat (piece 19), attach all the cleats, and miter-cut the ends to final size as described earlier. Assemble the frame upside down on your floor.
Cut the plywood (pieces 20) to fit in the assembled frame. Mark the plywood faces up/down, right/left, head/foot, and outside edge as shown in the Drawings. Lay out and drill the screw holes and cut the biscuit grooves as shown in the drawing. Screw the plywood pieces to the frame and round over the bottom edges. Next, you can flip the platform over, and set it on sawhorses. Round over the top edges and corners. Drill the lag bolt and #14 screw clearance holes through the frame at the head.
Make the fill blocks (pieces 21) now, but don't attach them to the platform plywood (using double-stick carpet tape) until you carry out the final bed assembly.
Constructing the Headboards
Make the headboard supports (pieces 28). Drill the fastener counterbore holes (pieces 29) and rout the rounded-over edges.
Cut the headboard plywood (pieces 25) from one sheet so the grain flows smoothly across the headboard faces when the bed is assembled. Leave the plywood pieces about 1" wider and 1" longer than their finished dimensions, and laminate them together to make the two 1"-thick panels. That way, you don’t have to worry if they slip slightly out of alignment during glue-up. When the glue cures, cut the panels to their finished size, and add the edging (pieces 26 and 27). Miter-cut the edging to hide the end grain. Rout the rounded-over edges.
Wrap up construction by aligning and fastening the headboard supports to the platform. Attach the headboards to their supports. Use a 10-1/2"-wide spacer to align the headboards parallel to the platform.
Finishing Up

Disassemble the bed, finish-sand the parts and ease any sharp edges. I used Danish Oil Finish as a topcoat, then added nail-in nylon feet to the bottom edge of the base. While this "floating" bed doesn't really defy the laws of gravity, the effect is convincing. A solid platform will keep it firmly grounded for years to come.


Keep the inspiration coming!
Subscribe to our newsletter for more woodworking tips and tricks