How to Apply Plastic Laminate
Toughen up your work surfaces and jig facings with plastic laminate.
In a busy shop, work surfaces and jig facings sure take a beating. Melamine can offer some degree of improved durability, but it doesn't hold a candle to cabinet-grade plastic laminate. "Real" laminate will protect worktables from glues, finishes and other chemicals, and it will help your most-used jigs bear the brunt of repeated use. Laminate is quick and easy to install. You'll learn the basics in the following eight steps.
Step 1: The best way to fit laminate to a substrate is to install an oversized piece, then trim it flush with a router. Measure your tabletop, jig facing or whatever surface you're applying laminate to, and add an inch or so to both the length and width dimensions. Then, cut the laminate to rough size on a table saw outfitted with a carbide-tipped blade. Since laminate is extremely thin, you'll need to make sure it can't slip under the rip fence. To prevent this from happening, clamp a piece of scrap to the fence to cover any gap between the fence and table. Set your blade height so the teeth just clear the laminate thickness, and cut the plastic to size. Hold the laminate down firmly against the saw table with a push pad so it doesn't flutter near the blade.
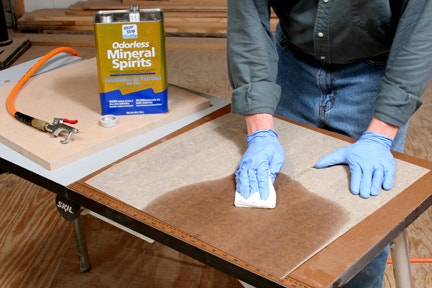
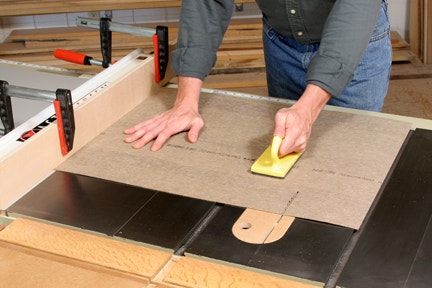
Step 2: Clean the back face of the laminate with mineral spirits to remove any contaminants or dirt that could compromise the glue bond. Use compressed air or a shop vacuum to give the substrate surface (we're using MDF here) a good cleaning, too.
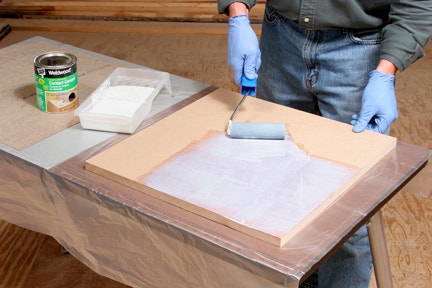
Step 3: Liquid contact cement is the best adhesive for bonding plastic laminate. Apply a thin, even coating of cement to both the substrate and the laminate using a foam paint roller. Allow the adhesive surfaces to dry to the touch. It takes about 20 minutes. When applying contact cement, be sure to wear gloves and protect your worktable from spills. Work in an area away from sparks or open flame, especially if you are using the conventional (not low-VOC) formulation of cement. Keep a door or window open to help vent the glue fumes, or wear a vapor respirator.

Step 4: Just like its name suggests, contact cement will bond immediately when the laminate and substrate surfaces touch. You only have one chance to line the parts up correctly when the glue takes hold. Here's how to prevent mistakes: lay several clean strips of scrap wood or dowels across the substrate to serve as spacers between the glued layers. As long as your spacers have no contact cement on them, they won't stick to the substrate or the laminate. Lay the laminate sheet into position on the spacers and check for an even overhang all around.
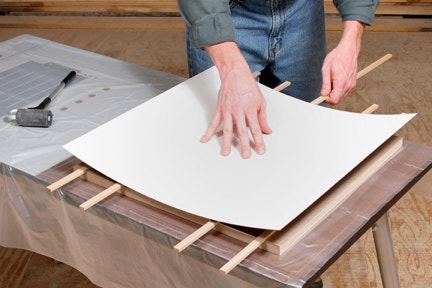
Step 5: Starting in the middle, pull out the center spacer and press the laminate onto the substrate. Continue working outward, removing one spacer at a time and pressing the laminate down flat.

Step 6: Use a J-roller or a piece of 2 x 4 wrapped in a towel to flatten the laminate and remove any air bubbles underneath. Roll the laminate starting in the center of the sheet and working out to the edges (see Photo 6). Be very careful when pushing down near the edges of the unsupported plastic - it's very brittle and cracks easily.

Step 7: Inspect the seams where the laminate and substrate meet. If some edges of the laminate are pulling up, even after rolling them out, you can reactivate the glue by heating it with an iron set to medium/high heat. Warm the loose spots for 10 to 15 seconds or so, and roll them again until the plastic cools. This generally fixes the problem.

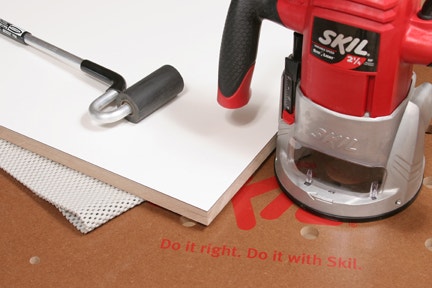
Step 8: The last step is to trim off the overhanging plastic. You can use a one-piece, carbide laminate-trimming bit or a short, bearing-guided flush trim bit for this task. Install the bit in your router and set the cutting depth so the bit or the pilot bearing will ride against the substrate. Feed the router clockwise around the outside of the workpiece to cut the laminate flush. If you are trimming laminate off of an inside cutout, feed the router counterclockwise instead. Once trimmed flush, the edge of the laminate will be extremely sharp! Knock off this sharp edge carefully with a file. That's all there is to it! You can now add laminate installation to your woodworking bag of tricks.


Keep the inspiration coming!
Subscribe to our newsletter for more woodworking tips and tricks