Hand Cut Mortise and Tenon Joints
Create a standard hidden (blind) mortise and tenon joint with just a few tools.
If you're doing woodworking on a shoestring budget, you'll be happy to know that the only tools you need to cut tight-fitting mortise and tenon joints are a square, knife and marking gauge, a fine-toothed saw, and a couple of sharp chisels and mallet. You may also wish to use a drill (a drill press is even better), to remove waste from the mortise ahead of chopping it to final size, and of course, you'll also need to supply some elbow grease and a healthy dose of patience.

For this example, I'll describe how to create a standard hidden (blind) mortise and tenon joint. Other variations (through, pinned, etc.) are created by a similar process. Start by laying out the joint on both male and female parts. Use the square to mark the shoulders of the tenon on all four sides, as well as the width of the mortise.
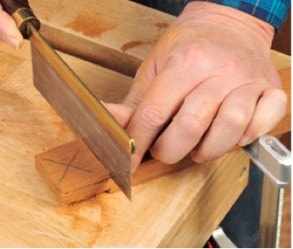
Instead of a pencil, use a scribing knife to make the marks (this will help when cutting the joints later). Set the marking gauge to scribe a line that defines the edges and ends of the tenon cheeks (the thickness of the tenon). If both joint members are the same thickness and the mortise and tenon is centered, you can use the same gauge setting to mark the sides of the mortise.
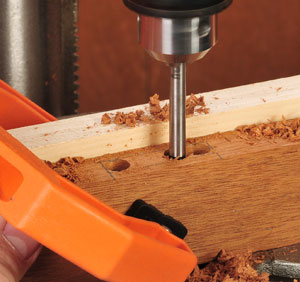
I find it easiest to chop the mortise first, then cut the tenon and pare it to fit. For faster mortising, use a brace or drill press fitted with a bit that's equal to or slightly smaller in diameter than the final mortise width. Bore a row of overlapping holes along the waste area, stopping just short of the ends of the mortise.
It's best to use a bit that leaves a flat-bottomed hole, like a Forstner bit. Using a wide chisel, chop the waste on the sides back to the line. I like to use a mallet to drive the chisel for the initial rough cuts, then take the chisel in hand to do the final trimming. For the final trim cut, set the chisel into the fine scribed line, and first just tap the chisel and deepen the mark. Then, tap the chisel down to the full depth of the mortise.
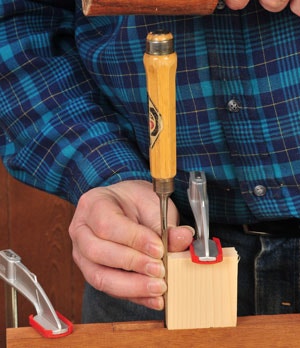
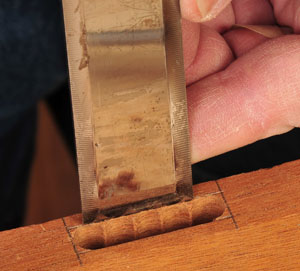
To help keep the mortises' sides parallel, you can use a scrap squared block of wood to keep the chisel square to the stock, as shown in the photo. Trim the ends of the mortise with a chisel that's the same width as the tenon.

To cut the tenon, clamp the stock vertically into a sturdy bench vise and use a fine-toothed saw (tenon saw, backsaw, Japanese dozuki, etc.) to carefully cut down the cheek lines to the shoulders. Use the scribed lines to line up the saw teeth, erring to the outside of the line — it's better to make the tenon too thick, rather than too thin. Hold the saw so that it cuts diagonally as you follow the line. Then, tilt the saw in the other direction to complete each cheek cut.

Next, reclamp the member flat atop the bench and saw off the waste at the shoulder on each side of the tenon. To make the tenon easier to insert into the mortise, use a block plane or chisel to chamfer the ends of the tenon slightly on all four sides.

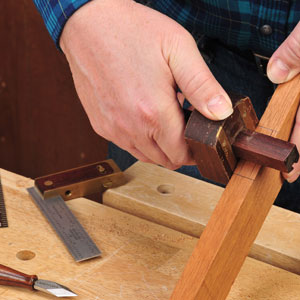
Now carefully check the fit of tenon into mortise. If it's too thick, DO NOT force it. Use a wide chisel to carefully pare off a little from each cheek face as necessary, until the tenon fits snuggly, but not tightly - remember, glue will swell the wood a skosh and make the fit a little tighter.


Keep the inspiration coming!
Subscribe to our newsletter for more woodworking tips and tricks