Build a Folding Outfeed Table to Mount on Your Table Saw Stand
A small-shop delight, this project is a sweet upgrade to your shop’s centerpiece.
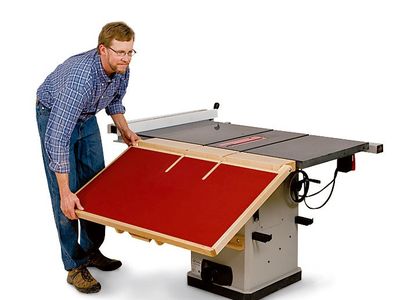
A folding outfeed table for your table saw can be an easy solution for ripping lumber and other projects, especially in a small workshop. Many new cabinet saws have a side extension table, and they’re a big help for supporting wide sheet materials or long workpieces when crosscutting. But I use a table saw even more often for ripping lumber. No cabinet saws that I'm aware of provide a means of support behind the saw where I really need it. I've tried using a worktable back there, but it's just one more fixture to get in the way in a small shop, and, I've never found a roller stand that provides the amount of stability I want. So, my solution was to build an outfeed table that I can flip up when I need it and fold down when I don't. It mounts to the saw's back fence rail and sets up with an extendable leg that props against the cabinet. Ordinary barrel-bolt hardware locks it quickly in the “up” position, so I never have to futz with the setting. It provides a 30"-deep platform behind the machine — plenty of room to keep long rip cuts from tipping off into the netherworld — and its triangulated design is sturdy as can be. After five years of hard use, the prototype for the fold-down table you see here has become an essential feature on my cabinet saw.
Tailoring the Table to Your Saw
If you decide to build one for your saw, first grab a tape measure and size up your machine. The parts in the Material List are suitable for a saw with 26" of vertical clearance between the visible-m-inlineop and the dust port. Make sure to adjust your table’s front-to-back size, if needed, so it won't interfere with the dust port when you fold it down. I made my table stretch from one extension wing to the other. You could make yours even wider if you like, but remember that the leg should be relatively centered underneath for stability. I suggest widening the leg to broaden its stance if you make a substantially wider outfeed table.
Building the Table
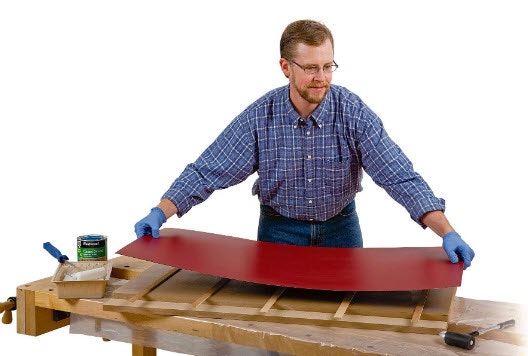
Starting the outfeed table for your table saw stand by constructing the table top and gluing on the laminate pieces. Get this project rolling by cutting the MDF table core top and bottom (pieces 1 and 2) to size and gluing them together. Drive a brad through each corner to keep the pieces from shifting during clamping. It's essential that the edges line up evenly. Pull out your contact cement, J-roller and spacers so you can cover the top and bottom of the core with plastic laminate (pieces 3 and 4). Start with oversized sheets, and bring them to final size with a trim router and piloted laminate cutter.
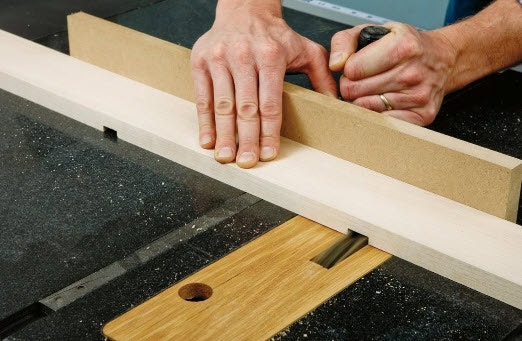
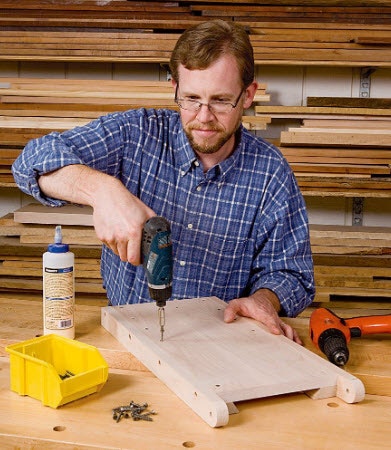
Creating 3/4"-wide dadoes across the filler strip in order to accommodate the folding outfeed table's leg pivot brackets. A filler strip (piece 5), machined with two small dadoes, tucks into place along the front bottom edge of the table core. The dadoes create pockets for the leg pivot brackets (pieces 6). Make the pivot brackets first, rounding their ends and drilling the centered 5/16"-diameter bolt holes. Then, use the brackets to set the width of the dadoes in the filler piece so you'll arrive at a nice, snug fit. Glue and screw the pivot brackets into their dadoes, then attach the filler strip to the core with more glue and screws. I wrapped hardwood edging all around the table. It helps protect the edges of the MDF and laminate. Another important feature is that the back ends of the side edging (pieces 7) are also shaped and drilled to form "pivot hinges." Here's the best order for completing and installing the edging: First create the side edging, then fashion the table pivot brackets (pieces 10) so you can round the ends and drill the through-bolt holes in all four pivoting parts at the same time. Make the table pivot brackets about a quarter inch longer than necessary, and set them aside.
Wrapping the outfeed table in hardwood edging and securing it with brad nails. Now, glue, clamp and nail the side edging to the core with 1-1⁄2" brads. Mark and cut the front edging (piece 8) to length, then glue and nail it in place. Fit a strip of back edging (piece 9) to the side edging, and install it. Take the time to round its ends on a disc sander so the corners won't become "gut busters" later on. Wrap up by cutting the table pivot brackets to final length, gluing and screwing them in place to beef up the pivot points. Ease all the sharp edges of the trim with a 1/8" roundover bit, a file or a block plane.
Making the Leg
Constructing the leg for the fold down outfeed table saw stand table. When I designed my original outfeed table, I wanted the leg to extend and brace against the saw cabinet but also retract so it could tuck behind the table when folded down. A telescoping leg provided the functionality I needed. The body of the leg houses an extension piece, and the parts open and close by what amounts to a giant sliding dovetail. Assemble the leg by gluing and screwing the two side braces (pieces 12) to the back (piece 11). Since the braces must pivot on the top ends, first round them over on your band saw, and step to the drill press to bore centered bolt holes. Attach the braces to the back panel so the bottom ends of the three parts a re-flush. Next come the guide strips (pieces 13). Tilt your table saw blade to 35°, bevel-rip the strips to shape and cut them to length.
Glue them inside the leg housing with the bevels facing inward. Drive countersunk screws through the back and into the strips to reinforce these important load-bearing joints. Cut the leg extension (piece 14) to width and length, and bevel-rip both of its edges at 35° so it fits well between the guide strips. Aim for a slightly tight squeeze at first, then shave the bevels with a block plane until the extension slides smoothly into the leg housing. Glue and screw a handle (piece 15) to the extension. Now, close up the leg, and fasten a barrel bolt (piece 19) near the handle: the "male" side mounts to the leg extension, and the "female" receiver piece goes on the guide strip. When the table is folded down, this bolt keeps the leg retracted.
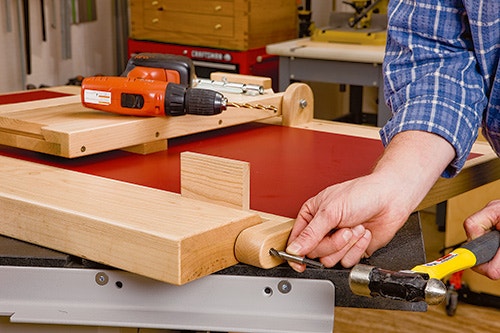
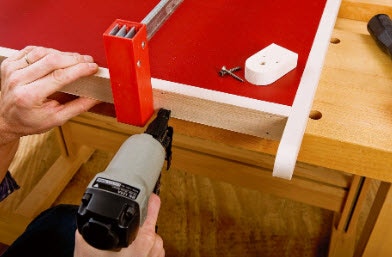
Mounting the leg onto the folding outfeed table with the help of some 1/2" spacers. Attach the leg to the table pivots with bolts, washers and nylon lock nuts (pieces 16). Next, cut the spacer and build-up strip (pieces 17 and 18) to shape, and fasten them together with one pair of their ends flush. They serve as a mount for a second male barrel bolt — it locks the leg against the table and prevents it from swinging loose when folded down. Slip the spacer between the leg and table and position it 8" in from the back edging. Screw the spacer to the table and the barrel bolt to the build-up strip. Slide the bolt over against the leg brace, and give it a good rap with a hammer to mark the bolt's location. Drill a 1/2"-diameter, 1"-deep hole here to allow the bolt to slide fully into the leg and secure it.
Mounting the Table to the Saw

Installing the mounting plate onto the table saw stand and prepping it to receive the outfeed table. Time to get this project mounted up! Laminate a thick blank of lumber together to form the mounting plate (piece 20) that attaches to the saw’s fence rail. Plane it down so the top face will be about 1/16" below the saw table when it’s attached to the fence rail. Ease the front bottom edge of the plate with a 3/4"-diameter roundover bit to create swing clearance for the table. You may also need to knock a little off the bottom back edge so the plate fits snugly against the fence rail. Sand all the table's wooden parts and the mounting plate up through the grits, and apply a couple of coats of wipe-on finish before proceeding.

When the finish cures, flip the mounting plate and the table facedown on a flat surface, and set the parts together. Slip a couple of 1/2"-thick spacers in between. Poke a 5/16" brad-point bit into each table pivot hole, and tap it with a hammer to mark the ends of the mounting plate for pivot screw holes.

Drill the 1/4"-diameter pilot holes 3-1⁄2" deep and as straight as you can. Bolt the plate to the metal fence rail with five lag screws and washers(pieces 21) spaced evenly along its length. Keep these screws clear of the table saw's miter slot locations.

Mounting the folding outfeed table to the table saw stand. With the mounting plate in place, make up the leg's wooden stop "ledge" by gluing and screwing pieces 23 and 24 together. Attach it to your saw cabinet with three short carriage bolts, washers and locknuts. (I know, I know ... this is a lot of holes to put in your trusty saw, but it's worth it!) I positioned the leg stop assembly so the bottom face of piece 24 is 12-5/8" up from the floor. Fasten the table assembly to the mounting plate with a couple of 5" lag screws and washers (pieces 22).
Final Fine-tuning and Routing

Milling a pair of miter slots into the outfeed table for the table saw stand with the router to finish the woodworking project. Grab a helper to give you a hand in setting up the table with the leg extended and propped against the stop. Mark and trim the bottom corners of the leg extension so it nests completely against the leg stop. Then use two clamps to hold the leg extension and housing at the correct length. Adjust and reclamp the leg parts as needed until the outfeed table is flush with the saw table. Extend the first barrel bolt and slip the remaining metal receiver piece over it. Screw the receiver to the guide strip to finalize the leg's "up and open" position.

I made a long, slotted jig and used a 1" O.D. rub collar and 3/4" straight bit to extend my saw's miter slots over into the outfeed table. A couple of stops limited these cuts and kept my bit from tangling with the saw's granite table. I chiseled away the waste where the bit couldn't reach. Wipe finish into the miter slots, and you're really ready to rip! Best of all, those long rip cuts will never be a seesaw operation again!


Keep the inspiration coming!
Subscribe to our newsletter for more woodworking tips and tricks