Five Uses for Toggle Clamps
Top-mounted toggle clamps excel where other clamps fall short. Here are five situations where toggle clamps can save the day.
Toggle clamps don't usually get the same attention as their larger two-jawed cousins, because their applications are more specialized. You might not even think to buy some until there’s a pressing need for them. Without them, you'll struggle to find another way to solve a clamping problem where a toggle would be the perfect choice. They come in two basic options — those that apply force down toward the base of the clamp and those that drive a plunger laterally away from the base. Having a couple of pairs of each type can prevent hand strain and often help you work more safely. Here are five woodworking scenarios where toggle clamps can really help.
Coping with Narrow Rails
It's unsafe to feed the narrow end grain of cabinet door rails past a coping bit without backing the workpiece up in some fashion. Without a support, the rail can pivot into the bit, ruining the cut and creating a dangerous hazard for your fingers. You could put a backup board behind the rail and hold the parts together without clamps, but then you're depending entirely on hand strength for accuracy. Here's a better solution: build a simple coping jig
It's a 1/2-in.-thick base piece with a spacer board on top that's the same thickness as the rails. A pair of toggle clamps mounted to the spacer pin the rail down against the base and keep it immobilized. The spacer board serves as a stop and a sacrificial surface to prevent blow-out on the back side of the coping cuts. Just slide the jig along the fence and past the bit to make perfect cope cuts, one rail after the next.
Cutting Tenons On-end
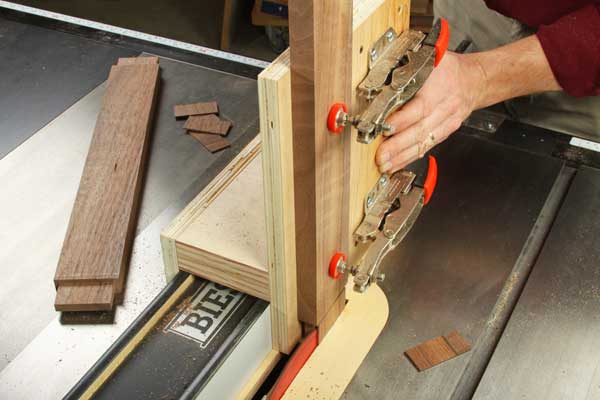
It's quick and easy to cut tenons on a table saw with a standard blade. Standing the workpiece on-end and feeding it through the blade speeds the process along and creates tenons with smooth cheeks, but you can’t do it safely freehand. The workpiece can tip forward or backward as well as away from the fence, binding the blade and causing a kickback. Instead, install a couple of toggle clamps to a tenoning jig you can build from scrap. This style has a saddle that wraps over the saw's rip fence to slide back and forth. A tall fence stands workpieces vertically. Attach a spacer to the fence in back of the workpiece, and mount two toggle clamps to it. Once clamped in place, the workpiece can be fed accurately through the blade. Adjust the rip fence one way or the other to set the cheek cuts, then flip the workpiece from one face to the other to cut both broad cheeks. It's simple and safe.
Tension-free Tapering
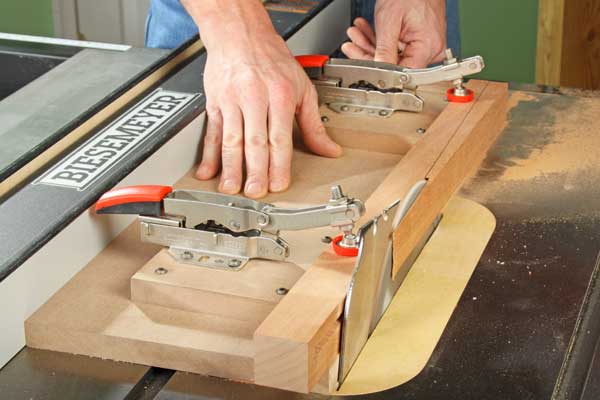
The typical two-leg tenoning jigs you can buy have one major flaw: there's no convenient way to hold a workpiece against the angled leg of the jig. Using a push stick is awkward, and holding it with your fingers is a catastrophe waiting to happen. Again, toggle clamps can add convenience and keep your fingers out of harm's way. You can make a tapering jig from a long rectangular piece of scrap. Align the tapered layout line on your leg workpiece with one edge of the jig base, and screw two spacer blocks behind the leg to hold it at this angle. Screw toggle clamps to the spacers. Once your workpiece is clamped in place, set the jig against your saw's rip fence, and adjust the fence so the leading edge of the jig is flush against the saw blade. Feeding the jig past the blade will slice off the tapered waste with pinpoint precision, and there’s no need for a push stick to hold the leg steady. Even better, your fingers are nowhere near the blade. Unscrew and reposition the spacer blocks to suit each new taper angle you need to cut.
Locked-down Miter Joints
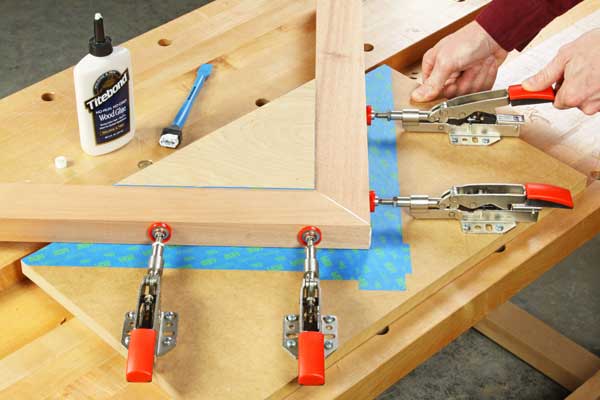
There's just no easy way to close miter joints with bar-style clamps. Even pressure needs to be applied on both sides of the joint, or the parts will slip out of position — especially when glue is added. How can toggle clamps help? By applying lateral force against a squared backup block, two pairs of toggle clamps mounted to a base form a quick and easy mitering station. The crucial aspect to this jig, of course, is that the inside back-up block must be perfectly square, and your miter angles need to be cut with equal precision. Apply painter's tape to the contact faces of the back-up block and to the base under the workpieces to keep the glue joint from sticking to the jig. Here's a nifty solution for making same-size picture frames "production" style...and without glue-up frustrations.
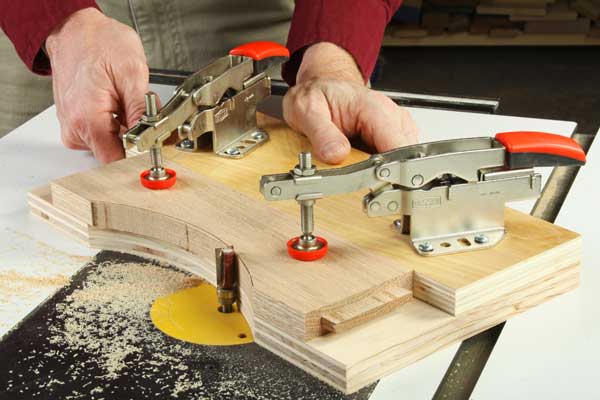
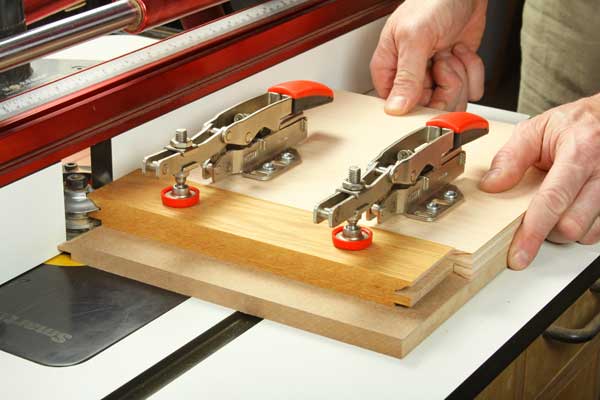
Template-routing Narrow Workpieces
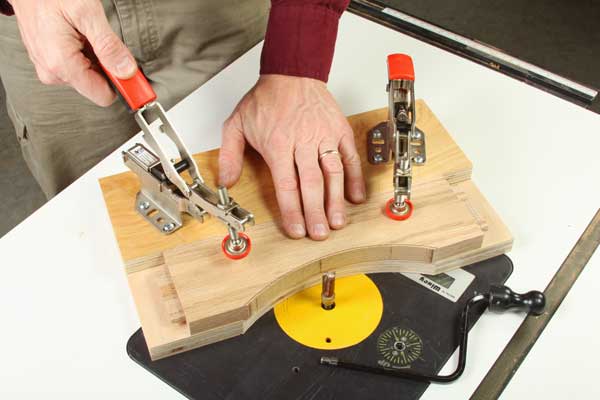
A piloted pattern bit and a template can help you turn out uniform arched door rails or all sorts of other shaped parts. But routing curved workpieces, especially if they're narrow, can place your fingers dangerously close to the bit. Why risk it? Just make your template piece wider than necessary and add a spacer block to it for toggle clamps. Position the spacer so that it extends the workpiece out 1/16-in. or so from the template for trimming. Fasten toggle clamps to the spacer to press the workpiece against the template. With this solution, there’s no need for double-sided tape, messy hot-melt glue or push pads to hold the parts in alignment. Lock the clamps, and you're ready for routing. You can even use the clamps as hand-holds while you work.
Once you own them, you'll be surprised at how useful and convenient toggle clamps can be! Their mounting convenience, small size and significant clamping force put them in a category all their own.


Keep the inspiration coming!
Subscribe to our newsletter for more woodworking tips and tricks