The Five Easy Pieces of French Polishing Know-how
The method requires only a cloth pad applicator and allows you to apply an exceedingly thin layer of finish exactly where you want it. This "hand rubbed" finish is traditional and economical, but difficult to learn. Consequently, it's rarely attempted, frequently botched, and widely regarded as mystical.
Simply put, you load a cloth pad with thinned shellac, then squeeze the pad to release the finish gradually while simultaneously rubbing the pad over the wood in an even, nonlinear pattern. How you assemble the pad, the finish mixture you use, the rubbing pattern you follow, how much pressure you apply, and how quickly or slowly you build the finish are all part of this complex ritual.
Naturally, there are as many ways to "do it correctly" as there are practitioners, so don’t be surprised if you read of different techniques elsewhere. The key is to find one that works for you, so feel free to borrow from several. Today, I'll share some of my favorite methods and materials, including shortcuts and safety nets.
Building the Base
You can start right in with the pad on raw wood, but that's not the way I do it. I jumpstart the process by evenly sealing the wood with shellac, and the best way to do that is the flood-and-wipe method.
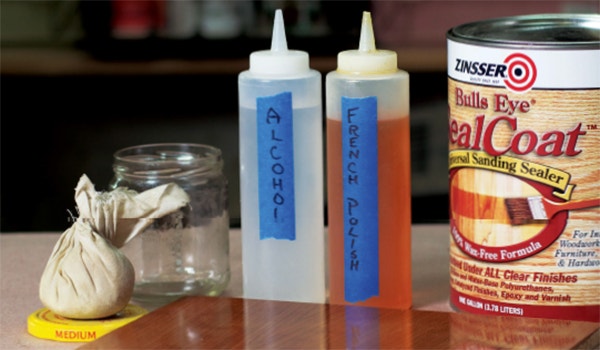
Mix a 20% or 25% solids blend (a 2 or 2.5 lb cut) of shellac in ethanol or denatured alcohol, or use Zinsser® SealCoat™ straight from the can. Flood the finish onto the wood, then wipe off all the excess. The wood will absorb more or less shellac where it is more or less porous. The result is an evenly sealed piece of wood, which is an ideal surface for French polishing.
Sealing will raise the grain of the wood, so once your shellac is dry, in about 15 minutes, smooth the surface by lightly sanding with 400-grit or finer paper. Although some might call it cheating, another option to get the look of French polish without the effort is to build a shellac finish with a brush or spray gun, then simply French polish the last coat.
Forming an Effective Pad
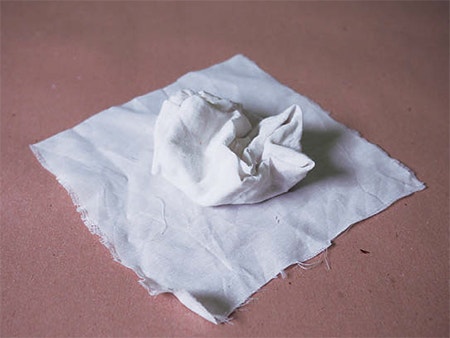
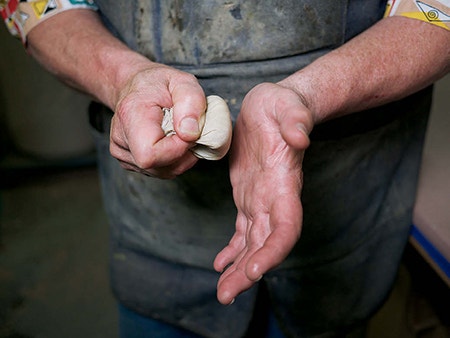
Make a pad by wrapping a cloth around an absorbent center. The outer wrapper should be strong, taut and smooth, since wrinkles can cause havoc.
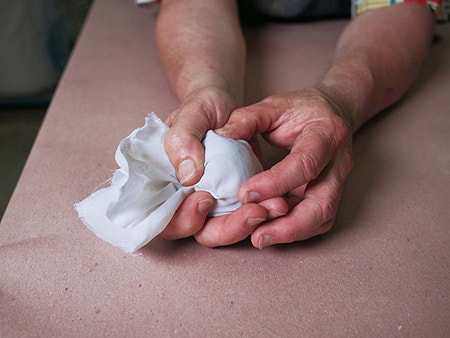
My favorite outer wrapper is a 5" square of linen, though in a pinch I have used trace cloth, a tightly woven cotton cheesecloth. Fill that with something absorbent and squishy, since you'll be loading it with finish, binding it into a ball or ovoid, then squeezing it to release the shellac through the wrapper.
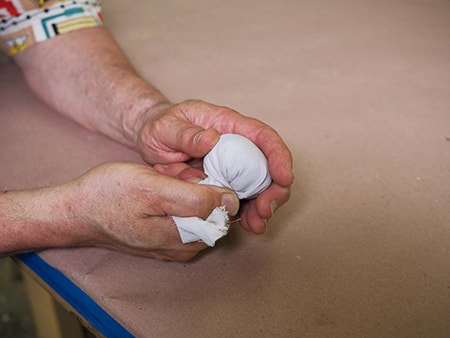
I've used sheep’s wool, cotton batting, synthetics, felt and even nylon fillings, but I prefer a crumpled ball of pure cotton cheesecloth or trace cloth. Fold the wrapper around the center ball, twist the corners together, and pull it taut so that the pad is firm, but still squeezable, and the surface is wrinkle-free. Size is up to you; mine are typically 2" to 3" in diameter. Eventually, you'll find yourself making smaller, tapered pads for tight areas and corners, and larger, spherical pads for flat surfaces.
Flowing On the Finish

Load a squeeze bottle with shellac mixture, and another with ethanol or denatured alcohol. Open the pad and load the absorbent center material by soaking it with shellac, then squeezing it out gently so it is wet but not dripping. Re-form the pad and look at the outside surface. As you squeeze it, finish should emerge, then recede as you ease up. That's equivalent to your spray gun trigger: the more you squeeze, the more finish you propel to the surface.
Rub the pad over the wood in small overlapping circles, like a random-orbit sander, while squeezing to bring more finish to the surface of the pad. Why circular motions? If you go only in a straight line, the wet shellac will "pull" into ridges, which is called "curdling." Should that happen, stop, let the finish dry, sand it smooth, then start again. Add extra drops of finish to the outside of the pad as it starts to dry out, and tamp it against a clean surface or the palm of your hand to disperse it, or reopen the pad and add finish to the core — your choice. After a bit, the pad may become thick with too much shellac: at that point, add drops of alcohol instead.

Press lightly and cover all areas uniformly. As the finish builds, start adding only alcohol to the pad, and press a bit harder to smooth the surface. Build layers by adding shellac; smooth layers by adding alcohol. On your final passes you can pad straight, with the grain, for a smooth, even look.
Lubricant
Keep the pad moving at all times, touching down and lifting off like an airplane. Stopping the pad will leave a cloth mark; to remove it, let the finish dry, then sand. You can make the pad glide better either by adding a few drops of any oil to the surface of the pad, or by adding 20% mineral spirits to your shellac mixture. If you do the latter, shake it before each use, as the spirits will separate.
Spirit Off or Rub Out
Lubricating oil will sometimes emerge a few days later, leaving a haze on the surface. Remove it by padding with a clean pad loaded only with a small amount of alcohol — no shellac. That’s called "spiriting off."
A French polished surface is not quite high gloss. For more shine, let it cure completely, usually a couple of days, and rub it with polishing compound. Do it by hand: a power buffer can quickly cut through the thin shellac layer or heat it enough to remove it in sections. If the whole thing fails, remove the finish with alcohol and start over.


Keep the inspiration coming!
Subscribe to our newsletter for more woodworking tips and tricks