Edge Trimming with a Router
There are many tools that can be used to make the edge of a board straight – a table saw, a jointer, a hand plane...But if you're working without a jointer or in tight quarters with large sheet materials, using a router and an edge guide or a straightedge template is arguably the best way to go.
This fairly simple procedure is practiced in small shops everywhere. You simply rough cut large, unwieldy material to size with a circular saw, and then use a straight router bit to trim it (or rough-sawn lumber) down to a smooth, straight edge.
There are a couple of drawbacks, however. The time investment is doubled, with two set-ups and two cuts instead of one. Also – and not to be neglected – it's double the mess. You end up with a pile of router shavings on top of the dust kicked out by your saw. Still, the results are generally very good – the potential is there for an almost perfectly clean edge, and you have excellent control over the location of the final cut. It's also very compact and very doable, even in the smallest shop. And to make matters better, there are a couple of simple ways to improve the experience and the final outcome.
Dust Control
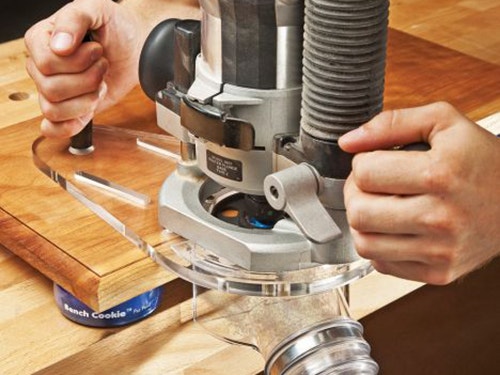
Here's an easy and affordable solution for the extra dust: The Rocker Edge Routing Dust Port. This handy gadget attaches to base of any router that accepts a standard guide bushing and will greatly reduce the mess you'll get from edge-routing stock. The dust port will set you back a mere $15 or so, and it screws in place in a couple of seconds. Just hook it up to your dust collector or shop vac and route away while you enjoy a much a cleaner shop.
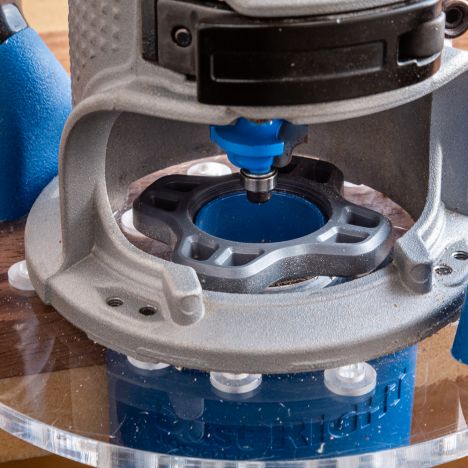
Once you're set up on a Universal router base, great dust collection is a simple matter of adding the Whirlwind Dust Port. Similar in concept to the Edge Routing Dust Port, the Whirlwind is designed specifically for use with a router plate system. The difference is that instead of attaching to the router bit opening, the Whirlwind attaches to the plate's outer frame, which means that you can experience the same excellent dust control with any size edge forming bit you'd ever want to put in a handheld router, simply by changing the twist-in plate inserts.
Edge Trimming Router Bits
The router bit you use for edge trimming can make a huge difference in the quality of the final cut. By using a shear or spiral bit, you can virtually eliminate splintering and "fuzz" on one or both edges of the material. Instead of running parallel to the body and shank of the bit, the flutes of shear and spiral router bits are angled - a simple difference that can have considerable impact on the way the bit performs. In general, shear and spiral bits cut the surface of the stock with a slicing motion instead of chopping straight into the stock. The result is less energy consumption, less vibration and a cleaner cut.
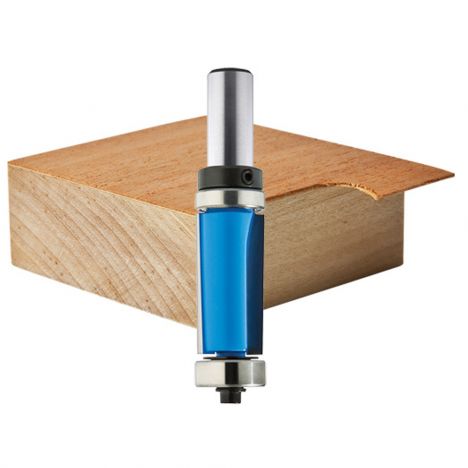
Shear and spiral bits behave differently depending on whether they have an "up-cut" or a "down-cut" configuration. The down-shear piloted flush trim bit you see on the left helps limit splintering on the top surface of the material. A down-shear bit also has a tendency to pull the base of the router downward toward the material, which turns out to be a "feature" when you're using a handheld router to make trim cuts along a pattern or straightedge: it makes it easier to keep the base of the router flat on the surface of the workpiece.
Up-cut bits, on the other hand, tend to leave a cleaner edge on the bottom of the material. They also have the effect of drawing the chips and dust upwards, and because of that are especially suited for plunging out mortises. Also worth mention are bits that perform both the up-cut and down-cut function in a single swath. Double compression bits are arranged so that they have both an up-cut and down-cut configuration – the two meeting in the middle of the bit. They are designed, as is easily guessed, to provide the cleanest possible edge on both top and bottom surfaces of the material.
Guiding the Bit
You have a few options when it comes to guiding the router through the cut. You can use a piloted flush trim bit; you can use an un-piloted straight or spiral bit along with a straightedge to guide the edge of the router; or you can use a guide bushing along with an unpiloted bit. (Keep in mind, though, that the Edge Routing Dust Port attaches to the bit opening and thereby eliminates the guide bushing method.)
The piloted bit method is the easiest to set up, and therefore the most popular. With a piloted bit, you simply line the straightedge pattern up with the cut line, clamp it in place, and away you go. Piloted bits are available in a variety of shapes and sizes, so you’ll be able to trim just about any size of material you'll ever encounter.
With an un-piloted bit, you'll have to guide the router itself along a straightedge, which means that you'll have to factor in the distance from the edge of the router base to the edge of the bit. Doing so works just fine, but does take a little longer and gives you more of an opportunity to make an error.
With piloted bits readily available, why would you bother with the extra set up? For trimming projects involving materials that are especially prone to tear-out, or for parts that needs to have especially clean edges both top and bottom, your best bet will be to use a double compression bit, which, for reasons geometric, are not available with a pilot bearing. (Remember that a double compression bit allows you to give the top edge a down-cut treatment and an up-cut to the bottom edge in one pass, and is the best way to ensure a clean edge on both sides of the material.)
As a last bit of advice, if you plan to use a straightedge to guide the edge of you router for some or all of your edge trimming, a commercially manufactured clamp guide will take much of the headache out of the process. And along with that, there just a very useful thing to have around the shop (to help you more accurately and squarely rough cut sheet materials before you trim it, for example.)


Keep the inspiration coming!
Subscribe to our newsletter for more woodworking tips and tricks