Easy Mortising Router Jig
This plunge router jig clamps in a bench vise and automatically centers mortises on 3/4"-thick stock. It can be used with 1/4", 5/16" or 3/8" straight or spiral bits.
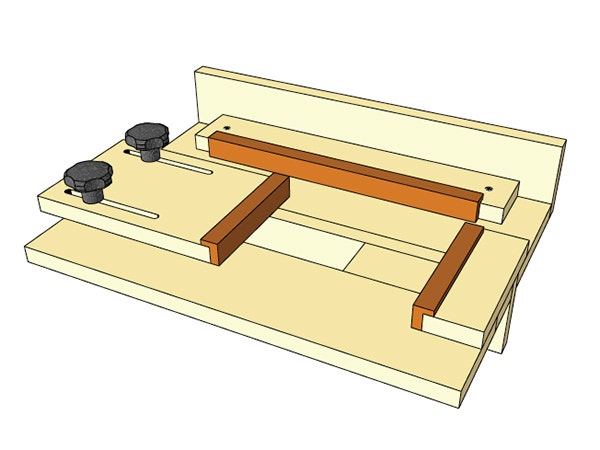
Here's a mortising jig you can use with any plunge router that has a 7"-diameter or smaller base. My design allows you to clamp both the jig and a workpiece inside a bench vise, with the workpiece tucked up under the base and against the clamping fence. What's unique about the jig's styling is that the system automatically centers mortises on the thickness of 3/4" stock. And, by simply changing between 1/4", 5/16" or 3/8" straight or spiral bits, you can cut these three mortise widths without affecting the centered position of the mortise. Shifting and locking the left adjustable stop sets the length of the mortise, up to about 4". Notice that your router base mounts to a base plate: sliding the router and base plate between the left and right stops and against the rear alignment shim limits its travel to ensure that mortises are straight, correct length and easy to machine.
Base Construction
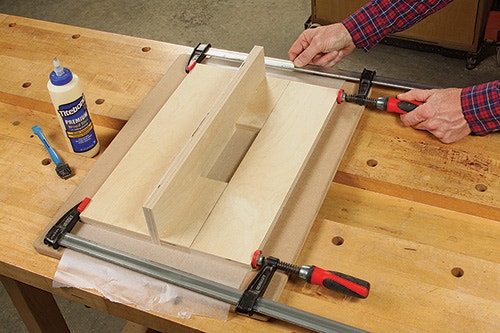
Cut base pieces 1 through 5 on the Material List to size from 3/4" plywood, and assemble them with glue and clamps as shown in the Exploded View drawing. The clamping fence, two spacers and front base piece create the opening for routing.
Cut more plywood pieces for the left and right stops and the router baseplate. Now go ahead and crosscut the alignment shim to length, but leave it several inches wider than specified for now.
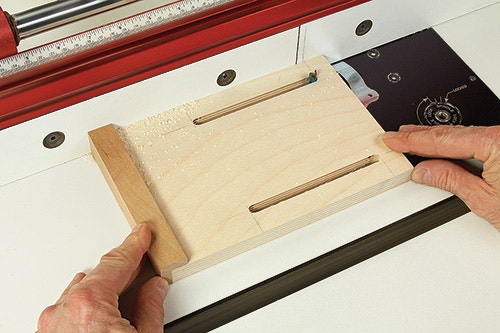
I added hardwood L-shaped edging strips to the shim and two stops to improve their edge durability. Once it's glued on, complete the left adjustable stop by routing a pair of 5/16"-wide, 4-3/4"-long slots for threaded star knobs at your router table. Secure the adjustable stop to the jig base with T-nuts or threaded inserts and knobs, where shown in the drawing.
Next, mount your plunge router's base to the base plate so the router base and base plate are squared up with one another. (Note: I offset my router base on the base plate to orient the bit as close as possible to the jig's cutting area.) Bolt your router base to the plate, mark the bit's location onto the plate, and bore a 1"-diameter or larger hole through it for bit clearance and visibility.
Shim and Fixed Stop
You're now ready to install the alignment shim and right fixed stop, and their positions are important: the shim centers the mortise cuts and the right stop sets the router’s rightmost limit of travel and the right end of the mortises you rout. Start by installing a 1/4" straight bit in your router. Set the router on the jig so the bit touches the back of the jig base's bit opening. Now measure carefully from the baseplate's back edge to the rear alignment fence, and add 1/4" — this measurement sets the final width of the alignment shim. Rip the shim to width, and just clamp it for now to the jig base, flush to the alignment fence.
To locate the right fixed stop, slide the router to the right until the bit touches the right edge of the base opening. Insert a 1/4"-thick scrap between the bit and this edge, then draw a line along the baseplate's right edge on the jig base. Align the hardwood edge of the fixed stop to this line, and fasten the stop to the base.
Final Adjustments, Use
It's time to test the jig for cutting accuracy and dial it in further. I did that by making a light plunge cut into a 3/4"-thick scrap clamped in in the jig. If this "test" mortise cut isn’t centered, you may need to shift the alignment shim forward slightly or trim it narrower and move it backward. Keep making test cuts and tweaking the shim's width and position until the cut is centered on the scrap, then attach the shim.
I've marked lines next to the left adjustable stop to serve as quick references for adjusting it to various common mortise lengths.


Keep the inspiration coming!
Subscribe to our newsletter for more woodworking tips and tricks