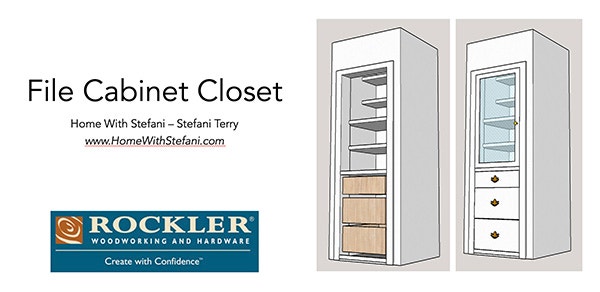
DIY Closet Makeover Project: Built-In Display Case and File Cabinet

Turn a tiny, unorganized closet into a beautiful built-in file cabinet and display cabinet.
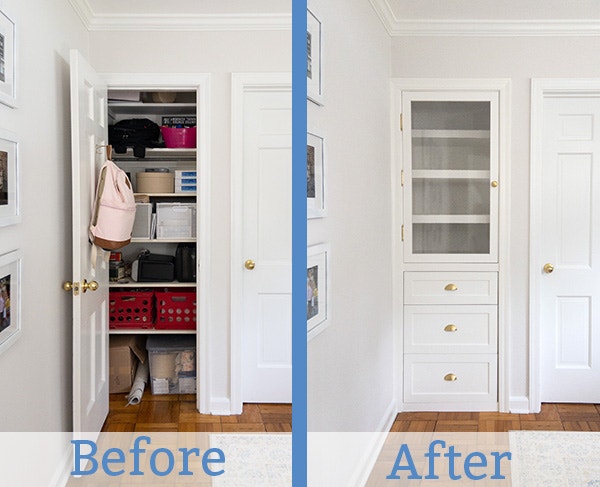
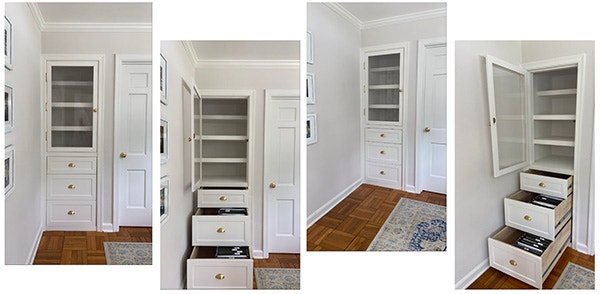
This closet is in our home office, and it was nothing more than junk storage. We now have five sturdy shelves for books, two large file cabinet drawers and one smaller drawer for miscellaneous office supplies. Every closet has different dimensions, so exact part dimensions are not included, but you can take the concept and construction techniques from this closet build and apply it to your own.
Project design and plan by Stefani Terry from Home With Stefani.
VIDEO: Watch Stefani transform this closet into a useful built-in file cabinet and display case.
More About Hardware, Tools and Materials:
Drawer Slides
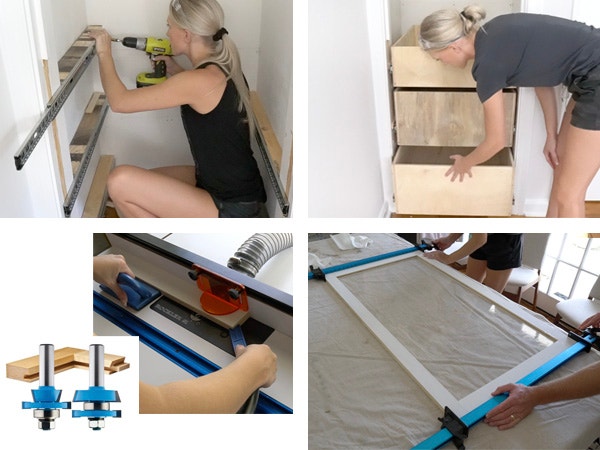
Slide hardware is an important consideration for any drawer project, because the slides you choose impact how much weight the drawers can hold and how accessible the contents will be when fully open. I chose Over-Travel Centerline Lifetime Slides because they will hold up to 100 lbs. per drawer—perfect for drawers full of heavy hanging files of paperwork. They also extend all the way out, so the drawer contents will always be easy for me to see and reach. However, Rockler offers a wide range of drawer slides in common sizes to satisfy any load limit or budget needs. If you’re not sure which slides are right for your project, here’s a helpful article on choosing drawer slides to bring you up to speed.
Drawer Assembly—Grab the Glue and Clamps
My file drawer construction is about as simple as can be—just butt joints reinforced with glue and brad nails. They’re a breeze to build for any accomplished DIYer! The key to their long-term durability, though, is strong glue bonds! But as we all know, working with wood glue can be messy. Applying the right amount not only reduces the clean-up chore but also prevents wasting glue. That’s why I put Rockler’s Master Glue Kit to work for this project. It includes a variety of solutions to help you pour, apply and spread glue effectively—along narrow edges or broad surfaces. It also comes with silicone glue brushes, a tray and a spreader that are reusable and easy to clean. A Silicone Project Mat XL is a great surface for carrying out your glue-ups, as I did. I like it because it provides a no-mar, protective surface for your workbench that’s easy to wash off and roll up for storage. Be sure to have plenty of clamps on hand to draw those drawer joints tight. Sure-Foot Aluminum Bar Clamps came in handy for me, but Rockler’s wide selection of clamps can help you put the squeeze on anything you need to clamp for your project—large or small, flat, angled or irregular.
Shaker-style Drawer Fronts Call for Specialized Router Bits
I really like the clean, no-nonsense look of Shaker drawer fronts, and that’s why I chose to build them for my File Cabinet Closet. Building them the way I did involves using a sturdy router table equipped with a mid-size or larger router and a matched set of Rail and Stile Shaker Cutter Router Bits. Using these bits will form rock-solid connections where the long and short members of the frames come together for the drawer faces. They also create a groove for inserting a flat center panel and a decorative bevel around the inside edge. I put Rockler’s Coping Sled to use when routing the joints to hold the drawer frame parts safely and confidently—always think safety! Rockler offers lots of router table options, routers, router plates and lifts, and quality router bits with lifetime guarantees … everything you could possibly need to rout right!
Hardware — the Hood Ornaments of Any Quality Project
Bin pulls and round knobs from Ashley Norton in a brushed brass finish extend the Shaker styling of this project and blend in nicely with the room’s brass passage door hardware. I used Non-Mortise Finial Hinges for hanging the project’s cabinet door, and those are an excellent choice too—especially if installing hinges isn’t something you do very often. They require no special routing or chiseling in the door or frame to create mortise recesses for installation; just choose where you want to locate them and install with screws. Check out this video on how to install no-mortise-hinges to learn more. Rockler carries this hardware and virtually any other knob, pull or hinge you could possibly imagine. Whether you’re after an antique, modern, whimsical or classic look, in a variety of material choices and sizes, your hardware solutions are as close as rockler.com or a Rockler store near you.
This project was designed and built by Stefani Terry from Home With Stefani. You can find more of Stefani's work at: www.HomeWithStefani.com


Keep the inspiration coming!
Subscribe to our newsletter for more woodworking tips and tricks