Decorative Carving on Turned Bowls
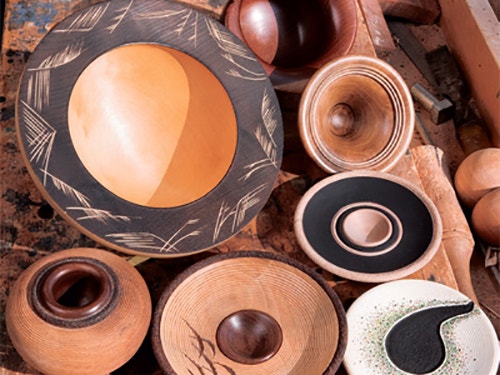
Adding a decorative rim to your bowl with paint, carvings and/or bleach can make a simple turning project into a piece of art.
In my first column for Woodworker's Journal, I discussed the three parts of a bowl: the rim, the body and the base. Most experienced woodturners give attention to how they create each of these aspects of their bowls, but I've found that many beginners don't. In particular, they fail to give much attention to the rim — then ask me why their bowls don't seem to stand out in a crowd.
The rim of a bowl is as important, or perhaps even more important, than the rest of the bowl. An embellished rim will command attention, even if you're using plain-grained wood. In fact, plain-grained wood is an ideal candidate for embellishing.
There are an incredible variety of ways and methods to embellish the rim of a bowl: carving, turning beads and grooves, applying texture, paint and other materials. The techniques I'll cover here are relatively straightforward so that even a beginner can jazz up a bowl!
Size of the Rim and Wood Species
The rim of a bowl can be any size in relation to the body of the bowl, from very narrow to many times the diameter of the body. Or for that matter, it can be almost nonexistent, nonexistent, flowing from a carved surface into the body of the bowl. There are no rules, although some folks insist on applying the golden mean. I figure, if it looks good, it looks good. Whatever you do, make it look like you meant to make your rim the way you made it!
When you select the wood for a bowl, take into consideration the type of rim you want to make. For instance, if you're going to paint and carve a rim, then you might want to select a fine-grained, easy-to-carve wood rather than something like curly maple. On the other hand, curly maple bowls with painted, carved rims can be lovely if you pay attention to the wood’s grain.
The wood I'm using in the photos is Queensland silver ash: Queensland, as in Australia, from when I visited three years ago. Silver ash is lovely to turn and carve, and the color and grain is perfect for a rim that’s painted black and carved. Our native silver maple works great as well.
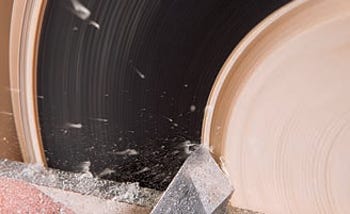
Start by using a pencil to draw lines on the bowl blank to help you figure out proportions and relationships. The lines can represent the body and rim of your bowl. I allow a bit of extra wood at the edge for rounding over and for cleaning up torn grain. When the proportions look right, I begin to turn.
3-D Versus 2-D
When I create a bowl that is going to have some sort of designed rim, I like to have that design be three-dimensional as well as painted. In other words, a designed surface is more interesting if it’s three-dimensional and painted, as opposed to a simple, flat, painted surface. This can be accomplished by carving or burning an outline for whatever painted design you apply.
3-D Versus 2-D
A curved surface is generally a bit more difficult to carve than a flat surface, but don’t let that stop you from putting a curve into the rim of your bowl. First of all, decide if you want the rim to be flat or curved, concave or convex. I've turned a slightly concave surface on the rim of my demonstration bowl, because I like curves. In fact, I like curves so much, I will often curve the rim of my bowl right into the body, leaving no delineation between body and rim. This shape lends itself nicely to a bit of carving on the far edge of the rim.
Practice Rims
Almost any bowl blank provide an opportunity for trial and error, as well as a surface for practicing painting and carving. When I'm not sure if the rim is going to look good, I do one or two practice rims. This is easily accomplished without losing much of the bowl's height. Simply begin by turning the rim and hollowing out a small portion of the bowl's body. You will now have the outline of your bowl and can practice painting and carving.
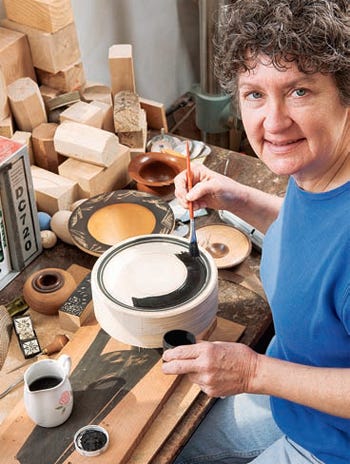
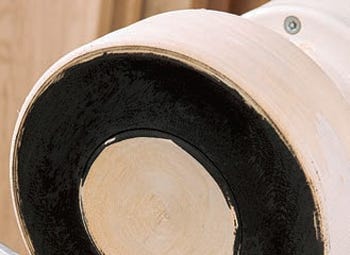
Paint the rim with whatever type of paint you like. I used black milk paint, but acrylic paint works well. You could also scorch the wood with a flame, but take care to not burn down your shop! If you simply want something that's quick and dries fast, use a colored marker.
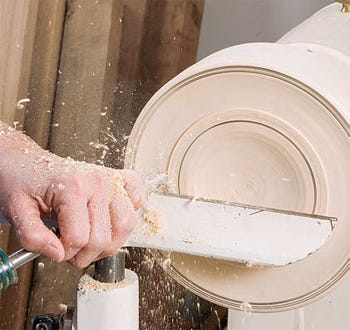
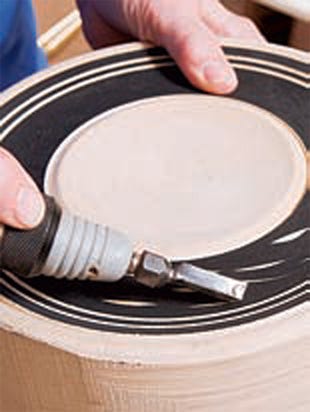
Once the paint is dry, put the bowl blank back onto the lathe and turn away the excess paint, cleaning up the edges. It only takes a light touch to remove a very small layer of wood. On this bowl, I turned two grooves into the rim as an accent. You could cut grooves into the entire rim, spaced evenly or randomly, carving in between each groove or in between every other one or between one set of grooves. There are many ways to embellish!
Practice Carving
There are a variety of methods for practicing carving, and my favorite is to take a scrap of wood, paint the surface and begin to make random designs. Or, you can use the rim of the bowl you just turned for practice — at this point, there's plenty of wood left to erase your mistakes.
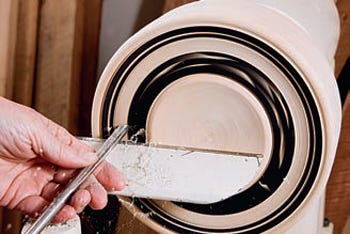
I like my reciprocating carver, but you can use whatever carving tools are available. Practice first, and don't cut toward anything you don’t want to cut ... like your fingers!
Designs for Carving
A carved design can be formal or informal, patterned or random. It can be something you've made up or a pleasing design you've found.
I like to apply a bit of carving to one small area of a rim as an accent. This works really well as a balance to a natural element that appears elsewhere in a bowl ... nature inspiring the artist's design.
Texture
Texture can be applied to wood in many ways. In fact, a smooth surface is actually a type of texture. For some of the bowls in the photos, I've used my skew chisel to cut grooves into the wood, evenly spaced. These grooves act as a natural catching device for bleaching part or all of the rim of a bowl.
A wood-burning tool can also be used to create texture, and it's amazingly quick and easy!
Final Rim
Now that you've practiced painting and carving, put your bowl blank back onto the lathe and turn away your practice area (unless you're happy with it as is!). Turn the rest of the bowl, finishing it entirely.
Not shown in these photos is the sometimes necessary step of sanding. Sanding isn't always required for the rim, but if it is, sand to about 150 or 220 grit ... just be sure to remove any torn grain. If you are going to carve the rim rather than paint it, completely sand the rim and the rest of the bowl to whatever grit you normally use.
Applying Finish
Most cured paints stand up well to any type of finish, but if you are applying lacquer with a rag or rubbing on an oil finish, take care to not rub the painted area too hard. That can smear the paint or remove small patches of it! For many of us, painting or embellishing wood is a huge mental leap. I understand — for many years, I avoided painting, preferring to go au naturel. Most turners, however, are eager to try embellishing rims. See what happens when you add beads, grooves, carving, texturing and/or paint to your next bowl. It’s really quite a lot of fun — so take the plunge!


Keep the inspiration coming!
Subscribe to our newsletter for more woodworking tips and tricks