Cut Flat Plywood Edges Using a Router Table
Prepare flat, smooth edges on plywood—perfect for edge banding—with this simple offset fence.
It’s tough to saw splinter-free edges on veneered plywood. But that’s exactly the goal if you’re planning to cover them with edge banding. Most woodworkers cringe at the thought of running plywood edges over a jointer with steel knives. That's a quick way to dull them. Here's a better solution: Make this simple offset fence to convert your router table into a makeshift jointer. Then you can let a sharp carbide bit turn out one crisp edge after the next. Here’s how to build one.
Step 1: Measure the length of your router table, and cut two pieces of 3- or 4-in.-wide, 3/4-in. MDF to this length. Glue and clamp the strips together to make a thick fence. Be sure their edges line up exactly when you tighten the clamps.
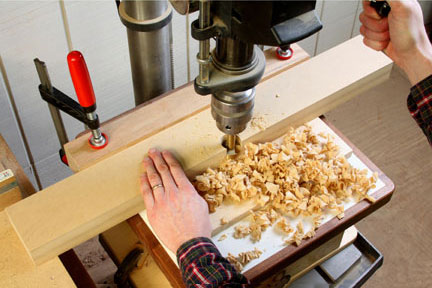
Step 2: Once the glue dries, mark the midpoint of your fence along one edge. Use a 1-in.-diameter or larger Forstner bit to bore a hole down through the fence at your layout mark. Set up your drill press so the bit overlaps the edge of the fence and opens up a pocket for the router bit
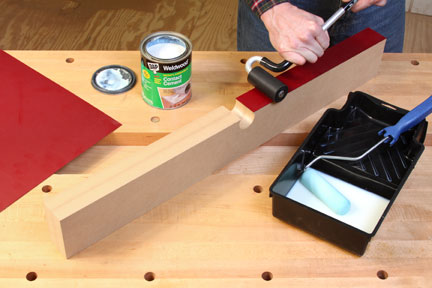
Step 3: In order for this fence to function like a jointer, the outfeed side (left of the bit) must be offset from the infeed side to account for the material the bit will shave off the plywood edge. A strip of plastic laminate can provide about 1/16 in. of offset to the outfeed side while offering a smooth contact surface. Cut a piece of laminate to fit, and mount it to the fence with contact cement. Flatten the laminate with a J-roller or a piece of scrap wrapped in a towel.
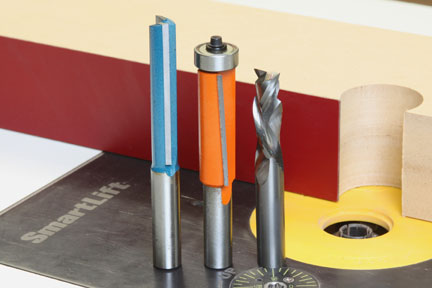
Step 4: Any style of straight bit will work for jointing, but choose one with a 1/2-in. shank for maximum stiffness. You can use a conventional straight bit, a piloted flush-trim bit or a spiral bit. An up/down spiral bit, shown at right, is an ideal choice, because it’s designed to eliminate splintering on both faces of sheet goods.
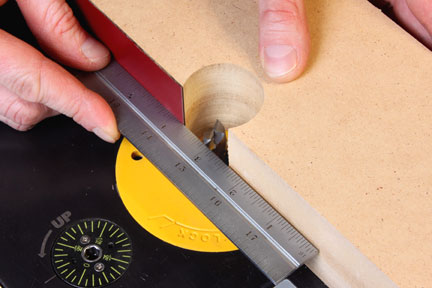
Step 5: Install the router bit and raise it about 1-in. above the table. Set the jointer fence in position, and adjust it until the outfeed side of the fence is flush with the cutting edges of the bit. Check this setting carefully with a straightedge. The bit should just "kiss" the straightedge when you turn it by hand. Notice that the infeed side of the fence will create a gap behind the straightedge: this represents the amount of material the bit will remove with each pass.
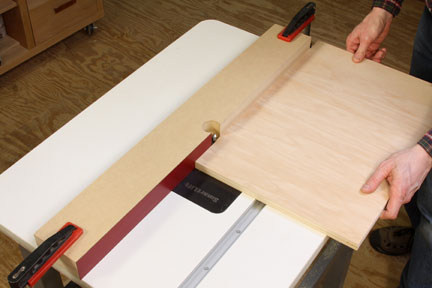
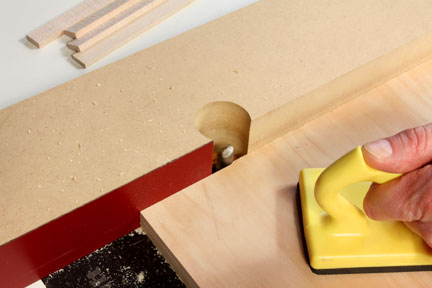
Step 6: Clamp the fence securely to the router table. Then set the router to its highest speed, and feed a test piece from right to left against the fence, just as you do for a normal routing pass. If a gap develops between the workpiece and the outfeed fence, the bit is projecting too far. Loosen one of the clamps and pull the fence forward slightly to correct the problem. On the other hand, if the workpiece catches on the outfeed side, the bit is set too shallow. Loosen a clamp and tap the fence backward to expose more of the cutting edges. These are tiny adjustments; make another test cut to verify your changes.
Once the fence and bit are dialed in, your workpieces should contact both infeed and outfeed sides of the fence evenly, all along the cut. Get ready for smooth, splinter-free edge joints!


Keep the inspiration coming!
Subscribe to our newsletter for more woodworking tips and tricks