Crown Molding Cutting Tips

For most do-it-yourselfers and carpenters, it takes a while to warm up to the idea of installing crown molding. The process just seems more intimidating than other trim carpentry and basic joinery tasks.
The ability to make nice, tight-fitting crown molding joints does take a little practice, and if you make mistakes, the resulting gaps and misalignments couldn’t be in a more eye-catching spot.
But it doesn’t take long to get up to speed, and with a little know-how, a few tricks, and a couple of key pieces of equipment, the process quickly becomes a routine undertaking.
Cutting Crown Molding Angles
The main challenge in installing crown molding – or any type of molding – is getting the pieces cut to the right length and at the right angle. With crown molding, getting the angle right usually causes the most difficulty. The wider a molding is, the more important angle cutting accuracy becomes. When you’re dealing with a hefty piece of crown or cove, even a slight error will show up as a noticeable gap in one end of the joint. Coupled with that, the geometry of this type of molding makes it a little tricky to cut. The fact that it gets installed at an angle to the wall (or cabinet or what have you) means that you can’t just plunk it down flat on your chop saw and miter it the way you would a picture frame.
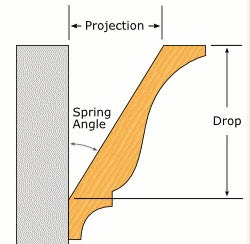
Instead, you have two options: The first is to make a “compound” cut. A compound cut is one where the miter saw fence is set at an angle to cut a miter, and the saw blade is tilted to cut a bevel. This type of cut factors-in the correct angle of the molding with respect to the wall (known as the “spring angle”) and allows you to lay the molding flat on its back while you saw it.
Calculating the correct miter and bevel settings for a compound cut involves more math than most people care for, but fortunately, crown molding is well standardized and compound angle charts for the common varieties of molding are easy to find.
Crown molding with a 38 degree spring angle is so common, in fact, that many miter saws are equipped with pre-set detents or marks at the 31.6 degree miter and 33.9 degree bevel settings used for 90 degree corners.
The "Upside Down" Cutting Method
Still, there’s an easier way. As most trim carpenters will tell you, the most efficient method is to hold the molding in a position that reflects its final installed position while you cut it. To do that, you simply turn the molding “upside down” and position it so that the edge that will meet the ceiling rests on the bed of the saw, and the edge that will be flat against the wall rests on the saw’s fence.
Then all you have to do is make standard 45 or 22-1/2 degree miters, leaving the blade perpendicular to the saw bed. The set up is much faster and it’s much easier to adjust the angle of the cut, which comes in handy in a world where corners rarely form perfect 90 and 45 degree angles.
Cutting Coped Molding Joints
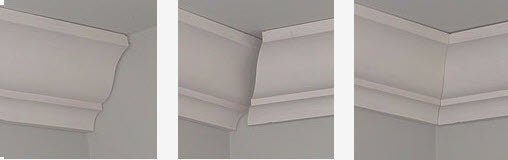
The next question is what to do with inside corners, where it is generally more difficult to get a nice, tight-fitting joint. Even with large pieces of crown molding, it is possible to simply cut a miter on both pieces and join the two together. But for corners that form a 90 degree angle especially, this is rarely done. A coped joint is by far the joint of preference. A coped joint is made by cutting a profile into the end of one piece of molding that exactly fits contoured surface of the molding it will meet (look to your right). How do you know where to cut? There’s a simple trick: Cut one piece of molding as if you were going to make a mitered joint. The line formed by the intersection of the cut-plane and the contoured surface of the molding is exactly where the coping cut needs to be.
There are definite advantages to using coped joints whenever possible. For one thing, you only have to worry about getting one angled cut right. That, in itself, can be a tremendous time and material saver. Also, it gives you the opportunity to press a slightly off joint together for a better fit, and even the option of attaching one piece to the other with a few pin nails. Finally, because of the way it fits together, a coped joint does a much better job of downplaying small gaps and imperfections than a mitered joint. Even if you do a mediocre job on every joint in a room, two out of four will still look pretty good from just about anywhere you stand.
Crown Molding Jigs Make All the Difference
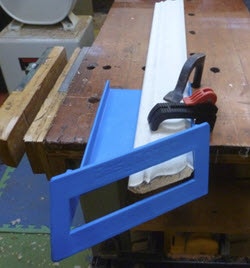
As mentioned above, avoiding compound cuts will save you time and make it easier to negotiate corners that don’t measure out to nice, polite 90 and 45 degree angles. But the “upside down” method of cutting miters has its challenges as well. Mainly, the problem lies in keeping the molding positioned at the correct angle while you line up the cut. Remember that you’ll often have several feet of material protruding past the surface of the saw, and the effects of gravity working against your efforts to keep the molding pressed up against the saw bed and fence at the correct angle. Making the modest investment in a Crown Molding Miter Jig will make such difficulties disappear. This simple apparatus makes certain that every piece you cut is stationed in the saw at exactly the right angle, and as a bonus gives you a handy reference guide that makes quick work of setting up for common molding sizes.
Cutting Copes the Easy Way
Cutting copes is another sticky spot. For a novice, it can be a little tough to get the swing of cutting the cope at the correct back-cut angle. With a little practice, you'll have the technique down pat, but it still isn’t likely to fill you with joy. With all of the advantages the coped joint method has to offer, no one has ever come forward to tell us they just love cutting across the width of a huge piece of hard maple crown with an old fashioned coping saw.
For anyone who hates coping joints – or suspects they will, once they try it - either the Easy Coper or the Speed Cope Jig would make a wise investment. A straightforward, affordable jig, the Easy Coper’s clever design lets you speed through copes for the most common crown molding joints with the assistance of any power jig saw, and the jig’s angled foot ensures that you’ll end up with the perfect back-cut angle every time.
If you're feeling slightly more cashy, or have a mountain of crown molding in your future, consider the Speed Cope. Its clamping mechanism and adjustable foot make it a more versatile tool. Whichever one you choose, pairing it up with the Crown Molding Miter Jig will make all of your crown molding cuts easier and faster, whether you're a rank amateur or hang the stuff for a living.


Keep the inspiration coming!
Subscribe to our newsletter for more woodworking tips and tricks