Clamping Tips for Edge Gluing Panels
What are the best practices for gluing up a panel? Try these tips to improve your panel-making tasks.
A well-made panel should be flat, sturdy and have an overall grain pattern that looks like it grew that way. Achieving these goals takes thoughtful assembly and good technique. Here are a few suggestions that can help.
Updated 10/20/22
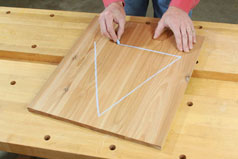
Lay Out Panel Boards

Before you even reach for your clamps and glue, spend some time composing the look of your panel. This should take place after you've jointed and planed the stock faces flat. Here's your chance to flip the pieces around, set them next to one another in various configurations and find the presentation that looks best. Try to blend the grain patterns where the edges meet so hard lines or variations in color aren't the first thing you notice. Sometimes you may need to try every arrangement under the sun before you land on the best compromise, but it's worth the effort. Don't worry too much about that old standby of alternating the end-grain patterns. Unless your boards are really wide, this practice won't contribute much to flatness over time. Once you find a pleasing arrangement, mark the parts so you can keep their orientation clear. You can draw a triangle or hash marks across the joints, use pieces of tape, or whatever method works best for you. The point is to avoid confusion about how the parts go together when you're gluing them up.
Ideally, the edges between boards in a panel should meet at perfect 90-degree interfaces. In truth, that often isn't the case. Your jointer fence may be a quarter or a half degree off of square, but it really doesn't matter. As long as the two angles between the workpieces are supplementary — add up to a total of 180 degrees — you'll get a matching glue seam. The way to ensure this is simple: When you're jointing adjacent edges, don't present the same faces of both boards to the jointer fence. Flip the second board to the opposite face instead to create the perfect mating edge.
Apply Glue to Panel Edges
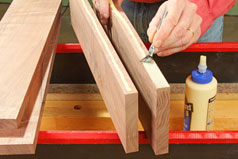
Keep two things in mind when you're gluing edges together: Wood Glue needs to penetrate into the pores of both sides of a joint, and it sticks best to itself. Your joints will be much stronger if you apply a bead to both edges — not just one — and spread it evenly. A thin coating between the contact surfaces is all you really need for good adhesion, but don't make glue-ups a one-sided affair.
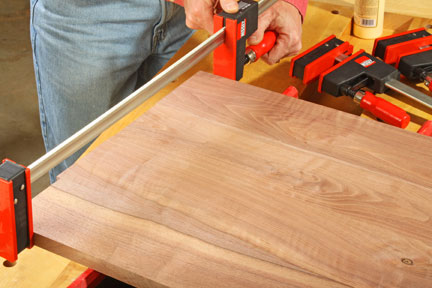
Clamping the Panel
Before glue begins to set up in a joint, you've probably discovered that it acts more like a viscous lubricant than an adhesive. It takes a little time for the excess to squeeze out of the seams. When you're applying clamping pressure, tighten them in stages, starting at the middle of the panel and working outward. Apply just enough pressure at first to hold the clamps in place while the extra glue is escaping. If you squeeze too tightly too fast, the boards will slip right past one another. Some amount of movement is bound to happen, no matter how carefully you apply clamping pressure, but it's easier to push the edges back into alignment when the clamps aren't drawn fully tight.
Learn More: New Favorite Clamps for Making Flat Panels
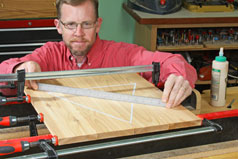
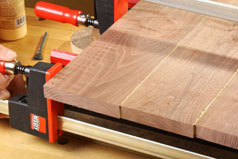
Clamping pressure needs to be distributed evenly through the panel in order to keep it flat. Usually, the best way to do this is to alternate the clamps above and below the panel. Still, a panel can distort if the clamps are tightened unevenly. Before the glue begins to set, check for overall flatness with a straightedge. If the panel is beginning to cup in one direction or the other, loosening the clamps slightly in the direction of the cup can often correct the problem. Now is the time to fix a potential problem while you still can.
Tip: How to Glue Up Wide Panels

When you're creating a wide panel from a bunch of narrower boards, it can be stressful to juggle too many "wet" glue joints at once ... boards are slipping and sliding, clamps are shifting, and the glue is beginning to cure. It doesn't have to be that way. The simple solution is to glue the panel together in narrower subassemblies first. Limit each of these to just two or three boards. Once the sub-panels are dry, you may only have one or two joints left to bring the whole panel together.
Faster Way to Flush
Even after careful assembly, some amount of scraping, sanding or hand-planing is typically necessary to level all the joints perfectly smooth. Here's a trick that can save some of this cleanup time. If the final width of the panel will still fit in your planer after assembly, leave the stock 1/16-inch or so thicker than necessary when you initially prepare it. Once the glue is thoroughly dry (allow at least 24 hours), run both faces of the panel through the planer again, setting it for light cuts. Be sure to first remove any excess dried glue with a scraper, to save wear-and-tear on your planer knives.
-
 Bessey K Body REVO Jr. 6-Piece Parallel Clamp PackSpecial Price $189.94 Regular Price $229.94 Save $40.00Out of stock
 -


Keep the inspiration coming!
Subscribe to our newsletter for more woodworking tips and tricks