Power Planer or Jointer? Why Not Both?
Modern power planers are equipped to plane and do many of the same tasks as a shop jointer, but with added portability outside your workshop. The worlds of woodworking and construction are similar but don’t always overlap. Tools used for one aren’t always suitable for the other.
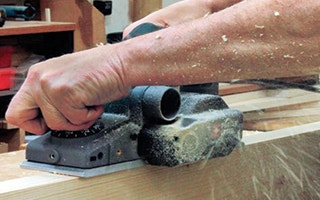
Some newer power planers, like this one from Porter-Cable, feature a switch that allows you to change the direction that chips and dust blow out.

But when it comes to performing woodworking tasks away from the confines of the shop — deck building, patio furniture, garage, and roof work, or repairing/replacing doors just about anywhere — who’s expected to get that done in your house? You, the woodworker, of course. With that in mind, a wise woodworker should always consider extending equipment from the shop out into the greater world. Few tools are better equipped for that task than power planers.
While they may have limited usefulness inside a well-equipped shop, they do have the extraordinary ability to take a number of woodworking chores out of a shop’s confines and do them very well on-site. This can be a real boon in keeping you from running back and forth from wherever you’re working to the shop every time you need to use a shop-based piece of equipment.
Consider The Cutterheads
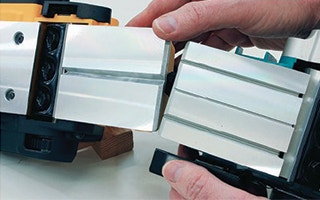
One thing to consider is the size, number, and shape of the chamfering notches on the planer's cutterheads, as each do different types of cut and different planers have different heads. They plane stuff, so they must be planers, right? Well, yeah, but when you take a look at the business portion of a planer, you can easily see that they’re designed exactly like another shop tool: the jointer. Outside of terminology, the only real difference is the orientation and the fact that these are handheld; otherwise, they work the same.
Power planers use a spinning cutterhead nearly identical to that on your jointer, with the blade positioned to cut in the direction opposite that of the workpiece feed. On a jointer, the stock is fed in and the cutterhead cuts toward you; with a planer, you feed the tool into the stock and the cutterhead cuts away from you.
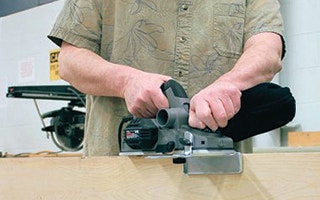
Bring the planer up to full speed and keep it held down through the whole cut, especially on long cuts like doors, using a fence will help keep the cut lines even. The depth-of-cut is also determined on a power planer the same way. On a jointer, the infeed table is raised or lowered to adjust the cut while the outfeed table is fixed. The corresponding portion on a planer, called the front or adjustable shoe, is raised or lowered to control cutting depth while the rear shoe is fixed.
As with a jointer how much stock you remove per cut is a balancing act based on characteristics and size of the workpiece, and it is determined the same way. The quality of the cut is controlled just like on a jointer, as well. Slower, shallower cuts give a smoother appearance than fast, deep cuts. Adjusting the depth-of-cut on a power planer is accomplished in different ways, but each does the same thing: raises or lowers the front shoe. The first is a large twist knob at the front of the tool that doubles as a handle, and you’ll see this method most often. Some planers with smaller depth dial.
Festool has opted for a beefy twist handle that sets the depth. And, comparing a planer to a jointer one more time, all can be used with a fence (don’t buy a planer that doesn’t come with one). A fence is essential for keeping your cut at 90 degrees, as on a door edge or for milling stock. For beveled cuts, some manufacturers provide fences that can be angled to a specific setting. Cutterheads and capacity vary considerably, although the most common cutting width among power planers is 3-1⁄4".
Cutterheads can feature one or two HSS or carbide blades, either single- or doubleedged. Some, like the Festool, use a single spiral blade. Along with capacity, you’ll find that power, weight and pricing are all over the board. Some inexpensive units run at about 4 amps, while huskier machines go to 7 amps and higher. Most fall in the 5- to 6-amp range, with machines in that group tipping the scales from about 6 to 8 pounds. As with most tools, upping the power further results in a corresponding bump in both weight and price.
Speaking of prices, expect to pay $70 to $80 for models on the low power end and $90 to $160 for beefier models, with some more powerful and feature-rich machines going for more.
Put a Planer to Work
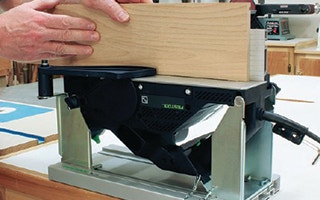
Some planers come with the ability to turn it on its back and convert the unit into a jointer. If you’re already familiar with a jointer, you have a good handle on how to work a power planer. The difference is orientation — essentially, it’s like using a jointer upside down. First, adjust the depth of cut to suit the job at hand.
For hogging off lots of material, set it on the deep side; for good looking finish cuts and minor trimming (such as fitting a door), dial the depth back. Start the cut by resting the tip of the front shoe on the workpiece with the machine angled slightly up at the rear. Turn the machine on and, when it comes up to full speed, lower the planer so the front shoe is flat on the workpiece and move it forward in one smooth motion.
Slide the planer through the cut with a light, uniform pressure on both front and back of the tool, and don’t lift up until the cutterhead has cleared the workpiece. If the workpiece is short, you can do all this without moving. However, for longer workpieces like doors, it’s best to “walk” the planer through the cut.
What Kind of Work Can You Do with These Tools?
In a nutshell, just about anything you’d do with a non-powered hand plane, but adding power extends their usefulness tremendously.
Working with Doors Used with a fence, a planer will give you a perfect 90-degree edge; if the door requires a slight bevel for a perfect fit, you can do that freehand or with an adjustable fence. Likewise, fitting door cases can be problematic if the jamb extends beyond thinner walls. A power planer can easily level those jambs in a snap.
Decks & Other Outdoor Projects You won’t find a faster way to chamfer deck, railing and post edges than with a power planer. Virtually all have a V-shaped chamfering notch on the front shoe — something you won’t see on a hand plane — and some have multiple notches in varying sizes. This notch guides the planer straight when milling stock corners.
Finding Warped Studs If you’ve ever installed a ceiling, flooring or drywall, you’ve undoubtedly encountered the occasional stud or joist that simply isn’t in the same plane as those next to it. Trying to get drywall hung with a warped stud jutting out-of-plane with the others is tedious. But, using a good straightedge, you can determine which studs (or joists) need a bit of shaving. A few passes with a power planer and frequent checking with your straightedge can give you a flat surface for installation in no time at all.
Rabbeting Because planers are really upside-down jointers, it should come as no surprise they can handle a few of the same tasks, such as rabbeting. Planer fences are designed so they can be set anywhere over the shoe, just as a jointer fence can go anywhere over the tables. (A curved cutout keeps blades from making contact.) To cut a rabbet, just slide and lock the fence in place to the desired rabbet width then plane along the workpiece edge until you reach the depth you want.
Ever taper Workpieces Make a short pass over the end of a workpiece, then a longer second pass, a third pass that’s longer still, and so on. The last cut runs the length of the workpiece to make a single smooth cut, resulting in a fast-and-easy taper. If you’ve ever tried to hang a door in an existing frame that’s not square, you’ll quickly come to appreciate a planer’s tapering ability.
Finally, it should come as no surprise that a tool based almost exactly on a jointer can also joint boards. To this end, several manufacturers offer adapters to simplify this task. Most are bench-mounted bases that support the planer securely in an inverted position.
What to Look For
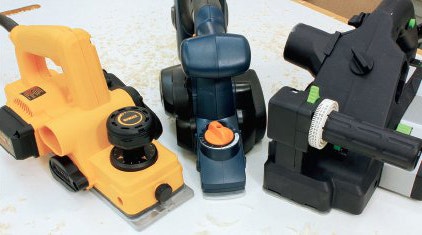
Consider comfort when choosing your planers, most (like the DeWalt on the left) use the front knob as the handle, though some have the dial as a separate piece (like the Ryobi in the middle) or, as in the Festool on the right, a twist grip handle.
When shopping for a power planer, the most obvious factors are power and price. For most indoor woodworkers who need a power planer only occasionally, a 5- or 6-amp machine is a good target. If you have plans to construct a large deck, garage or home addition, consider a heftier machine. Likewise, a smaller unit like the Ryobi cordless (with its 2" cut and a weight of only 5 lbs.) might be your best bet for light work.

Blades: Always opt for carbide blades when available, as they last a lot longer than HSS, especially for extensive heavy-duty use. And, of course, machines that sport double-edged blades give twice the use. This Rockwell planer has an extremely well marked dust port that is easily changed for more dust control options.

Chip direction: Some machines give you no choice, and shoot chips one direction only. For the most versatility, pick a machine that allows you to select left or right chip direction (which determines either dust bag or hose location) according to the job. If you don’t plan to use a bag or dust hose, a model with a chip chute that can be angled away from you is a good pick. Many modern planers come equipped with kickstands, to keep the blades off the surface between cuts.

Accessories: All planers come with a basic selection of necessary tools for blade changing and a guide/fence, but examine those fences carefully before buying. The larger and longer the fence is, the more control it gives; conversely, a too-short fence is worthless. Multiple cutterheads, angled guides, dust control add-ons, rabbeting and jointing adapters are all plusses, even if optional.
Depth scale: The easier to read at a glance, the better. Note that Festool planers have a metric depth scale, which may require some on-the-fly calculating. Some planers offer storage for your smaller adjustment tools that you might need to make alterations to your planer while it's in use, so they are easier to find.

Tool storage: When I’m king of the world, I’ll decree that all necessary adjustment tools must be stored right on the machine itself. Till that day comes, though, few manufacturers offer on-board storage. Planers that have it are far more convenient.
Cord length: A too-short cord will constantly tangle and snag, so the longer the cord, the better. Currently, Makita and Festool are the leaders here with cords that should be an example to the others.
Safety and Maintenance

The planer stand is a good piece of safety equipment to keep the blade clear form contact while you're working, and is spring loaded for easy setting.
Power planers are deceptive. They’re compact, not that loud, and don’t feel like they want to leap screaming out of your hands while using them like, say, a router can. In fact, some are as easy to handle as a power drill. However, remember that they have a cutter running at a very high speed that is always exposed. That cutter should be foremost in your mind at all times. Always allow the cutter to come up to speed before cutting, and always engage the workpiece smoothly with both hands on the machine; never use a power planer onehanded. Although a planer’s built-in kickstand keeps the cutterhead off the work surface when not in use, it’s best to let it power down completely before setting it down.
Avoid over-reaching; if the workpiece is long, walk the planer along the cut. Keep your work area free of obstacles, and be especially mindful of where the cord is at all times. Watch those chips! It’s always best to attach the machine’s collector bag or a dust-collector hose during use. If you don’t, always pay attention to where the chips will go. You can easily spew a surprisingly large wave of chips flying five to eight feet away when planing — especially when doing deeper cuts. When using an attached bag, empty it often. Those bags fill surprisingly fast, and chips can back up into the cutterhead. If chips start flying out of the bottom of the machine as you’re planing, you’ve got either a full bag or a chip blockage in the machine. Either way, stop and fix it.
Checking the surface for cuts is quite simple and can ensure you are happy with the sharpness of your blades, and different cutting styles can create unique textures.

Finally, keep those blades sharp. Dull blades slow you down, give inferior cuts and overtax the tool. Check them often. Sharp blades produce large, well-formed chips and shavings, so if you notice increased amounts of fine dust — or the planer bogging down, of course — it’s time to change or sharpen those blades.


Keep the inspiration coming!
Subscribe to our newsletter for more woodworking tips and tricks