Building a Finger Plane with Recycled Blade
This handy finger plane, perfect for small projects, can be made from a few scrap items around your shop.
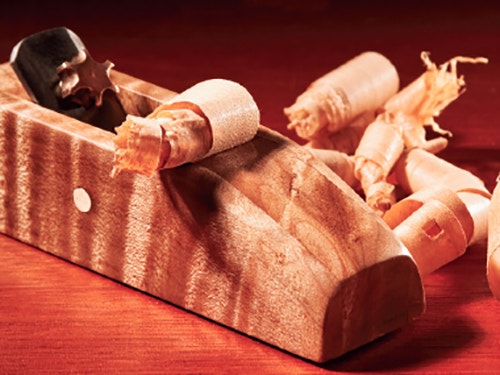
A good quality finger plane, like a pencil behind my ear, is almost indispensable to me when I am woodworking. It is small enough to carry in my pocket, and to those of us who have discovered them, it's the most universally useful of cutting tools: you may reach for it a dozen times a day — every time a workpiece needs a chamfered corner or shaping or trimming — and if it doesn’t come easily to hand, I, for one, feel lost. Problem is, every store-bought finger plane I’ve seen is either cheaply made or outrageously expensive.
However, if you start with a high quality iron, some nice hardwood from your scrap bin and a bit of careful hand work, you can build a finger plane stylish enough to display on the mantelpiece and tough enough to plow its way through the most demanding job in your shop.
What You Need
For the Finger Plane Diagram and Materials List, click here.
Constructing this plane requires use of some tools and supplies commonly found in many home workshops:
Building the plane also requires a few not quite so common items:
Starting with the Iron
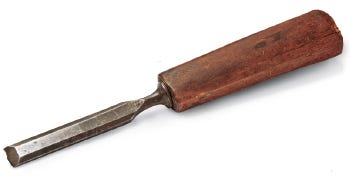
Cutting tools are like people: attractive is nice, but a stout heart is more useful. The heart of any plane is a blade — called the iron — which will take and hold a keen edge. Luckily, high quality pocket plane irons are plentiful and inexpensive. There was a time when the United States was the steel manufacturing center of the world. Nowadays, every secondhand store and almost every flea market vendor has a bucketful of made-in-U.S.A. chisels forged in that era, and they are easily converted into plane irons. The iron in this plane is fabricated from a 7/8" "Red Devil" socket chisel of about WWII vintage, which cost one dollar at a flea market. Socket chisels usually make better irons than modern chisels, which may be too hard to drill and tap. I’ve found that any width from 9/16" to 7/8" makes an appropriate cutter width for a finger plane like this one.
To convert the blade of the socket chisel into a plane iron (piece 1), use a felt-tipped marker to paint the back side, then lay out the cutoff line and clamp screw hole location, using a square and scratch awl. Make the saw cut outside the line, so the finished length, after cleanup, is still at least 2-1/2". Use a file to clean up the sawn edge and file chamfers on the corners. Centerpunch the hole location, so the drill tip doesn’t wander; then drill a 5/16" hole, and tap it 3/8-16.
Most old tools are also rusty, so now is a good time to use file, sandpaper and sharpening stone to remove the rust and hone the edge. The frog the iron rides on will be cut at 45 degrees, so the edge bevel should be no steeper than 25 degrees: a cutting edge that addresses the wood at 70 degrees cuts well, but a steeper angle may cause problems.
A Little Metalworking
The clamp screw (piece 2), which holds the iron in the plane body, and the striker plate (piece 3), which the clamp screw tightens against, are fashioned from a pair of 3/8-16 x 1" brass hexhead cap bolts. The finished clamp screw is actually only 1/2" long, but the lower half-inch provides sacrificial material for clamping it in a vise while it is worked. To avoid distorting the upper section of threads while filing, wrap them with masking tape. To shape the screw, clamp it in a vise and use a rattail file to cut half-rounds into each face of the hex head. When that task is completed, saw the screw to 1/2" finished length, cleaning up the rough edges with a file and sandpaper. To shape the striker plate — which is nothing more than the head of the second bolt with the faces cleaned up — saw off the head, then use a file to flatten and true the top and bottom faces.
While your metalworking tools are still at hand, cut the blade stay (piece 4) to size. This is a 1-3/4" (1/16" oversized) length of brass rod that bisects the plane’s body, against which the plane iron is tightened.
Making the Plane Body
Now it's time to rummage through your scrap bin and fish out that block of fancy-grained hardwood that was too small to use and yet too elegant to throw away. My plane is constructed from just such a block of hard maple, but almost any close-grained hardwood will do the job. If possible, use quartersawn wood and position it so the annular rings are parallel to the sole of the plane.
A plane is just one rung up the evolutionary ladder from a chisel — and in its essence is nothing more than a chisel held in a way that makes it easier to control. So, as long as all the parts go together, few of the dimensions except the 45° frog angle and the distance between the blade stay and the plane iron are critical. Building a plane is a bit like cooking biscuits — once you figure out the basics, the finished product becomes a matter of taste and feel.
Cutting all the pieces from a single block of wood is relatively easy, if the cuts are performed in the right order.
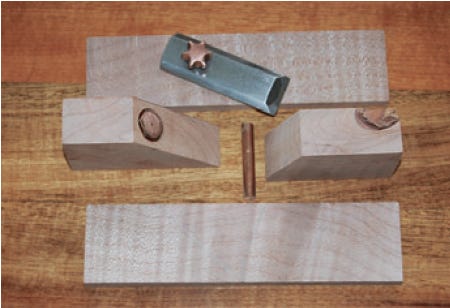
Begin with a blank that is at least 1-3/4" x 1-3/8" by 6" long. The blank must be properly squared up, all opposing faces parallel and adjacent planes at 90° to each other. Start by drilling the 1/4" hole for the blade stay. Next, mark up the top of your piece for the sides and middle (nose and frog). In my finger plane they're 7/8" wide, but you can adjust for your own plane blade dimension.
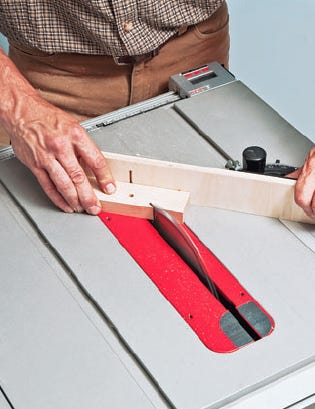
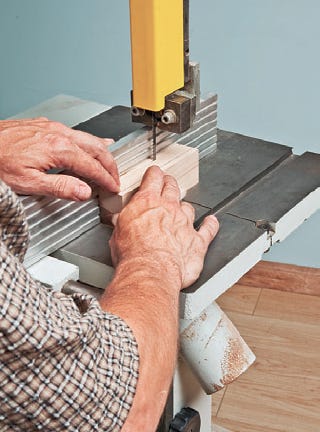
Saw on the outside of your layout lines with the band saw to remove the two sides (pieces 5). Be sure to use a fine-cutting band saw blade for this operation. (Note: If you don't have a band saw, I suggest that you lap-joint and glue a piece of scrap material to the end of the 7/8" thick slab, to make it safer to handle on a table saw.) If you do use the band saw, be sure to carefully sand down the saw marks on the faces of the sides and center piece. Once that’s done, you can cut the frog and nose (pieces 6 and 7) to size. I used a miter gauge on my table saw with an auxiliary fence attached.
Step over to your drill press, tilt its table to 45° and bore the 9/16" stopped hole in the face of the frog. Carefully tap the striker plate into the counterbore. Avoid split-out by clamping the frog between two scrap pieces while tapping the striker plate into place. Now get a couple of small clamps ready to go and set up for gluing the sides to the frog and nose.
The plane body should be assembled on a flat surface, and you'll want to complete the dry-assembly described below to ensure that everything fits as intended.
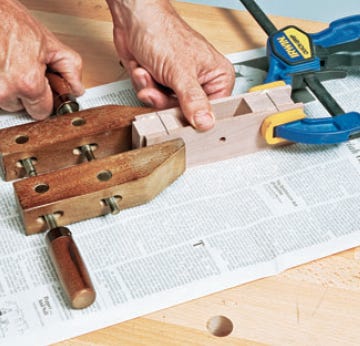
Start by fitting the blade stay into the pre-drilled holes and carefully position the frog between the sides. Slide the iron between the blade stay and the frog, and adjust the position of the frog so the iron can move freely. Make a witness mark on both sides to mark the position of the frog. Now, move the nose into position so the mouth — the gap between the nose and the iron — is between 1/16" and 3/16"; once again make witness marks so you’ll know where to line it up on glue-up. With the dry fit completed, remove the nose, iron and frog, apply glue to the wooden parts, reassemble, and clamp, as shown in the bottom photo. Use a wet cloth or sponge to remove excess glue.
Final Steps
After the glue has hardened, tape a sheet of 100-grit sandpaper to a dead-flat surface, and sand the sole until it is perfectly flat. Now you can shape the completed plane body to your individual taste with rasps, files and sandpaper. Finish the wood with a few coats of hand-rubbed tung oil, and rub a thin coat of paraffin on the sole, for lubrication.
Use typing paper and a flat surface to set the iron to proper cut depth. Typing paper is about .004" thick. Lay two thicknesses of paper on a flat surface, position the plane with the frog end on the paper, slide the blade down into position and tighten the clamp screw. (Note that the edge bevel is the reverse of the usual plane iron orientation — that is, the bevel is to the front — a setup necessitated by the thickness of the chisel blade iron.) Once the blade is clamped, it can be adjusted side-to-side or for a heavier cut with light hammer taps on the top end of the iron.
There you have it, a high quality shop-made finger plane. If you are like me, you will find it extremely useful ... and it will be the first of many!


Keep the inspiration coming!
Subscribe to our newsletter for more woodworking tips and tricks