Building a Base Kitchen Cabinet
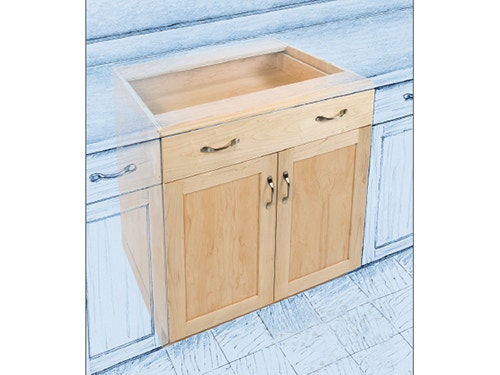
Bill Hylton's kitchen remodeling project begins with a solid, well-constructed base cabinet.
Completing a "kitchenful" of beautiful cabinets is the dream of many a hobby woodworker. Maybe it's yours, too. But the thought of actually building two dozen of these basic boxes may seem daunting. What you need is a starter project: a basic cabinet with a drawer, a shelf or two and a pair of doors. It'll give you hands-on experience and hopefully stoke your ambition to build more. Let’s get started!
Choosing a Cabinet Style
There are two fundamental styles of kitchen cabinetry. In the traditional approach, a face frame of solid-wood stiles and rails is attached to the edges of the box, outlining spaces for individual drawers and doors.
For the Kitchen Cabinet Base drawings and materials list in PDF format, click here.
A second approach — and the one we'll use for this project — is known as "Euro-style." It uses the drawer fronts and doors themselves to define the cabinet’s facade. They crowd together with only narrow gaps between them, and they overlay and conceal the edges of the box. Construction is efficient, and the basic design offers maximum versatility for shelving or drawers.
Planning a Basic Base Cabinet
Our project cabinet has a full-width drawer above a compartment with two doors. The compartment has an adjustable shelf, though it could easily be fitted with two or more pullout style trays.
It conforms to the prevailing size standards. It is 30" wide, 34-1/2" high and 24" deep (measured from the faces of the doors and drawer to the back edge). The box itself is 30" wide, 30-1/2" high and 23-1/4" deep. The 4"-high, 20-3/4"-deep base (sometimes called a pedestal) is a separate piece, because it's much easier to place and level than a full cabinet. This is especially true if you are installing more than one cabinet box in a row. As you tackle the cabinet, keep in mind my "Two Keys to Success": 1) Use good quality materials and 2) Cut all your parts dead square.
To make this basic cabinet, I opted for prefinished maple plywood, although unfinished veneered plywood or melamine are other good options. Prefinished plywood has a durable, glossy finish on one or both faces — far better than you can brush on — and you can get it in 3/4", 1/2" and 1/4" thicknesses. Be sure to orient the finished face to the inside of the cabinet, which is the surface you'll see when the cabinet is sandwiched between others in a kitchen.
Cutting Sheet Goods
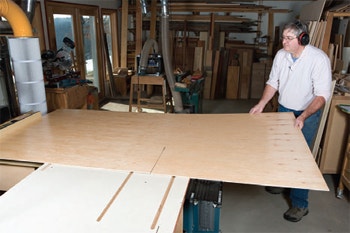
The first challenge of the project is cutting up the plywood. With the right table saw setup — a 52" capacity rip fence, big outfeed table and plenty of space on the infeed side of the saw — the only limit is your ability to heft the material.
If that's not your setup, your best option may be the circular saw. To guide the saw, I long ago made a pair of simple guides from 1/2" construction- grade plywood. One guide is 4' long, the other 8' long. I set the edge the guide on the good side of my layout marks and clamp it to the sheet (and spoilboard underneath). Adjust the saw so it just cuts through the good sheet.
Don't depend on sheet stock being square with perfectly straight edges. Even when it IS square, the edges may be scuffed or shopworn. Plan your cuts so all factory edges are trimmed off while sizing the parts.
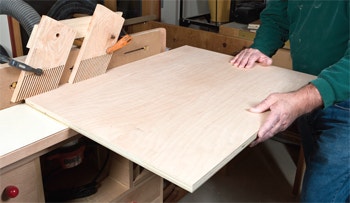
I generally reduce a 4 x 8 sheet to two or three pieces of more manageable size using a circular saw. Then I trim the parts to final size on my table saw. Two things are critical in sizing your panels: each must be perfectly square, and like parts must be exactly the same size.
The first two cuts — whether you make them with a circular saw or on the table saw — break the sheet into two 31" x 48" pieces and a 33-3/4" x 48" piece. At the table saw, I halve the first piece for the sides. Now, I've got a fresh straight edge on each side.
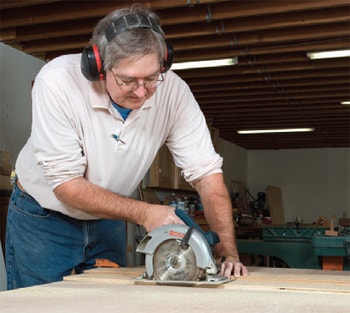
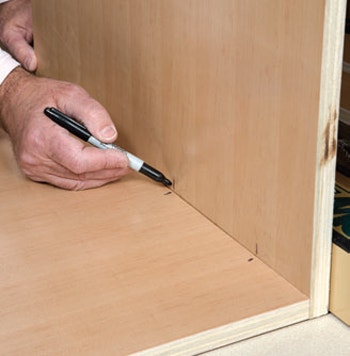
Next, I crosscut each of these parts to create a square corner. Mark the square corner. Once you have this squared up, you can make subsequent cuts using the rip fence. The only case parts that have a 30-1/2" dimension are the sides, so I'll set the rip fence and cut the sides to length, and in the process remove the factory edge. The sides are still a bit wide at this point. I hold off cutting them to final width until I've got the bottom rough cut. I want to cut these three parts to width at the same fence setting. Continue in this fashion as you size all the plywood parts. The goal is to cut all parts that share a dimension at the same time, with the same settings. For example, you want the sides and the bottom to be exactly the same width, so set the rip fence to that width and cut all three pieces to width before changing it.
Adding Biscuit Joinery
A number of good joinery options exist. You can assemble the box with biscuits, rabbets, even fastened butt joints. I generally use all three: biscuits to join sides to the bottom and rails, rabbets to install the back and screws to supplement both biscuits and rabbets. Biscuit joinery was developed for just this sort of project — joining parts cut from sheet goods into casework. The dimensions of the parts are easy to figure because they all just butt together and you don’t have to account for the depth of a dado. The joints are easy to lay out and cut, and they are plenty strong. In addition, it lets you edge band exposed edges before assembly. Cut a rabbet into the sides and bottom to accept the back as your first step. Make these rabbets 1/2" wide and 1/2" deep. I cut them on my router table.
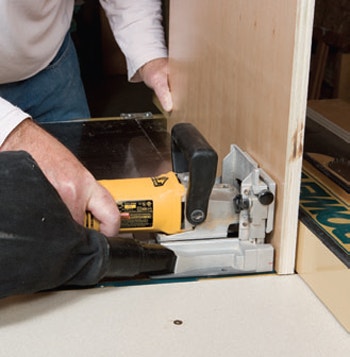
Setting the back into a rabbet provides scribing room on the back to help fit the cabinet snug to the wall. Lay out and cut the biscuit slots next. My method is to reference all cuts from the base of the biscuit joiner (rather than its fence).

You can work on the table saw to take advantage of its flat surface and its handy rip fence. For example, stand the side on its bottom edge and brace it against the fence. With the joiner flat on the saw table, align it with a mark on the side and plunge the cutter.

When the side slots are cut, place the bottom on the saw table, bottom face down, end against the fence. Cut the slots.

When you assemble the joint with biscuits, the side's end and the bottom’s underside should be dead flush.

After all the slots are cut, drill locator holes for the attachment screws. These small-diameter holes will tell you where to drill countersunk pilots for the screws after glue-up. The screws pull the sides tight to the bottom and rails, minimizing clamping time.
Banding the Raw Edges

Exposed plywood edges aren’t particularly attractive, so you should cover those that will be exposed. I used iron-on veneer edge banding here, and I banded all the necessary edges before assembling the cabinet.

You'll need to band the front edges of the carcass, all four shelf edges, the drawer rails and probably the drawer box edges at various stages of this project.

Use a household iron or a special edge-banding iron to press the tape to the edge and melt the adhesive. After burnishing the tape, trim the overhanging edges with a utility knife or a special edge trimmer.
Building the Base and Drawer Boxes

The base is a simple edge frame — assemble it with biscuits — topped by two 4"-wide cleats. With the frame squared and clamped, screw the cleats along the top edges. (Note: If you were making several cabinets to be installed side-by-side, you'd make a single long base for all of them to sit on.)
Now move on to building the drawer box. Bear in mind that the undermount slides require specific clearances to work properly. The runners are mounted underneath the drawer, and the bottom must be recessed 1/2" for them. The sides must be no more than 5/8" thick (in our case we made them of 1/2" stock).
For the Cabinet Base Drawer diagrams and materials list in PDF format, click here.
Cut the parts from 1/2" plywood as shown in the Drawings. Rabbet the sides to accept the front, and dado them to capture the back. Plow grooves in the sides and front for the bottom. When it all fits well, assemble the box with glue and clamps.
Assembling the Cabinet

Once all your carcass parts are cut and banded, begin assembly with a dry run. Leave the cap on the glue, but do use biscuits. Fit the parts together and apply clamps. While you do want to ensure that everything fits together properly, you also want to scope out the best way to do the work (which part to grab first, second ... and so on).

Here's what worked for me. Set a side across a couple of battens that'll allow you to get clamp jaws beneath it. Squeeze glue into each slot and press in a biscuit. Apply glue to the exposed edges of these biscuits. Stand the bottom in place and make sure its front edge is flush with the side's. Apply a couple of clamps, temporarily, to seat the bottom against the side.

You want the box to be square, of course, so use corner clamps or assembly squares to hold these two panels at right angles to each other. Stand the rails in their places, again making sure the front edges are flush with the sides. Then apply glue and insert the biscuits in the open slots in the bottom and rails. Carefully set the second side in place. Apply clamps at the four corners of the box.

Measure the diagonals front and back as you tighten the clamps. With the box squared and firmly clamped, drive the assembly screws. At each marker hole, drill and countersink a proper pilot hole and drive in a 1-5/8" drywall screw. With that done, remove the clamps and right the box (check for square). Leave the back off until you’ve installed all the internal hardware.
Making Doors
For the Cabinet Base Door Diagrams in PDF format, click here.

These flat-panel framed doors are easy to make. The rails and stiles are joined with groove-and-stub tenon joints around a 1/4" plywood panel.

Plow the 1/2"-deep grooves in both rails and stiles with a 3/16" slot cutter in a table-mounted router. Make two passes to center the groove.

Cut the 1/2"-long stub tenons with a large diameter straight bit on the router table.

Glue and clamp each door, making sure it is square and flat. Cup hinges mount the doors to the box. The hinge is mounted to the door and a base plate is screwed inside the cabinet. Clip the two parts together to hang the door.

While you must locate the parts accurately, the hinges can be adjusted slightly in three directions so you can align the doors.
Finishing Up

With the majority of the construction completed, all that remains is to install the slides in the box. Do that, then install the back. Apply finish to the banded edges, to the overlay drawer front and to the doors.

Drill holes for the shelf supports as you want them — there are jigs made for this task. Clip the door hinges to their base plates and adjust the hinges to align the doors. Fit the drawer into the case and mount the overlay front.

To install the cabinet, you'll need to shim the base to the floor to level it. Set the cabinet on the base, scribe it to the wall, if necessary, and belts and to your scribe lines. Then screw the cabinet to the wall studs.
Now, step back and admire your work!
-
 Rockler Clamp-It Assembly Square with 2-Pack Universal Fence ClampsSpecial Price $14.99 Regular Price $29.99 Save $15.00


Keep the inspiration coming!
Subscribe to our newsletter for more woodworking tips and tricks