Building an Arts and Crafts Style Bookcase
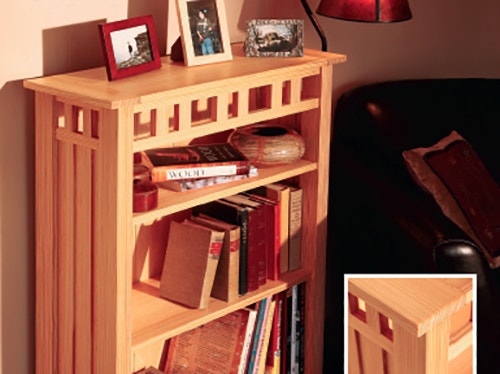
This bookcase was developed in the classic Arts and Crafts style with quartersawn longleaf pine lumber.
I love pine ... its smell, workability, luster; there's a feel to the wood that's hard for me to describe. As a kid growing up in far northern Minnesota, we had a huge white pine in the yard, the tallest tree for miles. Until I saw a real redwood, I couldn't imagine a bigger tree on the planet. It was the first tree I ever hugged, and it wasn't the last, either. The longleaf pine lumber in this bookcase is a bit different, somewhat like red pine but denser and heavier, with a workability similar to Eastern slope Douglas fir. Not the wood you want to do acanthus carving on, but perfect for furniture if you like simple lines with warm tones, lots of luster and straight grain.
For the Arts and Crafts Bookcase Drawings and Materials List in PDF Format, click here
.I built this project using a combination of hand and power tools as well as the Festool Domino loose-tenon joinery system. I'll admit to being a bit of a snob when it comes to my joinery methods, but I came away impressed with the Domino Joiner's quality and ease of operation. If you don't own a Domino Joiner, you could use dowels instead to build this bookcase.
Prototyping and Selecting Stock
Prior to even picking lumber, I put together a full-scale MDF prototype. It gives you an ideal chance to figure out what you're trying to create before you start cutting into the good wood. I decided that a simple Craftsman-style design would lend itself well here, and breadboard ends would be a nice decorative touch for the top.
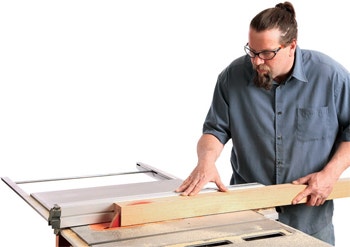
Once I was satisfied with the design, I selected nice 3/4" quartersawn stock from Rob's longleaf stash. One thing about longleaf's straight, parallel grain is that it's easy to lose the details in all those psychedelic grain lines, and the tangentially sawn surfaces have a tendency to look like grain patterns you see in CDX plywood — not the effect I wanted. So, I recommend choosing stock carefully for each of the project parts. For the top and shelving, choose boards with an attractive leading edge grain. On the other parts, find stock with grain angled in relation to the vertical by 20° or so.
Starting with the Posts
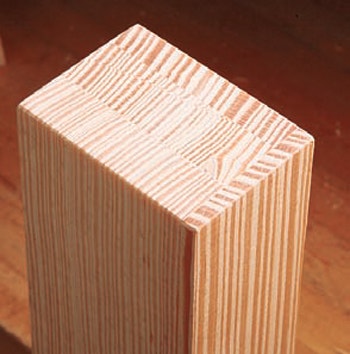
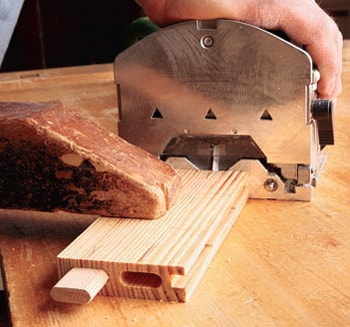
Notice that the bookcase posts are actually three face-glued strips of 3/4" stock with a fourth strip that serves as veneer to cap the "show" edge. I did this to achieve a wraparound quartersawn grain pattern on the three visible sides of each post and hide the glue lines.
To make them, glue up four blanks for your posts (pieces 1), with one of the outer pieces on each blank chosen to resaw for the thin veneer cap. Square up your post blanks on the jointer, and resaw them to a thickness of 11-3/16".
The offcut should give you a nearly 1/4"-thick veneer piece for each post. Glue the veneer in place and trim off the overhang with a router and piloted flush-trimming bit.
Building the Side Assemblies
Building the bookcase side assemblies is an involved part of this project, but they're not really too tough. You'll see that the top areas of the sides are made up of pairs of short, decorative rails and stiles. The lower areas are filled with two long, grooved stiles that capture three thin side slats. The rails and stiles attach to one another and to the posts with Domino tenons. Follow the Material List to make all those rails and stiles (pieces 2 through 5) now.
As I worked through the initial design, I realized that the bottom side stiles would end up flush with the mating rails, so I decided to reduce their thickness to 5/8" to add visual interest and create more shadow lines. Next, cut grooves along both edges of the bottom side stiles as well as the inside edges of the middle and bottom rails to house the side slats (pieces 6). I cut these centered grooves on the router table using a 1/4" straight bit. Prepare the two groups of side slats by resawing them from the same piece of thicker material. That way, each trio of slats will have consistent grain pattern and color.
Set your side rails and stiles together, mark centerpoints for the Domino tenons and proceed to cut the mortises. Remember to reset your Domino joiner if you make your lower side stiles thinner like I did, to keep the tenons centered on the material thickness. When mortising the bottom stiles and rails, I positioned the machine’s cutter to just kiss the back side of the slat grooves (the Domino cutters have metric diameters, and the Domino size I chose was roughly 5/16" thick).
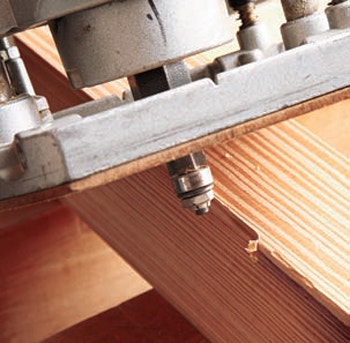
Dry-assemble the rails, stiles and slats so you can mark locations for the slat grooves and rail mortises on each pair of posts. Mill the post slat grooves on the router table, then bore the rail mortises. I indexed my Domino cutter using the slat grooves on the posts. To cut the mortises, I simply folded the fence mechanism down to 90°, then adjusted the height until the cutter met the grooves.
When all the mortising is behind you, it's time to cut the shelf dadoes in the posts and across the insides of the bottom side stiles. I developed an accurate layout on one post before carefully transferring my shelf dado locations to the other three. Note that since the shelves wrap around the insides of the posts and seat in the lower stiles as well, you'll need to dado both the inside face and edge of each post to accommodate the shelves. To make these 1/4"-deep dadoes, I clamped the posts together and used a scrap MDF fence to guide my router and straight bit across the part faces. Unclamp the posts and mill the adjacent dado cuts on their narrow inside edges, stopping these cuts at the slat grooves. Dry-fit the side assemblies together again, mark the shelf dado locations on the side bottom stiles (pieces 5), and rout these 3/16"-deep dadoes as well. Glue up and cut your shelf blanks (pieces 7) to size, trim their stepped ends to shape, and make sure they fit the side assembly shelf dadoes.
Making the Bookcase Back and Front
The bookcase back consists of five slats (pieces 10) that fit into centered grooves on the back top and back bottom rails (pieces 8 and 9). Make these two rails first, according to the Material List. Cut the slat grooves at the router table or on the table saw with a dado blade. Instead of wasting 3/4" stock on an area that won’t receive much stress, I resawed and thicknessed my back slats to just over 1/4", then planed them by hand to fit the rail grooves. Thin splines (pieces 11) between the back slats will keep gaps from opening up when the slats shrink in the winter. I cut my spline slots along the edges of the slats using a 3/32" thin-kerf blade in the table saw. Ash was a sturdy choice for my spline stock. Take care to make sure the splines fit the grooves just right without breaking the fragile slat housings.
After checking the fit of your parts, mark the rails and posts for Domino mortises: three on the ends of the top rail and two on each end of the bottom rail. Mill them now.
Next, measure, cut and assemble the decorative front top rails and stiles (pieces 12 and 13), and make the bottom front rail (piece 14). Cut the appropriate mortises in the rail and stile ends and in the posts for attaching these parts with Domino tenons during final assembly.
Prefinishing Before Proceeding
I switched to finishing prep next, which involved a combination of hand-planing, sanding, finishing and scraping before final assembly. I generally hand-plane flat and straight surfaces before evening them out with a scraper or sandpaper, and I followed that approach here. Then, after sanding with 180-grit paper and a thorough tacking to remove dust, I brushed a coat of wax-free shellac on all surfaces inside and out, except for inside the slat grooves and, of course, the glue joint surfaces. The shellac will add depth to the grain’s appearance and seal in any resins that could bleed through the topcoat.
I let everything dry for a few hours before giving all surfaces a light scraping — yep, you read that right. Scraping works like a charm, giving the wood a polished-smooth feel. You will need to hone your scraper carefully: you want a tiny burr, not a big hook. Once you get the hang of it, you won't go back to sanding ... I guarantee it! Build up the final topcoat layer with several more coats of finish.
Assembly
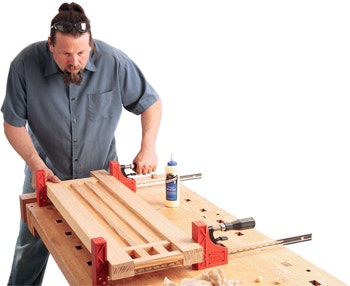
It's finally time to glue up the side rails, stiles, slats and posts to make both side panel subassemblies. Assemble the top front rails and stiles as well so you can install it as a single unit between the side assemblies. After an hour or so of drying time, strip the clamps. With the right side panel lying face-up on your bench, add the front rail/stile assembly, bottom front rail, back rails, shelves and other back pieces to the equation. Drop the left side panel into place, and install clamps and cauls to hold it all together. Tap the back panel pieces with a mallet and block to align them properly.
Completing the Breadboard Top

While the case joints dry, glue up a panel for the top (piece 15) and create blanks for the breadboard ends (pieces 16). Here's how I cut the joints: First, rout a 1/4" wide x 3/8" deep groove into the breadboard ends, stopping these grooves 1/2" from the front end but running them all the way out the other end.

Use this groove to index your mortising machine or drill press for boring two 3-1/2" wide x 2-3/4" deep mortises that receive the center panel tenons. Once the mortises are done, lay out the tenons on your panel ends, cutting the cheeks and shoulders on the table saw. Band saw the tenons to shape. They may require a bit of trial-and-error final fitting to seat correctly.

Assemble and clamp the top panel parts, gluing just the deep mortise-and-tenon joints. I hand-planed my top flush, then sanded, sealed, scraped and topcoated it. Attach the top to the case with metal fasteners and screws. Now you've got a solid and visually striking little pine bookcase that will provide generations of loyal service.


Keep the inspiration coming!
Subscribe to our newsletter for more woodworking tips and tricks