Building a Dowel Joint
Learn how to make dowel joints quickly and successfully with a doweling jig.
Dowels may not be as fashionable as pocket screws these days, but they're sometimes the best choice for situations where a joint must be both strong and fastener-free. Dowels are also helpful for keeping joint parts aligned during glue-up, particularly odd-angle joints. Adding dowels to a cross-grain joint creates a mechanical connection where glue alone will eventually fail. Whether you're building face frames, boxes or miter joints, this article will help you master two of the most common styles.
Tools for the Job
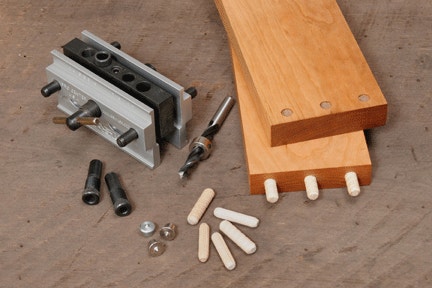
There's a trick to making successful dowel joints: you need a jig that registers parts precisely. If dowel holes are even slightly askew, the joint parts will be thrown out of alignment and not fit together. Doweling jigs are made in several styles, or you can build your own from scrap. The jig should clamp securely to the workpiece, guide your drill bit for drilling a perfectly square hole and be easy to register accurately on your joint parts. The jig shown has interchangeable bit sleeves so you can use drill bits with diameters ranging from 1/4 in. to 1/2 in. You'll also need dowel pegs, of course, and a sharp brad-point drill bit. Fluted or spiral-cut dowels are better choices than smooth dowels, because the tiny surface grooves create gaps for air and excess glue to escape. You may also want to have a set of metal dowel points on hand. When they are inserted into dowel holes in one joint part, their pointed tips will prick the mating surface to give you center marks for drilling the mating holes. They're a "must have" for blind-drilling situations where your doweling jig won't work.
End-to-Edge Dowel Joints
Here's the joint you'll use for building face frames or, with a little alteration, mitered picture frames. Make sure your workpieces have flat surfaces with square ends and edges.
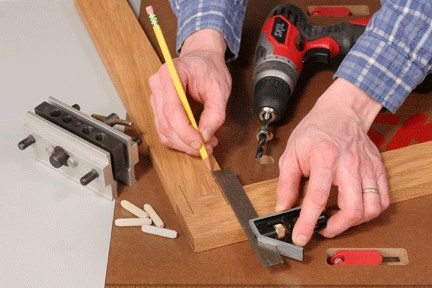
Step 1: Set your parts together, and draw lines across the joint to mark the dowel positions. Locate the dowel holes at least 1/4 in. away from the workpiece edges for optimal joint strength. If your workpieces are less than three inches wide or so, two dowels will do the job.
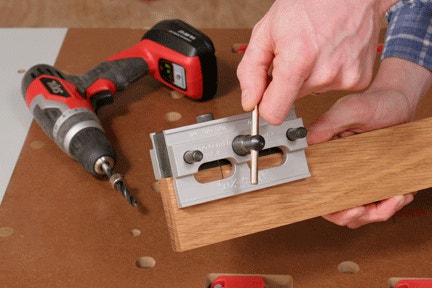
Step 2: Clamp your doweling jig to one of the two workpieces so the jig's drilling registration mark aligns with the dowel layout line. The jig shown is designed to center itself automatically on the stock when clamped in place. If your jig has interchangeable bit sleeves, thread in the appropriate sleeve for the bit you'll use. On 3/4-in.-thick stock, use 1/4- or 5/16-in.-diameter dowels. Thicker dowels will leave the walls of your stock too thin, weakening the joint.
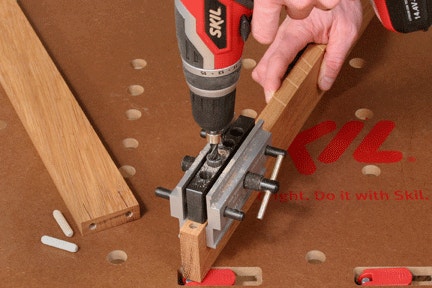
Step 3: Drill holes in both halves of the joint. It helps to have a stop collar on your drill bit to set the drilling depth, but a piece of masking tape wrapped around the bit will work, too. Drill each of the dowel holes slightly deeper than one half the dowel length to create a little gap for excess glue. You don't want the dowel's length or extra glue to keep the joint from closing properly.
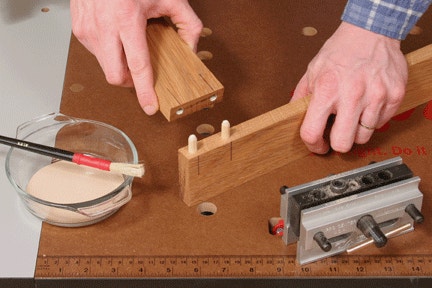
Step 4: Before gluing up the joint, slip the dowels into their holes dry and test the part fit. You may need to widen the holes slightly by cleaning them out a bit more so the parts slide together easily. Once things fit nicely, spread glue into the holes, insert the dowels and apply clamps. You're done!
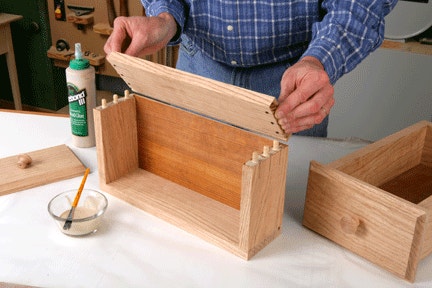
End-to-Face Dowel Joints
This dowel joint variation works well for assembling boxes, installing shelving in bookcases or building cabinet carcasses. You'll need metal dowel points to build these joints accurately.

Step 1: Mark dowel layout lines on the workpiece that will receive dowel holes in its end. Use your doweling jig to bore these holes, just as you would for an end-to-edge joint. Then, slip dowel points into the holes.

Step 2: Set the joint parts together against a clamped fence or bench dog to keep them aligned correctly. Carefully tap the end of the dowel-point workpiece with a rubber mallet or dead-blow to prick centerpoints for drilling the opposite dowel holes.

Step 9: Here's where careful setup and drilling will mean the difference between a joint that fits together properly and one that just gives you fits. A drill press is the best way to drill dowel holes into the face of the other workpiece. Install a sharp brad-point bit and clamp a fence to your drill press table so the bit's point meets the prick holes exactly. Bore the mating holes. Then, carry out a dry fit of the joint. If the parts go together but tighter than you'd like, you can sometimes improve the fit by sanding the dowels slightly or widening the holes a tad. If the joint is a little loose, glue will usually swell the dowels and tighten it up.


Keep the inspiration coming!
Subscribe to our newsletter for more woodworking tips and tricks