Build Strong Miter Joints with Splines
A stone-simple jig makes it easy to cut mitered spline joints on your router table.
Miter joints may be the usual choice for picture frames, but they're far more beautiful than they are brawny. Truth is, the end-grain-to-end-grain connection of a glued miter joint offers almost no strength on its own. You'll have to reinforce them, one way or another, and splines are a sensible solution. Inserting these slivers of wood into a slot between the joint parts adds a degree of long-grain connection, which creates a stronger glue bond. A spline will also help keep the joint aligned during clamping, and since it's made of wood, you can rout rabbets or other profiles into the joint without worrying about hitting metal fasteners in the process.
A quick and safe method for cutting spline slots is to use a slot-cutting bit in your router table. All you'll need is an angled piece of scrap, to act as a backup jig, and you can make spline miter joints in no time flat. Here's how.
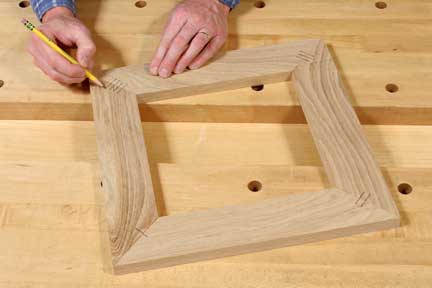
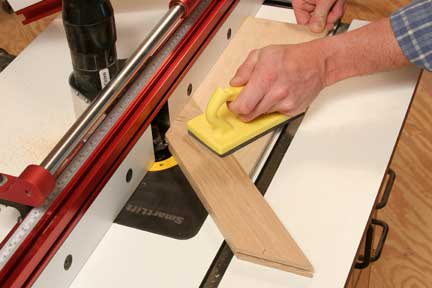
Step 1: Carefully miter-cut your frame parts with a sharp crosscutting blade in the table saw or on your miter saw. Set your frame together, and refine the miters a little at a time with a block plane or on a disk sander until the joints close evenly. Choose the best arrangement of the frame parts, and draw reference marks across each joint to keep their orientation clear.
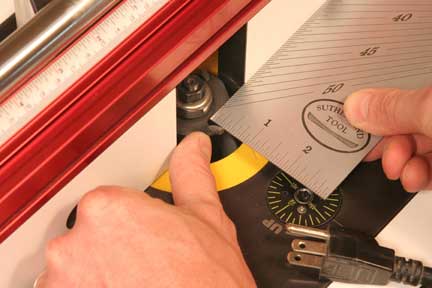
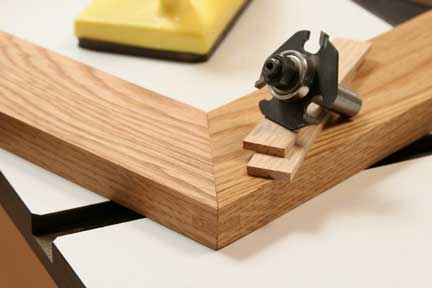
Step 2: Install a slot-cutting bit in your router table. For 3/4-in.-thick material, a bit that cuts 1/8-in.-wide slots is ideal. Splines don’t need to be thicker than this to offer plenty of strength. Raise the bit so it will cut a spline that's roughly centered on the stock thickness – exact centering isn’t critical. Then, recess the bit in your router table fence so it will cut slots slightly deeper than 3/8 in.
Step 3: Miter-cut the end of a piece of scrap at 45° to act as backup support during routing. The scrap should be wide enough to keep your workpieces from pivoting as you move them across the table; make it long enough to be stable as you run it along the fence.
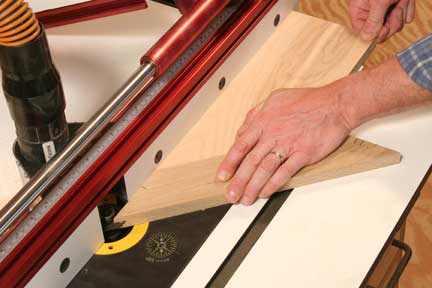
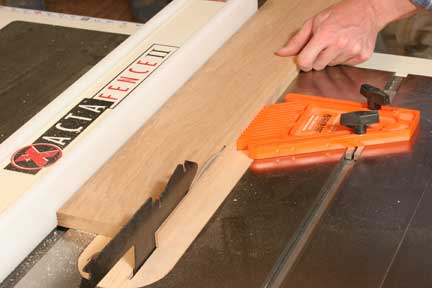
Step 4: Set your first frame workpiece in position on the router table, and fit the backup board in position behind it. The arrangement of the parts allows enough room to use your hands to grip and feed the parts safely. If you're working with narrower parts, use a push block or push stick instead to keep your fingers well clear of the bit. Cut the first slot, sliding the workpiece and backup board completely past the bit.
Step 5: Once the first slot is cut, pivot the workpiece to the other mitered end, but don't flip it over; you want to see your layout marks with every cut so the spline slots line up correctly across each joint. You'll need to flip the back-up board, however, to suit the new orientation of the workpiece. Cut the second slot, using a push block as needed for safety.
Step 6: Once all of your spline slots are routed, you're ready to make the splines. The choice of wood is really up to you: use the same wood as the frame parts if you want to minimize the appearance of the splines, or choose a contrasting wood to turn your splines into a showier design feature of the joint. Select a piece of stock long enough to make all four splines from one strip. Since the splines are thin, it’s a good idea to rip them on the "open" side of your table saw blade so they can fall away freely. Be sure to use a splitter when making this cut. Set your fence carefully, and cut the spline strip. Adjust the fence as needed if your first strip is too thick or thin – aim for an easy "push" fit in the spline slots. Cut the strip into four pieces that are about 1-1/2 in. longer than the joints are wide.

Step 7: Carry out a dry fit with the splines in their slots to make sure the frame will go together as it should. Then, spread a light film of glue into the spline slots and onto the splines. Assemble all four corners, and close the joints with bar clamps. Increase the clamping pressure evenly and a little at a time, checking the joints for square. Scrape off the excess glue when it turns rubbery, and leave the frame clamped for several hours.

Step 8: Trim away the overhanging ends of the splines with a sharp flush-cutting saw, and sand the joints smooth. Now you’ve got miter joints that are ready to stand the test of time beautifully.


Keep the inspiration coming!
Subscribe to our newsletter for more woodworking tips and tricks