Build Face Frames with a Shop-made Doweling Jig
A little scrap and a couple of bushings are all it takes.
Before the days of biscuit joiners and pocket screw systems, woodworkers turned to dowels for building strong face frames. They're still good options today, but you'll need a jig to drill those dowel holes accurately. Here's how to make and use this simple jig.
Step 1: Select a piece of 1-1/2-in.-thick scrap (even a piece of 2x4 will work fine), and joint and plane it flat and square. Rip the scrap to match the usual width of your face frame parts — a 2-in.-wide jig is a good general size — and crosscut the jig blank 2-1/2-in. long.
Step 2: Although you could make this jig without bushings, it won't take long before your drill bit will begin to widen the guide holes — and that will ruin the jig's accuracy. Bronze or steel bushings will greatly extend the life of your doweling jig. You can find them at most hardware stores. Buy a pair with a 1/4-in. inside diameter, and have them on hand for the next step.
Step 3: Lay out the proportions of your jig. The top "drilling" portion of the jig should match your bushing length. Notch the jig's lower area so that it will fit over your face frame stock and create a long lip for clamping to the workpiece. Determine the spacing you want between your dowels, and mark two layout lines on the jig that start on the top and wrap around the drilling area on the notched side: these will serve as handy alignment aids when using the jig. Finally, mark the dowel centerpoints on top of the jig blank.
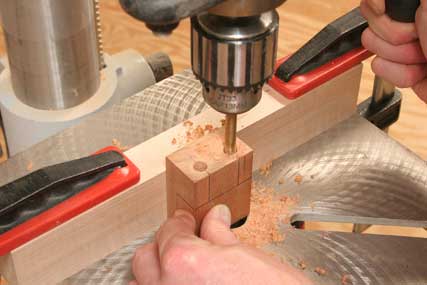
Step 4: Measure the outside diameter of your bushings; they're probably 3/8 in. Clamp a fence to your drill press table to back up the jig blank and align it for drilling. Drill a pair of holes down through the top of the jig for installing the bushings. It's not necessary to drill all the way through the blank — the holes only need to extend to the notch area.
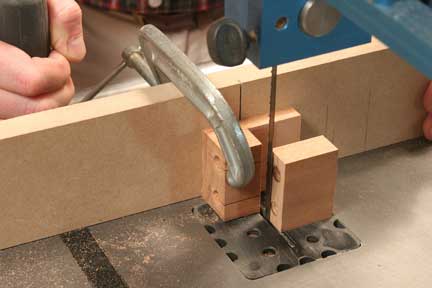
Step 5: Form the notched area of your jig at the band saw. Start with a rip cut against your band saw fence to create the long lip, then follow up with a crosscut at the notch layout line to cut the waste free. Make this cut with the jig backed up and clamped against a miter gauge.
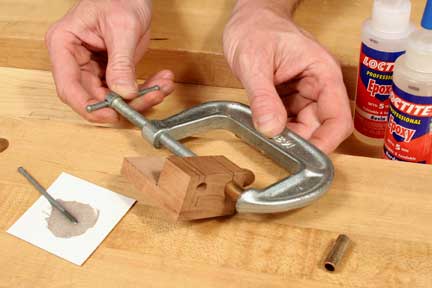
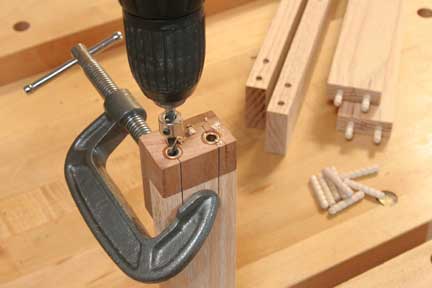
Step 6: Mount the guide bushings in the jig with quick-set epoxy. One easy way to insert the bushings into their holes is to use a C-clamp as a press. Tighten the clamp to squeeze the bushings into place. When the epoxy cures, your doweling jig is ready to go.
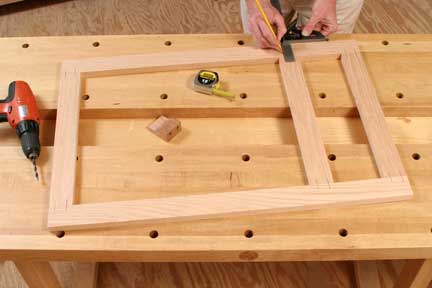
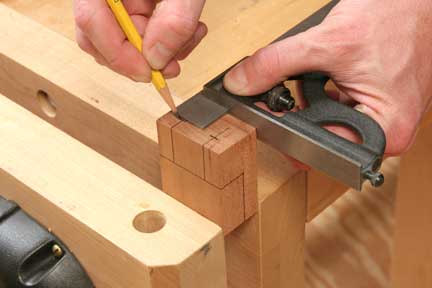
Step 7: To put your new jig into action, lay out your face frame parts, and draw pairs of lines across each rail/stile joint to mark the dowel positions. Use letters or numbers to mark each joint as well, in order to keep the part orientation clear.

Step 8: Mark your drill bit for the proper drilling depth with a piece of tape wrapped around it or with a stop collar. The depth should equal the length of your jig's bushings plus a little more than half the length of the dowels you plan to use.

Step 9: Drill the dowel holes in your face frame parts. The order of how you drill the parts doesn't matter; just make sure to align and clamp the jig carefully so the dowel centerpoint lines on the jig are even with the layout lines on your workpieces.

Step 10: Carry out a full dry-fit before you glue and clamp the frame together. If any of the joints are twisted, try a different pair of dowels. Sometimes dowels warp, and a straight one could correct the problem.
Store your new jig where you keep your dowels or drill bits and it will be ready to go every time a face frame is on your "to do" list.


Keep the inspiration coming!
Subscribe to our newsletter for more woodworking tips and tricks