Bending Wood Part III - Steam Bending

So far in this series we have looked at simple wood bending in thin stock or with kerf cuts, and forming bent wood parts through laminating thin strips together on a form. In this final installment, we will discuss steam bending wood. Steaming actually changes the cellular structure of wood to make it more pliable. As the wood cools and dries clamped to a form, it very quickly regains most of its original stiffness, but in the shape of the form.
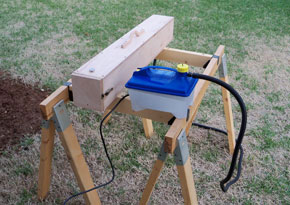
Steaming wood for bending requires having some form of steam generator and a container to steam the wood in. Up until recently, this largely meant building your own, but now complete steam generators are available that you can add to a shop-built steam box.
Wood selection is very important for successful steam bending. Air dried lumber is much easier to bend than kiln dried. Kiln dried lumber can be used, but needs to steam longer. Soaking it water overnight also helps a great deal. Certain species of wood bend much easier than others as well. Essentially, the more open the grain, the easier it steams which makes sense as the steam can penetrate the open pores more easily. Of common woods, white oak is best, followed by red oak and beech. There are many good books and DVDs on the subject available as well.
Stock preparation for bending is no different than any other woodworking project. Your parts should be planed to thickness and ripped to width. Generally, it is difficult to figure exact length around curves, so crosscut parts long to be trimmed after bending. The parts are placed in the steam box insuring that there is space between them for the steam to circulate, then the steam generator is turned on. On average, you want to steam for one hour for each inch of thickness. I found that with kiln dried wood, and since it was cold outside my shop (you do not really want to have steam and water inside with your tools) I let the system run for about an hour to get everything fully warmed, then refilled the water tank and steamed the parts for an hour.
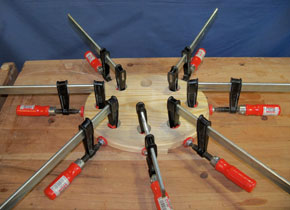
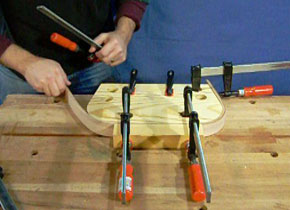
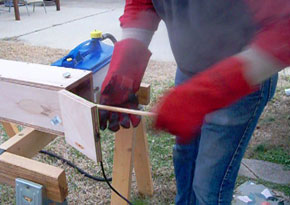
As you would expect, very thin parts, like the pieces that form the embroidery hoop, soften pretty quickly and thicker parts will take more time. Make sure that you have everything ready before removing the parts from the steam box. They will cool very quickly, so have all your clamps at hand. Parts that are ready to bend will be very hot and wet! Gloves are a necessity. Get the parts right to the form and force them into position quickly. Add clamps as needed to hold the wood tight to the form. They need to remain held in position to fully cool and dry, overnight at least.
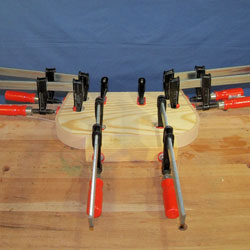
As with other laminate bending, there will be some “spring back” when the parts are unclamped. Note how the form for the carry all handle over bends the part by 10 degrees on each side. When released, the handle sprang back to a nearly perfect 90 degrees on each side, but over a couple days opened up a bit more. The embroidery hoops spring back even more, but the inner hoop will be joined into a closed part and the outer hoop will get hardware to make it into a clamp, so this is less of a concern.
Obviously, a blog is not the best place to learn all there is to know about bending wood, but we hope that this series has given you ideas and inspiration to try using wood forming techniques to enhance your projects. Learning more through reading and practice can open up a lot of new possibilities for your woodworking enjoyment.

Keep the inspiration coming!
Subscribe to our newsletter for more woodworking tips and tricks