Shopping Cart
(0)
You have no items in your shopping cart.

Nature hates straight lines, and as woodworkers we spend a huge amount of time and effort in making things straight. But curves can and should be a large part of your woodworking. There are several methods for forming wood into curves, and the next few blog posts will explore these techniques. We will be looking at simple force bending, kerf bending, lamination and steam bending.
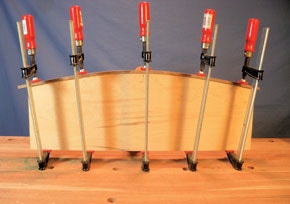
Typically, the part is held to the curve with glue only since piercing the wood with a nail or screw would tend to break it under the bending stress. A good rule of thumb is that if the part can be formed by hand, then a good glue joint should hold it perfectly well. Glue up the mating surfaces and clamp the parts together. To avoid gaps, start clamping from the center and work outward, or from one end to the other. This allows you to work gaps out as you go.
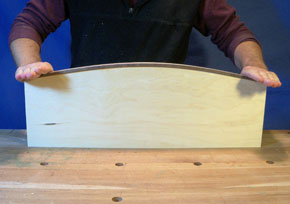
Kerf bending is the process of cutting a number of slots into a piece of material that allow it to bend. Essentially, by kerfing the part, you are making it thinner, so it can be flexed to follow a curve. While this method is not very strong, it does allow for easy forming of wide or tall parts.
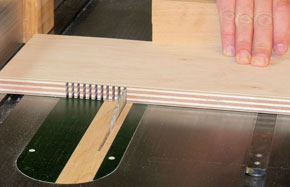

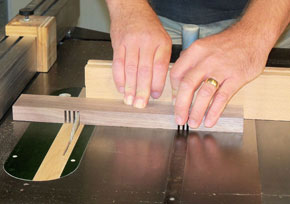
Nearly any saw can be used for kerfing. Here I used the table saw, but for very long parts, a radial arm saw is ideal. A circular saw or even a handsaw can do the job too. The trick is to cut most of the way through the material to allow it to bend, but not so much that it becomes too fragile. Keep the kerfs close together and regularly spaced so that the bend is smooth and regular with no flat spots. I have even seen small moldings that were hand kerfed with a fine saw used as trim on antique doors.

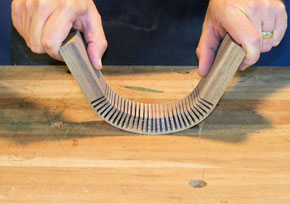
Kerfing allows for bending all sorts of thicknesses of stock, and is especially useful for bending plywood. Note here how I kerfed just the areas that were going to be curved, leaving the flat areas to be attached conventionally.
Stair builders often use this technique for the large "bullnosed" bottom stair on a fancy staircase. Getting the right depth and spacing can be a bit tricky at first, so practice your technique with some scrap material before committing to kerfing your actual parts.


If you do not want to go through the effort of kerfing your own stock, you can purchase kerfed panels that can be cut to size and wrapped around a form. This option is excellent for decorative columns and such. Rockler sells 1/4 inch thick Neatform sheets for this purpose, and large lumber suppliers typically have 4x8 sheets available of various pre-kerfed materials. Kerfed plywood or MDF faces can be painted or veneered to achieve the final look your project demands.
Practice these bending techniques to get a feel for how they work and might fit into future projects.


Keep the inspiration coming!
Subscribe to our newsletter for more woodworking tips and tricks