Bench Grinder Tips for the Woodshop

Make the most of your bench grinder with this collection of handy tips and tricks.
Some tools are underappreciated in a woodworking shop, and a bench grinder is often among them. Sure, when it comes to sharpening chisels and blades, few tools offer a faster and easier way to get a nicely honed edge, and woodworkers have relied upon a well-tuned grinder for that important task for years. Their go-to status as the first choice for sharpening is well-earned, but by thinking beyond the obvious you'll find that a bench grinder is far more useful than you might have imagined. There have been lots of great articles on grinder tips and techniques, but I've managed to round up a few you may not have seen before.
Identify Your Grinding Wheels
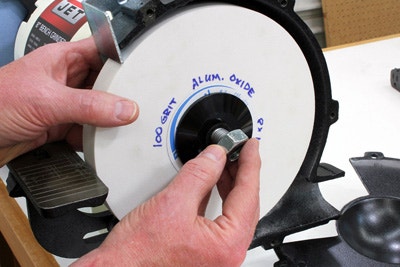
The paper label affixed to grinding discs carries important information, and the thickness of the paper helps the wheel seat more securely beneath the flange when tightened. But after a bit of use, those labels take a beating underneath that metal flange. When it comes time to swap the wheel for a different grit — or replace it with a new one — that important info on the label may no longer be legible. It's best to simply not rely on it being there later, and to mark grit and other disc data directly on the wheel with a permanent marker. As a bonus, you'll always be able to tell at a glance everything you need to know about the wheel without needing to remove the flange hiding the label.
Tool Rest Distance from the Wheel

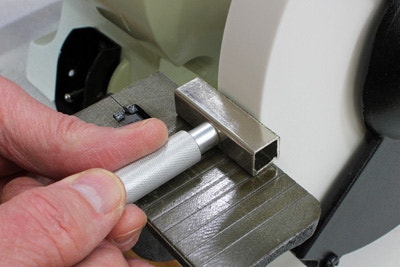
When setting the tool-rests you always want the front edges somewhere between 1/16" and 1/8" away from the disc surface. You can set this with a rule, of course, but a quick little setting jig makes the task a snap. Use a short piece of 1x2 scrap, and glue a piece of thin ply to one edge. The ply should overhang on one side just enough to catch the front edge of the tool-rest. When setting the tool-rest, just hook the jig on the front edge and move the rest in until it stops. With the distance set, lock down the tool-rest and remove the jig.
Dressing the Grinding Wheel
No matter what you use your grinder for, eventually you're going to wear down the grinding surface as the grit gradually flakes off, or "clog" the wheel with fine swarf. Sometimes, wear occurs unevenly or at an angle depending on how and what you've been grinding. No matter the issue, it's imperative that you true up the grinding surface from time to time with a tool called a dresser, which allows you to give the wheel a fresh edge in just a few moments. To use, adjust the tool-rest so it's 90 degrees to the wheel and hold the dresser flat on the rest so the business end is parallel to the wheel surface. Turn on the grinder and, keeping the dresser firmly on the tool-rest, move it across the wheel. Go easy, as the dresser may remove grit more quickly than you expect. The key is to remove only enough material to smooth the surface, and bring it back into square if needed.
Grinding a Screw to a Custom Length
Ever have a situation where the screw you want to use is just a hair too long, but switching to the next smaller size would compromise holding strength? If so, a bench grinder will come to the rescue. For a single screw, you might just hold the tip against the wheel to shave a bit off the end, but if you need to shorten several screws, try this really simple jig that not only allows repeatability, but offers a safer way to do the job.
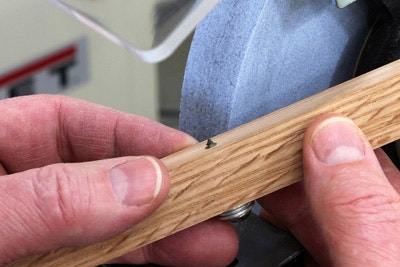
Drill a pilot hole through a scrap of hardwood with a thickness that matches the desired screw length, or simply stack up washers to adjust the depth. Now, insert the screw till it stops, and check the protruding point to be sure the correct amount is exposed. If it's too much, add another washer; not enough, remove a washer.
With the tool-rest set at 90 degrees to the wheel, turn on the grinder and work the tip of the screw back and forth over the wheel. Take your time here until you get a feel for it, and continue grinding until the screw is flush with the surface of the wood. Don't go too far, though, as you don't want to grind into the wood itself.

The wood acts as a visual guide or depth stop as you grind, and no matter how many screws you put through the process, they'll all come out the same.
Polishing with a Grinder

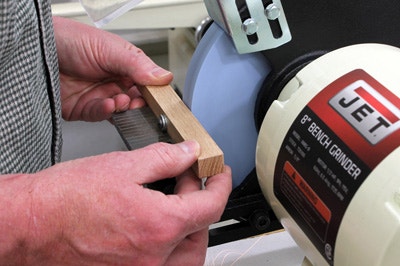
Because a variety of wheels are available, grinders aren't limited to just grinding. A buffing wheel is typically used in the sharpening process to hone a razor edge on carving tools, but when used on slow-speed grinders like the one shown here running at 1,725 rpm, they can also bring out the shine on completed projects. Just apply a bit of wax to the project and allow it to dry per label directions, and then polish the waxed finish with the buffer (Photo 7). When buffing objects in this manner, you may wish to remove the tool-rest to give a bit more access to the buffing wheel.


Keep the inspiration coming!
Subscribe to our newsletter for more woodworking tips and tricks