Bench Chisel Basics

For most of the history of woodworking, if you were going to make two of the three main woodworking joints (mortise-and-tenon and dovetail), it would have been impossible to do so without a chisel.
Even today, with the advent of power tools and specialty jigs, it is likely that most mortise-and-tenons and dovetail joints will have some chisel work involved.
(The hand plane, which facilitates making the third main woodworking joint — butt joints — is a modified chisel held in a "fixture.")

As we learn in Econ. 101, where there is great demand, supply will follow. For that reason, if you were to go on to the Internet and search for bench chisel sets, you would find literally hundreds of options. And with that many options comes the challenge of selecting a specific set. So, what makes one bench chisel different from another?
Steel is the Deal
While it may seem obvious, a chisel's performance will depend to a significant degree on how the steel is formulated and then manufactured.
Iron, the basic metal from which steel is made, is for practical purposes all the same. It is an element, after all. Steel, on the other hand, is a compound of elements that are then melted together at extreme temperatures to form an alloy. It might be helpful to think of it like baking a cake. (Take a cup of iron ore, a tablespoon of chromium and a touch of vanadium and bake at 2,000° for several hours.) As the result of hundreds of years of experience and the application of advanced chemical and metallurgical studies, the steel we have in today's best chisels is better than it has ever been.
Once the steel has been formulated, the journey to becoming a cutting edge has only begun. When the molten metal has been poured into a form, it becomes an ingot as it cools. The ingot is then rolled out into a more usable sheet of steel. Some details of the steel's structure are set at this point; if there are small holes or voids in the grain of the steel, for example, they will not go away. But other characteristics of the steel must be changed and modified to make a chisel or any other tool intended to have a cutting edge.
Forging Ahead

In the old days, a blacksmith would heat and hammer the steel into a shape, with rounds of heating and hammering until the smith was happy with the shape — and the same thing is done today, with a twist or two. The blank that will become the chisel is cut off of the rolled steel and fixed between two electrodes, and a strong electric current is run = through the blank until it is glowing red. Then a machine hammers it into a rough shape and it is plunged into oil or water to "temper" it. The hammering and tempering process actually changes the molecular structure of the steel, affecting its hardness. That hardness is one of the main factors in whether a chisel can achieve a durable sharp edge. It is, of course, a compromise: hard enough to hold a sharp edge, but not so hard as to be easily broken. The perfect chisel cutting edge would be infinitely strong, infinitely smooth and infinitely thin. In reality, each of these characteristics must be a compromise.
It's a Real Grind

After the blank is forged into its final shape, it is ground into the familiar look that we all recognize. (Before it was even forged, some choices had been made: whether the chisel would have a tang that travels through the handle or stops partway, or it could be a socket chisel, etc.) The back of the blade is flattened, its edges are beveled, and the cutting edge is ground to a cutting angle and finally sharpened. This last step, grinding the cutting edge, can be a one- or several-step process. The handle is then attached and the tool is complete.
The Basic Set
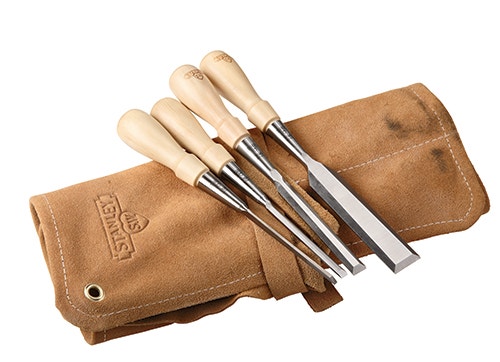
How do you determine how many and what sized chisels you should have in your shop? With the huge variety of chisels around, it may seem daunting, but it really just comes down to what you want to do with them.
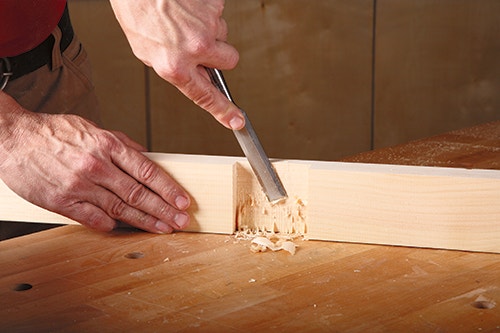
Chisels cut across wood grain accurately; they clean up wood fibers, such as in drilled-out mortises. Carving out hinge gains and cutting handmade dovetails are other tasks which require chisel work. The list goes on and on. With that said, if you are an average woodworker, or one who is just getting started, a set of four chisels, plus one, will perform 90% of the chiseling tasks in front of you. A basic set includes a 1/8", 1/4", 1/2" and a 1" chisel. The 1/8" chisel will get into saw kerfs and decorative reveals. The 1/4" tool will fit into both 1/4"- and 3/8"-wide mortises — two very common sizes used in cabinetry. The 1/2" works great for carving hinge gains, larger mortise cleanup, squaring up 3/4"-wide router made dado cuts, paring off 3/8"-diameter wooden screw workhorse.

The 1" chisel will do everything that the 1/2" does, but on a larger scale. But keep it for cutting wood fibers ... don't be tempted to do more "creative" tasks with it; that’s for the "plus one." Every shop needs a "big banger," a chisel that is used for all the things that chisels should not really be used for. Removing really hard glue globs from glue lines. Scraping paint off the floor. Opening a can of finish. Cutting through a stubborn nail, removing the burr on a piece of aluminum or opening a can of soda whose pop-top has failed.

The big banger is there to save the edges of your other tools by being the one that is sacrificed to overcome your frustration or impatience. A 1-1/4" or 1-1/2" size is a good starting point. It should have a plastic resin handle with the tang running all the way through it and a striking cap on its end. (So you can really bang on it!)

With those four chisels, plus the big banger, your basic woodworking tasks are covered. If you are going to be doing handmade dovetails or chopping mortises by hand, you will need additional chisels to do those tasks correctly.

And finally, a word to the wise. With all the chisels out there on the market, you may find some that are sold as 3/8", for example, but are actually 10mm. Is that a big thing? Likely not, but if you are buying the tools for a specific use where the 3/8" is critical, then yes. So there you have it: chop on!


Keep the inspiration coming!
Subscribe to our newsletter for more woodworking tips and tricks