How To Apply A Clear Finish To Closed Grain Hardwood
Learn how to apply a natural finish on close grained hardwood.
How to apply this finish:
1. Sand the project up through the grits until at least 220-grit. It is a good idea to sand pieces that will be hard to reach before assembly.
2. Wipe the project with mineral spirits to check for glue splotches.
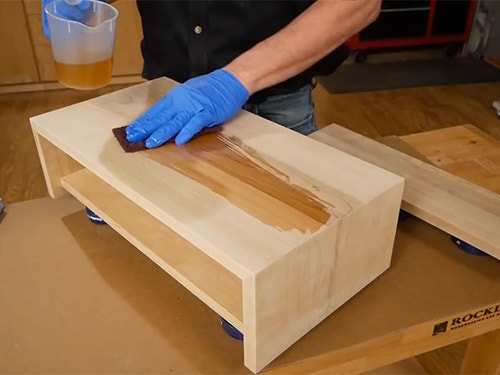
3. Use a good quality Danish Oil type finish.
a. Flood it on, let it sit and wipe it off.
b. Let towels dry flat and dispose of properly!
4. If you have any nail holes, cracks or defects in the wood, fill them now with a wood filler putty that matches the color of the oiled wood (sand smooth).
5. Apply at least two more coats of the Danish Oil.
6. Optional: After the finish has cured for 72 hours, apply a coat of high-quality paste wax and then polish it off.
7. Optional: Substitute a wipe-on gel polyurethane for the Danish Oil applied in the same manner.
Supply Checklist:
Video: How To Apply A Clear Finish To Close Grain Hardwood
Rob Johnstone: Today, I'm going to show you how to apply a wipe-on clear finish to a close-grained hardwood like this birch. You can also apply it to cherry, mahogany, maple, walnut, just not something like ash or oak. To make it easy, if it's not oak, this is a great finish. Here's an important tip, don't finish your project all assembled. Take whatever pieces off you can, like this drawer front, for example. Finishing the parts individually makes your job a lot easier. Wipe-on finishes are super easy to apply and deliver great results. The key for any finish is surface preparation, getting it properly prepared. In most cases, that means sanding. Wait, it's easier than you think. I recommend starting with 80 grit sandpaper, and working up through all the levels without skipping any of them. Next, 100 grit, 120, 150, 180, 220 and even 320. In fact, with close-grained hardwoods like birch and maple, it's my opinion that you can't sand to too fine a grit. If you want to go all the way up to 600 grit or higher, it will be all the better.
Here's a tip to make your sanding easier and much more effective, move the sander slowly across the surface, about one inch per second. Most people move the sander far too fast. Neither moving a sander faster nor skipping grits will save you time on this task. Remember, as you advanced each finer grit, your goal is simply to remove the last grit, scratches or sanding marks. There's one more step that you need to do before you can apply your wipe-on finish, and that's to look for glue spots that may have survived the sanding process. I use mineral spirits to help me find those spots. The mineral spirits finds a glue spot. Go ahead and grab your sandpaper, and starting back at 80 grit, sand the glue spot all the way through the grits. With that done, you're ready to apply the wipe-on finish. As I said, the wipe-on finish like this Watco Natural is super easy to use.
You just flood it on. I like to use a synthetic scratchy pad like this one to apply the coat. It makes it very even, it allows you to get into corners, and you can even clean it and reuse it. To apply it, you just flood on the Watco oil in a nice even coat and let it sit for 30 minutes or so. If you see an area that soaks up the finish quickly, just apply some additional product. Then, wipe off the excess with blue shop towels. Let the Watco oil cure overnight. For something freestanding like this drawer front, it's always best to coat all of the surfaces to prevent warping.
Disposing of oily rags properly is quite important. In this case, what you want to do is lay out your shop towels in a flat layer and let them dry completely. Once they're dry, they're landfill-safe. If you wad them up, they could spontaneously combust. Nobody wants that. Now, to get your first coat of finish on your project, now's the time to fill any nail holes or cracks that you might have with colored putty. Do it now because you can match the finished color much more accurately. If you can find a putty that matches the color of your wood just regularly, that's great. One advantage of this kind of putty is that you can mix different colors together so that you can match different tonal qualities in the wood that you've got. Now with the putty filled into the holes or any cracks that you might have had, you let that dry, do a really light fine sanding, and then you apply the final coat of the wipe-on finish. I recommend at least three, maybe four or more, allowing the finish to cure between each one.
Here's my final tip, once the finish has really cured, apply a coat of really high-quality paste wax, wipe it on, polish it off, it'll give you a nice soft luster, and it'll feel so great. Applying a wipe-on finish to a close-grained hardwood like this birch is the very definition of a no-fail finish. It's easy to put on, you can touch it up, it's beautiful and it's durable. If you're going to be building something out of birch or cherry or some other kind of close-grained wood like that, consider a wipe-on finish. I hope you found a couple of these tips useful. Thanks for watching.


Keep the inspiration coming!
Subscribe to our newsletter for more woodworking tips and tricks