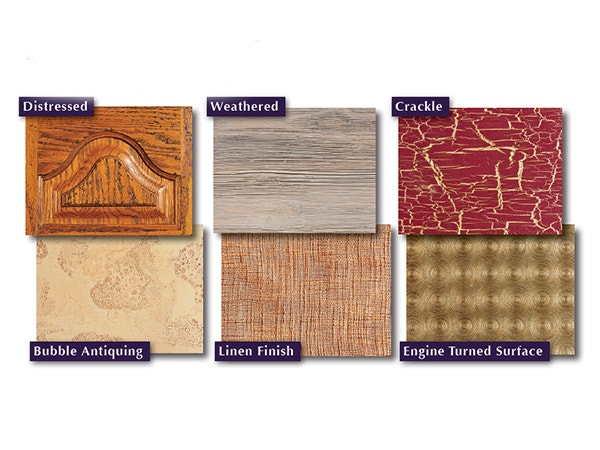
How to Add Unique Textures to Finishes
Although we typically strive to make both our wood and finish surfaces smooth, adding texture intentionally can be quite interesting.
When we do add texture, it's often to make wood or finish look old or worn, which is the case in four of the six examples discussed in this article.
Distressed Finish
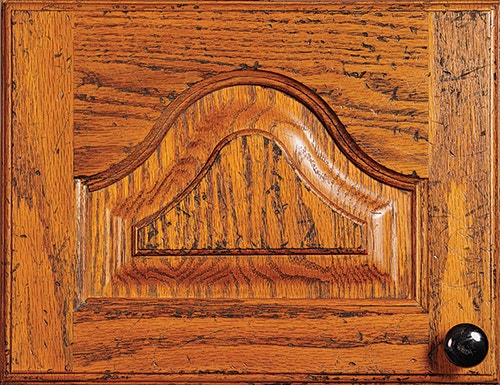
By far the most common added texture is what finishers call "distressing," which means adding dings, dents, scratches and scrapes. These color-enhanced wear marks are a quick and easy way to create "instant antiques."
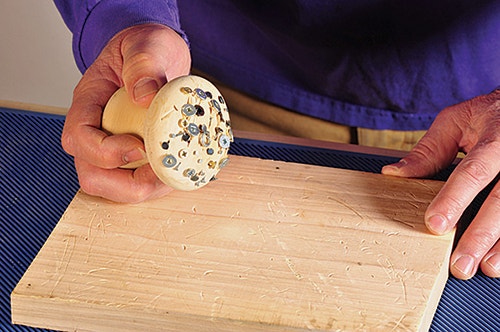
Craft a homemade distressing tool by adding a variety of nails and screws to the face of a round block or mallet. Hit, roll and scrape the business end against the wood to add dents, scratches and gouges where natural wear might occur. Add the "damage" either to raw or finished wood.
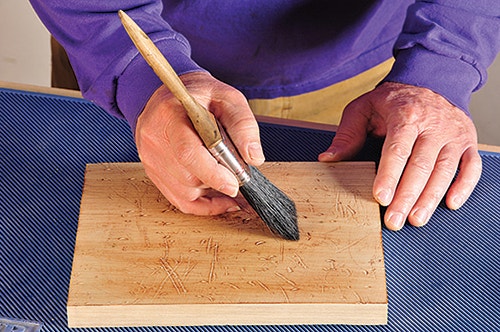
Enhance the marks by dry brushing, which works on raw wood or painted surfaces, or use a wet glaze on sealed wood by brushing on a liquid or gel pigment stain, then wiping it off the surface, leaving color only in the distressing divots. Both coloring approaches highlight the "damage" marks, but look slightly different.
Weathered or Barn Wood
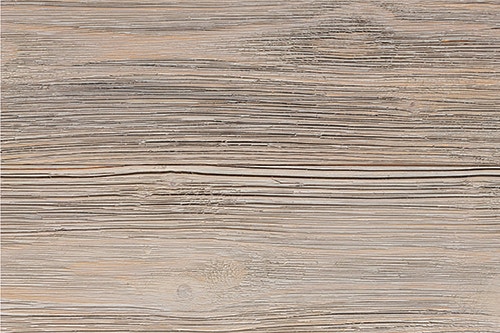
Reclaimed barn wood is a hot commodity these days. As wood weathers, it not only turns silver gray, but also tends to erode, leaving ridges and grooves in the surface. On softwoods, common for barns and fences, this washboard effect follows the softer early and harder late wood growth rings. While the technique shown here works on all wood, softwoods erode deeper and faster.
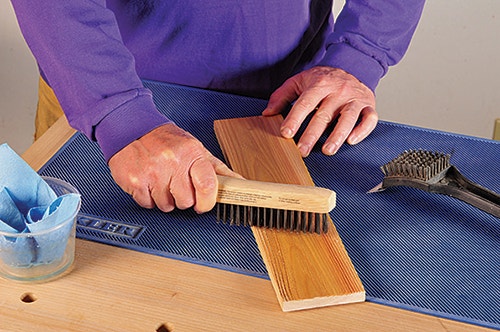
I use two different wire brushes — a stiffer one and a finer one — to create the ridge lines. Start by soaking the board liberally with water; the wire brush cuts more quickly on wet wood. Scrub along the grain using the stiff brush until you erode away as much of the early wood as you like. Once the wood dries, you will notice that the scrubbed surface is very fuzzy. Use a finer wire brush on the dry wood to remove the fuzz.
Now it's time to add color. Put some white paint into a cup and thin it about 20% or so with water to mimic the consistency of wiping stain. Now add a much smaller amount of black paint to the pan, but don't stir it. Simply drag a stir stick once or twice through it to marbleize it a bit.

Brush on the black/white wiping stain and wipe off the excess. You'll notice that because the stain was not stirred well, you end up with some grooves blacker and some lighter gray, though overall it will be a uniform silver gray when viewed from a distance. Look closely at real weathered wood and you'll see similar variation. You don't need to seal it, but if you choose to, go with a topcoat of dead flat clear finish after the paint is dry.
The first two examples had us texturing the wood itself. In the next two, we'll texture the paint instead.
Crackle

As a board with multiple layers of paint ages, the paint may crack badly enough that older coats of paint show through the cracks. To copy that, I'll use two dramatically different colors for the background and cracked topcoat.

Put on your first color of paint, the one that will show through, and let it dry. Apply a liberal, even coat of liquid hide glue over the painted surface. Let the glue dry, then paint over it with a different color of water-based latex or acrylic paint.

This top coat of paint will crackle as it dries, right before your eyes, letting the color below the glue show through. You can control the size of the crackle, at least somewhat, by how thick or thin the glue and top paint coats are. Thicker coats yield larger cracks; thinner coats result in smaller ones.
Bubble Antiquing

Bubbling mimics old finish that's been damaged by heat, and we’ll use fairly high heat to recreate it, so please use caution. Apply Zinsser® B-I-N® or latex paint to the wood surface. Before the paint dries completely, heat the area you want to bubble with a heat gun, which will both bubble the finish and dry it more quickly, though the technique will work on already dried B-I-N as well.

Once the paint is cool and dry, sand the surface lightly to turn at least some of the bubbles into craters. A weak, burnt sienna wet glaze, wiped on and wiped off, brings out the texture and leaves the surface looking like an old parchment treasure map.
Linen Finish

Though it works with all sorts of textured cloth, in the old days we called this a linen finish, perhaps because we were actually using linen. I've used drapery cloth, lace, burlap and even drywall repair tape to get a variety of surface patterns.

Glue a highly textured cloth onto wood, then coat it completely with Zinsser B-I-N, either plain or tinted. After the B-I-N dries, dry brush or wet glaze the surface. Dry brushing brings out the cloth pattern with darker lines on a white background, while wet glaze creates light patterns against a darker background. Try different colors and different cloths and come up with your own creative alternatives. When you like the result, seal it with dead flat clear finish to maintain a cloth-like appearance.
Engine Turned Surface

For this look, we're going to sand a pattern of scratches into the wood to create visual interest. Using a sanding disk mounted in a drill or drill press, create repeating circular scratch patterns in either even or staggered rows.

You can leave the wood natural, dry brush to bring out the rings, or wet glaze after sealing the wood. I painted my samples silver, added an asphaltum wet glaze on one to create a bronze look, and sprayed one with translucent red lacquer.
There they are: a few new methods to expand your creativity. Choose the ones you like, or try them all. Either way, you now have another handful of finishing techniques to add to your bag of tricks.


Keep the inspiration coming!
Subscribe to our newsletter for more woodworking tips and tricks