Video: More Than a Murphy Bed

In this video, Michael Alm creates a Murphy Bed with built-in side table, LEDs, and more.
Michael Alm's Murphy bed is practically a bedroom in a wall and uses one of Rockler's Murphy Bed Kits. This build features LED light fixtures, USB outlets, a table and more! Lots of tricks and techniques for any built-in project.
You can find more great projects and techniques from Michael Alm at his website.
Featured Tools:


Michael Alm: Hey, everyone. Michael Alm here. This week, I'm not my workshop. I'm actually at a client's house. I'm working on a built-in bedroom. This is going to be a Murphy bed but it's also going to have a bedside table and a bunch of features like LED lighting and stuff like that. I'm excited to share this build with you guys because if you've ever considered making a built-in, a lot of the same techniques are going to apply.
You can never really trust a wall to be perfectly flat and plumb, so I like to design my built-ins with basically like a false wall somewhere, something that I can build up off of that I know is perfectly plumb, flat, level, true. That's what I'm doing right here. I'm peeling away this baseboard so that I can put in some framing lumber so that I have something to rely on for the rest of the build.
I'm just using some regular framing lumber on this and you can see my laser level is a super handy tool to have. You can always just use a standard level to do this sort of stuff. Then I'm setting up this wall so that it's nice and parallel to the bookcase on the right-hand side. I'm referencing everything off of that bookcase. Now I'm building a soffit. I designed this soffit basically to bring the height down so that the bed kit would fit properly. It also allows me to run electrical inside of the ceiling.
This is a handy trick if you don't know it. If you don't have an extra set of hands on a job site, you can just cut a two-by-four to the correct height and it can hold things up to the ceiling for you. Once the soffit was in place, I could remove it and I noticed that one of the sides was twisted a bit so I just took a piece of scrap wood and used it as a lever arm and then twisted it back so it was nice and plump.
When I came back to the job site the second day, I realized that that two by four was too thick. I needed to reduce it because I'm going to be putting a piece of MDF over the surface of it so that I can have a paintable surface there. It was a super easy fix. I just replaced the two-by-four with a one-by-four and I could keep going with the framing. I added this cleat to the back, which basically just gives me something to nail the ceiling onto.
Again, I checked it for Level, secure one screw in the center and then level it out and then secure multiple screws from there. Then I also wanted to make sure that the back and the front were coplanar and they weren't. There was a little dip in the center. I was able to screw up into the ceiling studs and bring that section up just a little bit. Then I could use my big level to make sure it was nice and flat.
With the soffit leveled out, I could start framing up the right-hand wall. This is a really shallow wall. I just needed enough space for an electrical wire to be hidden inside. I also added a piece of 3/4 inch plywood at the bottom. This is because the bed hardware sits right up against this wall and I wanted to make sure it was nice and strong. Now you can see that MDF piece which is going to get painted. This is why I changed out that board. Then I'm just building a little bit of structure so that I have something to nail the ceiling into.
Since this is a ceiling and it's going to be above people's heads, I decided that I would just screw those in as well. They probably would have been fine with the nails, but this just makes sure that they're extra secure.
The next day, my buddy Josh came over to help with the electrical. I'm not an electrician, but Josh is and he actually runs a lighting design company. He talked me through all the steps that I needed to know in order to run the electrical, and he helped me out throughout the whole build. One of the things that he told me was that I don't need to break into these walls. Basically, what we're going to do is we're going to make a little false wall that hides all the electrical and the drivers that control the LEDs.
Now that we had a plan, we could actually start organizing wires and figuring out where the power was going to come from. The main source of power is going to be this outlet right here and Josh put an extension on it so that we can lock it in underneath the bedside table. We didn't need this second outlet. This is going to be behind a plywood panel. What I did was I cut out the drywall around it just enough to get this cover plate to sit nice and flush to the surface of the wall.
With Josh's instruction, I was able to plan out all the wiring. These are low-voltage wires because they're only controlling LEDs. This one's going to go to a bedside table lamp that isn't made yet. It's not actually going to be included in this build but we just buried that wire in the wall for later use. The rest of the electrical is going to sit above the bedside table. I'm just putting in a little block here so that I can have a place to anchor a three-gang box. I need to switch for the headboard light, a switch for the soffit light and a place to put an outlet.
I put in this little spacer block to make sure that the three-gang box was nice and centered and then I could secure the three-gang box with some screws. I had to trim out some sections using my multi-tool to just get some areas where the cords can go. This one's going to light up the headboard and this wire is for the soffit light. I notched out this lower section so I could collect all those wires back to that original main source of the power and again secured all the wires with staples.
With all the low voltage secured, now I can bring up the Romex which brings power to the switches. Whenever I work on a job site, I try and pre-cut as much material as possible. In this case, I measured out all of the panels that I needed to cover that space and cut them in my shop just because it's way easier to maneuver in there and it's definitely way easier to throw them in the back of old gold.
With that said, I don't usually like to cut the panels perfectly to size because I like to scribe the back wall. Again, that wall is not super flat so I use a scribe, draw line, and then trim it to fit. The other thing that I like to do is I leave the front long so I can trim that flat at the very end. It can actually take a couple of tries with the scribing. With that frontage trimmed, I can be pretty confident that it's going to be perfectly flush every single time.
Then the other panel which was a little bit more complicated because I had to cut open a space for the electrical box, but it's not too bad. You just measure off of the floor, off of the walls, and make sure that it's nice and tight. I also needed to cut out a relief notch for the electrical. That one's for the soffit and this one's for the headboard and then I could secure it into place.
The next panel to go in was the ceiling panel. In order to get this really nice and tight, I again scribe to the back edge, but it was so wobbly that I had to use a jigsaw for it. One of the things that I like to do with the jigsaw is tilt it back because jigsaws never really cut straight and I'd rather cut away excess material on the side that's not seen than have that stick out and cause an unwanted gap.
With that in the right spot, I traced out the spots where I had structure and then just applied a bunch of glue to that. Again, it's a ceiling so I want to make sure that it doesn't fall. I ended up gluing it on and putting a few nails in it to make sure it was nice and flush. All of the surfaces outside of this built-in are going to be painted and for that I like to use MDF. MDF stands for Medium Density Fiberboard. It is basically a whole bunch of sawdust that's been glued together.
It doesn't have any structure but it's great for painting on. I secured those. You can see I glued that edge that meets up with the walnut ply because I wanted that to be nice and tight. I didn't have the space to put wood filler in, so I just wanted to make sure that I got a really nice tight joint there. The next element to build is the floor. I'm using my improvised workshop out here in this beautiful back patio from my client's house. This was my setup and I'm not complaining.
The floor is made up of a series of strips that are just scraps that I had leftover from cutting the walnut panels. All I'm doing is gluing and nailing these pieces in. This isn't going to take a lot of weight. It's really just the base for the bedside table. The bed doesn't actually secure to this at all, so nobody's ever going to stand on it. It's just a really basic structure that essentially is just a toe kick.
With the frame built, I could nail it to the sidewalls, and I just used a little three-quarter-inch spacer because I'm going to have a strip of walnut that goes across the front of it, and that's three-quarters of an inch. I did add liquid nails underneath certain sections of it because there's a little bit of a dip in the floor, and I didn't want this thing to squeak at all if anyone did actually end up stepping on it. I glued down the surface panel. This is actually what's going to get finish applied to it, and then I can add that solid piece of walnut as the toe kick.
The last little bit of walnut plywood that I needed to cover up the end grain of is up here. It's set back because it's where the bed rests up against. I just added a little quarter-inch piece of walnut there. After that, I could use my Mirka sander to clean up all the edges and make sure that everything is nice and flush. It made short work of it, and then I could start applying finish.
I wanted to get to this pretty early because I knew I wanted at least four, maybe five coats on this thing. Every time I was on the job site, I would just apply another coat at the end of the day, gradually building it up. I was also working on the bedside table while I was building up this finish. It's an order of operations thing. You can see this is the first coat and it looks splotchy, and it'll get better and better.
While that finish was being applied, I was also working in my shop. I built the bedside table, which is its own video. If you haven't seen that yet, that is already on my channel. This is the headboard that I'm working on that matches up to that bedside table. The main little design feature that I was adding in was this sapwood inlay. This is also walnut, it's walnut sapwood and I'm lining it upright with the sapwood inlay that I put on the bedside table.
I trimmed out that top edge with another piece of sapwood, and I was able to use my Rockler bandy clamps to hold into place. With my palm sander. I sanded everything nice and flush. Then I was ready to cut out for the bedside table. I made sure that the bedside table was nicely aligned with that new inlay. This was definitely a nerve-wracking cut because if it's off by even a 32nd of an inch, you're going to notice it. I took my time. I labeled everything. I have a tendency to just cut right through parts if I don't label them because of muscle memory. I made sure and put that blue tape on, which helped a lot. Then I cut the back of it at a 15-degree angle. This was actually specified by the manufacturer of the Murphy bed hardware.
If you guys remember and you've seen that side table build, I made a little void in the back. That's because I discovered that even though I put a lot of effort into trying to make those walls co-plainer, they were not perfect. I had to trim out the side of this cabinet. It was [chuckles] a little bit of brute force just to get this done. I had to use the tools I had on the job site. I didn't really think this through very well, but I managed to get through it with a couple of old chisels that I usually just use as pry bars. It worked.
In order to secure the bedside table to the floor, I decided to use dominoes. You could use dowels if you have dowel jigs. Domino is just such a quick way to do this kind of work and super strong. If you haven't heard of domino, it's basically a floating tendon that you can put in pretty much anywhere. You draw a line and you put these little dominoes into the hole and it lines everything up super nicely.
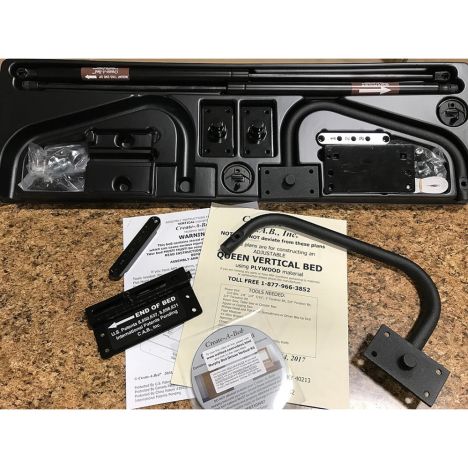
The next element to install was this back panel, and this again is the reason why I had to cover up that outlet. And then with that in place, I could add in the Murphy bed hardware. This is a kit that comes from murphybeds.com. You guys may have seen the other Murphy bed video that I put out, and that one I installed the Rockler hardware kit. I've had good experience with the Rockler hardware kit.
The reason I didn't use the Rockler one on this one is because it wasn't going to actually fit with the bedside table that I had designed. The piston was actually going to sit above it. This is a spring-actuated system as opposed to the Rockler one which is air piston. My experience with this, the Murphy bed system is generally pretty good. I think the instruction manual's really cryptic and hard to get through. When it comes to the mechanism, it worked great. The next day Josh came back to help me install the lighting. He's working on the headboard light. This is going to go behind headboard and uplight that wall.
Again, it's very nice to have an electrician on site to problem-solve things. I'm not an electrician and I like to have someone who has a little bit more experience with it on the site to make sure that everything's nice and safe. We secured that cleat into the studs and tested it out, and it worked great. Now it was time to secure the headboard. These are just some little cleats that I made. It was really hard to figure out a way to-- You couldn't get screws in behind there. I didn't want hardware on the surface, so I just made these little blocks and added dominoes into the headboard and the blocks themselves.
This was a quick little jig so that I had something to hold the part. I just nailed it off to my sawhorse. With those made, I could screw them into the bedside table and the right-side wall. I also added a little nailer onto the left-hand side wall to make sure that that left side of the headboard wasn't floating in space. I could then tap in the dominoes into the cleat and slide the headboard into place. Took a little bit of maneuvering to get it all to lock in, but once it was locked in, it was really nice and strong. One thing I did notice was that the center of the headboard was kind of wobbly. I made this wedge piece that I just glued against the backside of the headboard.
Back in my workshop, I started making the panels that are going to go on the outside of this Murphy bed. I want the whole outside to be painted. I'm using this material called armor core. It's MDF on the face and plywood on the inside. I edge banded that with some popular edge banding, and then I could sand it flush and get it ready for veneering. I'm going to be veneering just one of these panels. It's going to be the door that covers up the bedside table.
I haven't done a lot of veneering, but I watched a couple of videos by John Peters. He's got a bunch of videos on how to veneer. I'll put links down below. The basics of it are you just add contact cement to both the surface of the plywood as well as the surface of the veneer. Once you have both surfaces completely covered in the contact cement and they're nice and dry, you can bring them together. I use these strips just to keep the contact cement off of both panels while I'm aligning it. This stuff as soon as it sticks, it is stuck. It's not coming back up. You got to be really careful with it. Take your time and get it aligned really, really nicely.
You want to apply a good bit of pressure as you're going and make sure that you're not getting any air bubbles underneath the surface. After that, you come back with a board and burnish it out, make sure that there's absolutely no place where it hasn't come into contact. Then you can flip it over and trim off the excess. I just use a razor knife for this with a nice, sharp new blade in it.
After that, I sand the edge down, make sure that there's nothing that's overhanging, and then I can start applying finish. Other than this door panel, I need two more panels that I cut out and primed. These will make up the bed panels, the actual panel that the bed goes on.
Back at the job site, I took those bed panels and dominoed the sides of them so I could bring them together. In the instructions they'd have you keep these two apart, but my client requested it to be one panel. In order to do that, I think it's something like 60 inches wide. A four-by-eight sheet is not wide enough to make it up. I ended up gluing it together. This went pretty well. Fortunately, the structure of the bed hardware actually pulls it into square, so I didn't have to worry too much about it. I also left them long so that once they're glued up, I could cut them down to length.
With the panel all glued up, I could lay out the hardware for the kit. The kit comes with some super strong rails that managed to pull that plywood nice and flat, and a ton of screws that you screw in along the whole length of it. It also comes with corner brackets that hold the corners nice and tight. The kit also comes with this aluminum stiffener that'll pull any belly or sag out of the middle of the panel.
With the bed panel complete, we are ready to set up to install it and in order to do that, you pull back the tension arm and it has this little lock that holds the arm in place, and then you're ready to go so we brought in the panel. Definitely needed an extra set of hands for this so thank you, Josh. You lift it up and it has a little catch there which you later add a couple of bolts to and that's pretty much it. It's pretty easy to install.
I sanded up that glue seam that was formed from the glue-up, and then I was able to prep the door. I used this little jig from Kreg. It's a really convenient jig that I wish I had a long time ago. It's made for European-style hinges and makes it super simple.
The number one question that I got when I was building this bedside table was why I need that cutout in there and this is why it was made for the inside hinges because the door frame actually sits on the inside of that bedside table.
The next little detail is to add in the soffit light cover. This was just made out of a couple of pieces of wood, walnut in the front and it's set at just like a 15-degree angle. This just gives a little bit of shielding so if you were to look up at the light, you don't see the actual light fixture itself. With that installed, I was able to start prepping for paint. When it comes to something like this, I don't take any risks. It seems like if I ever leave anything exposed, paint gets on it, so I covered every single surface of this. Took my time with the edges of stuff and made sure that everything was nice and burnished so paint would not get underneath it. I also caulked all the joints where the wall met the face of the built-in.
I started off with a primer and primed all of the exposed MDF and then went over the top of that with three coats of wall paint. Fortunately, the client had the original paint from the rest of the room, so it was easy to match. Now it's just down to the final touches. I reinstalled the door and added a door pull and added in the foot hardware for the Murphy bed. With that, it was all done.


Keep the inspiration coming!
Subscribe to our newsletter for more woodworking tips and tricks