Video: Building a High Chair

In this video, Chris Salomone designs and builds a prototype of a high chair for his son.
Chris Salomone knows that you may not need a high chair, but everything he's doing here is pretty applicable to a regular chair. Milling wood, template routing, cutting joinery, cutting a seat dish, and lots of other woodworking goodness
You can find more great projects and techniques from Chris Salomone at his website.
Featured Tools:


Chris Salomone: Today, we're going to build this highchair prototype perfect for a baby or an adult, but mostly a baby on Foureyes.
All right. Even though I'm calling this chair prototype, I'm going to build it out of Walnut for a couple of reasons. One, it's kind of tricky to get to a store at the moment, so the risk-reward ratio isn't really in my favor, and two, it's really not that much wood. The price difference between Walnut and the cheapest wood isn't enough to make me really care. All that said, regardless of which species of wood I'm using, the first step is breaking my boards down into a few more manageable-sized chunks and milling all of the pieces down to their proper thickni.
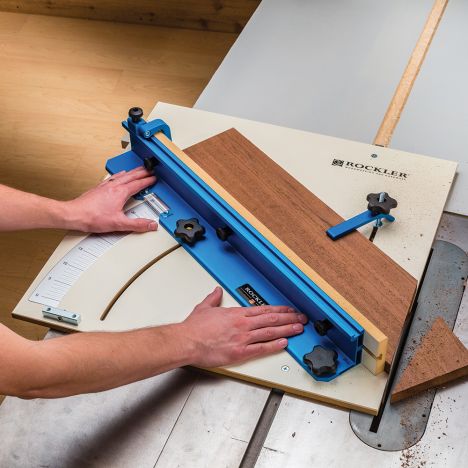
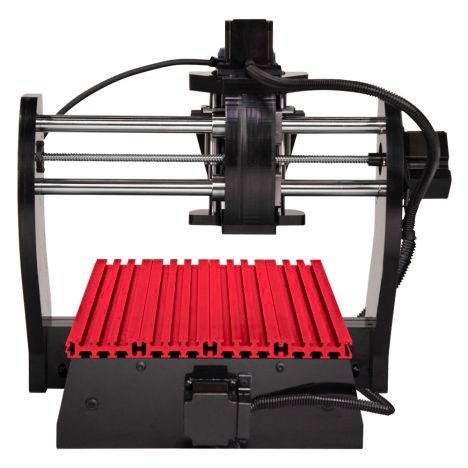
Next, I'm going to set those aside for a minute and grab a piece of half-inch plywood to start making myself a few templates. In this drawing here, you can see the pieces that I want to make, and those are the front leg, back leg, and then another of the entire shape. I can do this by transferring my dimensions from my model to my sheet, or by printing a full-size copy to trace, and then, either way, cutting them out with a bandsaw and refining with some sanders and rasps. Actually, if you want to see a detailed video on how I do that, I'll link one below. By far, the easiest way for me to get this done is with my X-Carve by exporting my model as an SVG directly into Easel, throwing a sheet on the X-Carve, and just letting it do its thing.
With my template in hand, no matter how I made them, I'm going to start off by ripping four pieces of Walnut to just a little bit wider than they need to be in the end, and these are going to become my four legs. Then I'm going to grab a piece of plywood that I can use as a temporary sled to cut the four mating faces of my legs and to better envision what faces those are, it's these ones.
Next, I need to make a 90° crosscut on the piece that will become my midway stretcher on the leg assembly. For now, I'm not worried about the size at all. I'm just making sure it's oversized and then we can cut in a few dominoes and do our first of two glue-ups.
After about 45 minutes, these were dry enough that I could take them out of the clamps and get to work on attaching my top piece, which I could do exactly the same but since I often it questions about how people can do the same thing without a domino, I'm going to go ahead and use this Rockler doweling jig for these joints. Honestly, it's basically the exact same process. It just takes a little bit longer, definitely more budget-friendly though.
Okay. Let's set the leg aside for a bit and get to work on the other components of the chair, which include a backrest, seat bottom, front, footrest, and back stretcher thing, all technical names. Again, we'll start off by cutting our pieces into chunks and milling them down to their finished thickni which is plural for thickness, fact-checking.
Okay. While the seat bottom dries, let's grab our leg assemblies again and finalize their shapes. We'll start off on the bandsaw by removing the bulk of the material, just staying a little bit proud of our lines. Then we can use a combination of our handheld router and the router table to flush-trim everything. Once the first one is finished, I like to use that as my template to make my second one, just in case there's any discrepancies between my actual piece and my plywood template, both of my actual pieces should be identical, and being the same is more important than being accurate.
To trim my legs to their final length, I like to use a track saw or in this case, my Kreg ACS. Here, you can see that I'm using my template to set up a fence so that I could cut both the legs exactly the same.
Okay. Now, I've never made a seat dish before, and honestly, a high chair is probably the last place that you need one, but I think that they look cool and I thought it'd be fun to try something new that I can use later so I decided to make two. For one, I'm going to see if I can do the bulk of the carving on the CNC, and for the other, I'm going to do it by hand. For the CNC version, I modeled it in SketchUp and then Shaun imported that into Fusion 360 where he set to a path and we exported the G code into Easel to do the carving.
For the handmade version, I started off by tracing out some guidelines and then drilling a series of holes at varying depths as a sort of yardstick to ensure that I was carving deep enough and not too deep in different areas. Then I took it outside and used an angle grinder to get rid of the bulk of the material. I would say that this went okay, definitely not bad for a first try, but when I do it again, I'm going to be conservative with the angle grinder and err on the side of spending a little bit more time removing the last bit of material with some really aggressive random orbit sander.
I honestly felt like I had more control sanding and could just tone the shape a lot better. Unfortunately, I didn't film it other than this shot where you can see me sanding the CNC version using 220 grit to make it smooth but basically leaving the shape. Then here you can see the end result of the hand-carved version. I'd say it came out decent. Definitely good enough that I know that I can do it with a little bit more practice.
Okay. Now, there's one thing to talk about that's notably missing from the chair at this point and that's the little strap thing that goes from the front bar to the underside of the seat and in-between the kid's legs so that they can't slide out. Long story short, I ordered some strap a few weeks ago hoping that it would get here in time for the video but with stores being mostly closed at the moment and so forth, it didn't make it.
That said, my plan was to sew a loop into it before assembly. That way, I could slip it on and then assemble and I would just have to pre-finish the parts that it touches. Obviously, it's too late to do that now but I've got a lot of good tips from people over on Instagram about some different routes that I can go. The bottom line is, it shouldn't be a problem.


Keep the inspiration coming!
Subscribe to our newsletter for more woodworking tips and tricks