Simple Custom Picture Frames
Creating custom picture frames for friends and family is a great gift giving project that's sure to please even those difficult to shop for gift recipients.
Everyone has a special photo or keepsake they've meant to have framed. Making a custom frame to match may be the best gift of the season. Best of all, it's a quick and simple project to complete with the right tools and set up.
Choosing Stock
First, you'll want to choose your stock. Picture frames don't require a lot so your scrap pile can often yield a treasure of possibility. Carefully match the color of your lumber to the artwork or photograph, and mat. It's the mark of a meticulous craftsperson and it's sure to impress. If your scrap pile doesn't cooperate, there are dozens of wood stock types available in all colors and textures. Tip: If you're really in a hurry, you can use ready-to-cut picture frame moldings.
Ripping to Width
Now rip your stock to width. Use 3/4" lumber (you can go thicker but it's not a good idea to go any thinner), and rip it at least 1-1/2" wide because anything less will look pale and weak--like you skimped. And you wouldn't want to leave a bad Yuletide impression. Using a good table saw and fence, rip enough length to account for the full dimensions of your finished frame, leaving an inch or so extra at the ends for good measure.
Rabbet the Backside

Cut a rabbet in the backside of your lengths to accommodate the artwork, matting, and backer board that will be installed in the finished frame. It helps to envision the thickness of the stock in thirds, which is why 3/4" stock works so well. The rabbet should be no shallower than 1/2" and should remove no more than 2/3rds off the thickness so that there is at least a 1/4" left to profile an edge on the front side. (See Illustration 1.) A 1/2" rabbet or straight route bit will typically take a 3/8" width of cut. This is a good dimension that will create a 1/2" by 3/8" rabbet in the backside of your frame. Although your table saw can be used to cut this rabbet, a router table may be a safer alternative. Chuck a 1/2" bit in your router table and rout the backside of your frame members.
The Front, Inside Edge
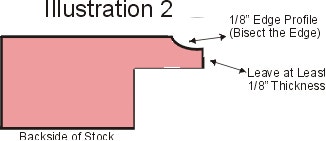
Choose the style of molding profile you want along the front, inside edge of your frame. Since there is only 1/4" of stock thickness left along this edge, you'll want to keep this profile within a 1/8" tolerance to leave a strong enough edge within which to hold the frame's contents. Leaving anything less will create a raggedy looking edge or none at all. The profile you choose here should remove no more than half the wood fiber from this inside edge, so it's important to choose the proper type of router bit. Bisecting the edge with, say a 1/4' bit will leave just the right amount of stock and create an attractively dimensioned inside border for your frame. (See Illustration 2.) A cove bit or classic bit, for example, would do nicely. In working with narrow widths, always use feather boards on your router table. It saves fingers.
Front, Outside Edge

For aesthetics and eye appeal, a different edge profile works best along the front, outside edge of your frame. If you've used a bead on the inside edge, a Roman Ogee, Classic Roman, or Ogee Fillet would look nice on this outside edge. Taking away no more than half the wood fiber is a good rule for sake of both appearance and strength. (See Illustration 3.) Tip: this edge can be profiled after glue-up, which sometimes results in better looking corners.
The Back, Outside Edge
As an option, you may want to also profile the back outside edge of your frame. To maintain structural integrity and good appearance, don't remove more than half the remaining amount of stock from this edge should you choose this option.
Miter Cut To Dimension
Once the frame members have been profiled to your liking, you can move on to cutting your miters. Use this handy formula to get the total length of each side: [Length of Mat] - [width of rabbet]x2 + [width of frame]x2
Miters can be cut with a power miter saw, manually with a hand miter saw, or at your table saw with a miter gauge or miter jig set to a 45° angle (for square or rectangular frames).
Trimming to Fit
Dry fit your frame. If the frame members are cut well, they'll fit. If not, a little trimming is in order. Don't be tempted to trim cut your mitered edges, it could end up in disaster. Instead, lightly sand them to fit with a stationary disk sander or use a miter trimming tool. This will give you more control over stock removal.
Gluing Up
Glue up your frame using a good frame clamp of your choice. Instead of standard yellow glue, a good epoxy is best in this situation. It holds firmly against the end grain of the frame members. Let the glue-up set until the epoxy cures.
A Decorative Option
As another option, you may want to spline the corners of your frame. This is a decorative approach to frame joinery that will be highly appreciated by your gift-giving recipient. The use of a contrasting wood for corner splines--a dark wood such as walnut or mahogany--can further accentuate this attractive element. A router table or table saw with a tenoning jig can be used to cut accommodating slots for your splines along the outer edge of each corner. A 1/8" slot works well and leaves enough room on either side for a balanced look. Most table saw blades cut a kerf of about this size. Always cut the slots for your splines after you've profiled the edges with your router, otherwise you risk routing into your beautiful corner splines when you profile the edges.
Finishing Up
There are many good finishing alternatives for picture frames (which will not normally need to endure a great deal of wear or stress). A good-quality oil finish will achieve a nice luster, but wax or polyurethane will also do nicely.
Wrapping Up
Now that your beautiful, hand crafted frame is complete you may have trouble giving it away. If so, you'll need to make another. But before you wrap it for Christmas, make sure to brand your signature on it with your "hand crafted by" branding iron because you'll be creating a high-quality family heirloom that will be cherished for generations.


Keep the inspiration coming!
Subscribe to our newsletter for more woodworking tips and tricks