Improve Your Workshop's Dust Control & Collection System
Even if you can't develop an intricate dust collection system like this, there are many simple ways to improve your dust collector's output. Whether it’s a broom and dustpan or a state-of-the-art central collection system, every woodworker I know has some kind of strategy for dealing with wood waste in the shop. Of course, some of these methods produce better results than others in terms of fire safety, cleanliness and respiratory health. We all know that keeping a shop’s floors, benches and machines clean of sawdust creates a safer environment that’s more pleasant to work in. And even the least health-conscious among us knows that reducing the amount of fine wood powder that floats around the shop and gets into your nose and lungs is imperative for long term personal health.
But regardless of the kind of dust control or collection equipment you have in your shop, sawdust can still become a problem unless you learn to use your equipment effectively. Although the steps for setting up a full collection system are well beyond the scope of this article (see my book, Woodshop Dust Control), I will present numerous strategies that will help you get the most out of various dust-busting devices, including air filters, shop vacuums, portable collectors and central dust-collection systems. You’ll find tips for setting up small collection systems as well as tweaks for improving collection in larger central systems. I’ll also suggest some ways to upgrade your shop’s overall dust control.
Filtering Fine Dust from Shop Air
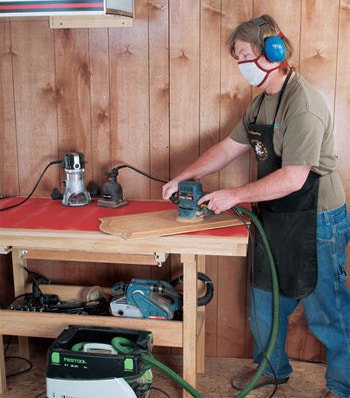
Collecting dust from portable power tools For portable power tools, try to locate your work surface near the intake side of an air filtration device. Many woodworkers install an air filtration device (AFD) in order to reduce airborne fine dust in their shops. This is a step up from blowing dusty air out of doors with a fan, as an AFD doesn’t exhaust heated or air-conditioned air along with the dust. Although they’re no substitute for “primary collection” devices that capture sawdust as it’s created (shop vacuums, downdraft sanding tables and dust collectors), AFDs are still important tools for ridding the air of fine floating wood powder that’s evaded collection.
An AFD not only makes your shop air healthier to breathe, but also reduces the amount of fine dust that settles all over the shop and needs cleanup. For air filtration to work effectively, an AFD must be installed and used properly. AFDs don’t have much suction power to draw fine dust into their filters, so it’s important to mount an AFD so that the clean air blown from its exhaust creates air circulation around the shop.
The drawing below shows that the ideal place to hang an AFD is one third of the way along your shop’s longest wall, with its intake oriented to the closer short wall. Because fine wood powder can float around in the shop air for hours, you must run an AFD for at least a couple of hours after you’re done making sawdust.
If a single AFD doesn’t seem to be doing the trick (fine dust still settles all over everything), there are a couple of ways you can improve filtration performance. First, try mounting a box or circulation fan on the shop’s opposite wall, oriented as shown in the drawing. When run on low speed, this fan encourages the circular airflow that moves dusty air towards the AFD. Another way to get better results from a single AFD is to locate your power tool bench and/or sanding area close to the AFD’s intake side, so that fine dust doesn’t have to travel far before being drawn into the filters.
Remember to clean and/or change your AFD’s filter regularly. If air filtration still isn’t up to snuff — no pun intended — then the best solution (after doing all you can to improve your primary collection system) is to mount a second AFD on the wall opposite the first one, as shown in the drawing. The exhaust air from each AFD helps feed dust towards the other.
Upgrade: Downdraft Sanding Tables
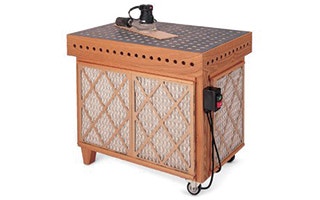
Sanding on downdraft sanding table One easy and useful way of reducing dust production in your workshop is sanding on top of a downdraft sanding table. If you do a LOT of sanding, especially on materials that produce toxic or irritating dusts (glued laminates, synthetic finishes, exotic woods, etc.), even the best AFD isn’t going to keep your shop air very clean and healthy. A downdraft sanding table is a primary collection device that can do a surprisingly good job of capturing fine dusts before they become airborne. The device is basically a large, flat box or cabinet with a perforated surface on which you do your sanding. Dust is sucked down and away from you (it’s still a good idea to wear a mask during heavy sanding). Freestanding models have their own built-in fan and filters; benchtop units, like the Delta AP075, connect to a shop vacuum or collection system.
Dust Collection With a Shop Vacuum
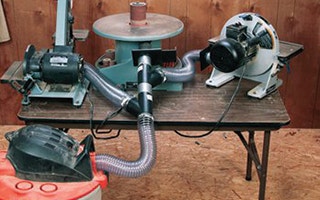
Benchtop dust collection system A single shop vacuum can serve as a dust collector for multiple benchtop tools at once. If you have a small woodshop, there’s a good chance that you use your shop vacuum for more than just shop cleanup (which is, by the way, much better for your respiratory health than blowing fine dust off benches and machines with compressed air). Modern shop vacuums have adequate power for collecting chips and dust from both portable power tools and small benchtop machines. The majority of modern woodworking power tools have built-in dust ports that are ready to connect to a shop vacuum’s flexible hose. Other tools, including routers, angle grinders, etc., may be fitted with optional hoods that allow vacuum hose attachment.
Portable power sanders — belt, random-orbit sanders, etc. — are real dust-spewing hogs that can only be tamed by connection to a shop vacuum, even if you work atop a downdraft sanding table. Shop vacuums with smaller diameter hoses are best for portable tools, while models sporting larger diameter (1-1⁄2" to 2-1⁄2") hoses are better for benchtop machines that produce larger chips and shavings, such as portable table saws and thickness planers. If you’re tired of swapping hoses between benchtop machines, you can connect several machines to the same vac by setting up a small hose network. All it takes is some flexible 2-1⁄2" hose and a handful of plastic pipe fittings. To assure that you’ll get good suction at each tool, it’s best to keep all the machines in close proximity to each other and to the shop vacuum. For example, three of my benchtop sanders shown in the photo above are mounted to a worktable with the shop vacuum set nearby. Y-connectors join short lengths of hose coming from each machine to the main hose that goes to the vacuum. Plastic air gates (aka blast gates) attached at the port of each machine allow you to concentrate more suction at a particular machine if necessary. Not having to disconnect and reconnect the hose each time you change between machines is really convenient, especially if you’re working between several machines at a time.
Upgrade: Add a Preseparator
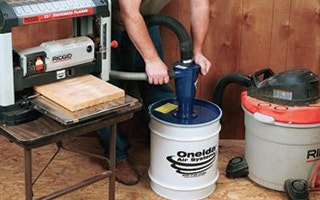
Oneida dust deputy preseperator system A preseperator will help prevent your dust collector from clogging with large chips. A big shop vacuum may have the power to suck away large chips a portable thickness planer (up to, say, 13" wide) produces. But you can’t plane many boards without having to empty the vac’s smallish-size drum. An easy way to increase the unit’s capacity is to install a preseparation unit ahead of the vacuum. Oneida’s “Dust Deputy” is a mini cyclone (like the ones found on full-sized industrial style dust collectors) mounted on top of a sealed drum. You simply connect a hose from the machine or power tool to the cyclone’s side inlet and the vacuum’s hose to the top exhaust port. The cyclone strains about 99 percent of dust and chips out and deposits them in the drum. This not only adds sawdust holding capacity to your shop vacuum, but it also prevents the vacuum’s filters from being clogged by fine dust. This allows top vacuum performance even when the Dust Deputy’s drum is very full.
Central Dust Collection
Primary collection via a dust collector and ductwork system servicing full-sized machines is by far the best step towards taming sawdust in any woodshop. But properly setting up an effective system can be a daunting — and difficult — endeavor. Most small-shop systems that are designed and installed by woodworkers (not dust collection experts) often fall short of their optimal performance. Luckily, you can usually improve a collection system by altering or upgrading either the machine layout or hood setup, the ductwork system or the collector itself.
Change Your Machine Setup
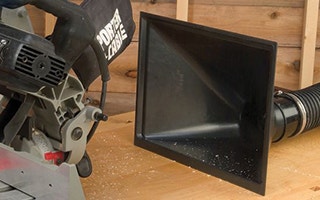

Dust hood collecting from miter saw An auxilliary dust hood can help capture the large chips and dust thrown off by large machinery like this miter saw. If your central system is already performing pretty well, with collection that’s sub par at only a few machines, here are some tricks to try. Move big machines closer to the collector: Large chips and shavings collected from big thickness planers, shapers and wood lathes are the most difficult to capture and transport through ductwork. A relatively easy way to improve collection is to move the machine closer to the collector and connect it with a shorter branch duct, so chips don’t have as far to travel. If the machine can’t be moved, another solution is to disconnect it from the central system and use a small, separate collector or, if the machine is a benchtop unit, even a big shop vacuum located close by to collect the sawdust. Make sure there’s enough air passing through the machine and into the ductwork:
A common “rookie error” is to seal up every opening on a cabinet-style table saw to try and concentrate suction and improve dust collection. But before dust can be captured and transported through ductwork with good air flow, air has to pass through the machine’s hood or enclosed base and into the ductwork. In some cases, adding holes or slots on a hood or enclosure will increase airflow and can actually improve collection. Add a second dust hood to the machine: The single hood or dust port found on shapers and router tables, table saws, compound miter saws, stationary belt sanders, etc., may be adequate for capturing sawdust if the ductwork’s airflow is optimal. But to catch chips thrown with great force by the machine’s blade, cutter or belt, try fitting the machine with a second collection hood. For example, the compound miter saw shown in the photo, previous page, is fitted with a plastic auxiliary hood mounted directly behind the blade guard. The hoses from the hood and saw’s guard-mounted dust port are both connected to the same branch duct, via a Y-fitting. You can add an auxiliary dust hood to a shaper or router table by simply clamping the hood to the machine table. Orient it so that chips are thrown directly into the hood’s open maw.
Improve Your Ductwork

Most central collection systems are set up with a main duct that runs out across the shop to feed branch ducts that connect each machine to the main duct. In an ideal world, the size and length of each duct — as well as the fittings (elbows, Ys, etc.) that connect them — are carefully optimized for airflow and resistance. If you’ve taken a more “seat of the pants” approach with your ductwork and aren’t getting the collection you desire, here are a few things that may get your pipes humming. Reducer hose fitting for benchtop machines Reducer fittings help connect benchtop machines to a 4" flexible hose by reducing the hose size at the machine. Shorten and straighten the ductwork between machines and collector: Every extra foot of pipe and hose adds air resistance that reduces collection efficiency. One way to achieve decent performance in a small system is to locate the collector closer to the machines. For example, a system might use a very short ductwork system and air gates to control collection at several machines.

Use as many straight lines as possible, but if you need to make your ducts turn a corner, use more gradual 45° angles rather than a single 90° one for smoother airflow. Because it’s harder for air to travel around corners and bends than to run straight, try to plan your ductwork to run as straight as possible from machine to collector. If a duct must round a corner, avoid using tight-radius 90-degree elbows. Rather, turn corners more gradually by using special large-radius elbows or two 45-degree elbows. Use larger pipe for your ductwork: You can almost always improve the dust-capturing performance of systems plumbed with small-diameter (4" and smaller) pipe or hose by fitting a larger main duct and/or branch ducts.
For example, replace the 4" branch to your table saw or planer with a 5" or 6" one. The larger pipe allows more air and chips to flow to the collector with less resistance. When connecting benchtop machines with small 2-1⁄2" dust ports, run a 4" branch line or hose to the machine, then use an adapter fitting to attach the hose to the port. This improves collection by reducing the air resistance in the branch. Replace flexible hose with rigid pipe: Despite its ease of use, flexible hose extracts a big air resistance penalty in a collection system. A ductwork layout plumbed with smooth-walled pipe will have better airflow (and hence, better collection) than the same layout using only flex hose. Keep flex hose used to connect machines to rigid ductwork short (2' to 3') and ground the hose’s metal helix wire at both ends. It’s better to use metal pipe instead of plastic, because properly grounded metal ductwork won’t develop a static charge (common with plastic ductwork) that can give you a nasty shock or even start a shop fire.

Make sure the seals on your joints are sealed tightly. Either duct tape or silicone caulk can serve it well. Make sure all ductwork connections are airtight: You’d be surprised how a bunch of little leaks can add up and reduce the effectiveness of a collection system. Seal pipe fittings and joints with duct tape or silicone caulk. If you’ve used stove pipe, tape/caulk all joints on adjustable elbows as well as the lengthwise seams on snap-locking straight pipe.
Improve Your Collector
Whether you have a small portable chip collector or a huge centrally installed cyclone system, performance is affected by the same factors. Here are some strategies and modifications to help you get the most out of the collector you already have. Clean your filters often! When the lower bags in a two- or four-bag chip collector fill up, the unit’s filter area is effectively cut in half. This not only reduces suction significantly, but the higher air pressure inside the bag also forces fine dust particles through the fabric and into the shop air. For best collection and health, empty and clean your filter bags as often as possible. Although they won’t fill up, the canister filters used on collectors such as the Delta 50-850A and Oneida XXP020100 also need occasional cleaning. These units feature built-in cleaning systems that brush dust accumulations from the inside of the filter pleats. In addition to cranking these at regular intervals, also periodically clean these filters more thoroughly by blowing them down from outside with compressed air. Replace fabric bags with pleated canister-type filters: This not only reduces the amount of dust that’s blown off the filter each time you turn on the collector, but a large canister filter can also add extra square feet of filter area to your system. This can improve your collector’s performance by allowing air to flow more freely through the filter, even when it becomes coated with fine dust during normal use.
A pleated filter on your dust collector will often have extra devices like battons that bump the filters that can be used to keep up good air flow. Add a preseparator: If you’re using a single-stage unit as your main collector (on these units, sawdust travels directly through the blower (fan) and then into the filters/collection bags), consider adding a cyclone to the system. Connected to the ductwork just ahead of the collector, a cyclone adds a little extra air resistance to the system, but it can improve collection in several different ways:
1. Up to 99 percent of the chips and dust end up in a drum (not a fabric bag), where they’re easy to empty out.
2. The collector’s filter bags/canisters deal with less dust, so airflow is maintained even when the cyclone’s bin is getting full.
3. Stray screws, nails and scraps accidentally sucked into the ductwork don’t pass through the blower, where they may ruin the fan or create a spark that ignites the fine dust in the filters, causing a fire or (rarely, but possibly) an explosion.


Upgrade to a bigger collector: If you’re currently using a collector that’s woefully undersized for your setup (for example: a 1 HP portable collecting dust from a 2,000-squarefoot shop), the only way you’re going to improve your dust collection is to buy a larger, more powerful unit. But don’t just rush out and buy a new collector until you’re sure that your main problem isn’t low airflow due to undersized ductwork. You can hire a pro to optimize your ductwork (dust collection specialists, like Oneida, offer system design services). Or, if you’re not allergic to math, you can do this yourself by following the guidelines in my book, Woodshop Dust Control. Once the ductwork is properly designed, you can select a collector with enough air-handling capacity (measured in cubic feet per minute — CFM) and suction power (measured as static pressure — SP — in inches of water) to suit the system. Don’t buy any collector that doesn’t have a fan graph, a plot of the unit’s actual performance showing the correlation of SP and CFM. Getting serious about reducing sawdust in your shop is a good idea for a multitude of reasons. While not everyone has a budget that will support all the latest and greatest gadgets — applying these strategies will certainly help you get the best efficiencies from the equipment that you’ve already got.
-
 Dust Right 4'' Quick Change Multi-Port Tool SetSpecial Price $67.49 Regular Price $89.99 Save $22.50


Keep the inspiration coming!
Subscribe to our newsletter for more woodworking tips and tricks