How to Build a Portable Gazebo
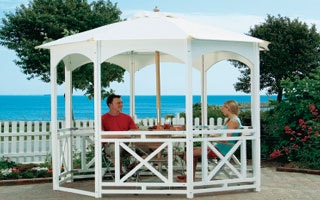
A gazebo is a nice finishing touch to any backyard, providing a new vantage point from which to enjoy your gardens and a focal point when looking at your landscaping. Gazebos also provide shade from the sun and shelter from rain, giving you more hours to enjoy the outdoors. The only drawback — especially for gazebos in the classic octagonal style — is that they are complicated to build and expensive to buy.
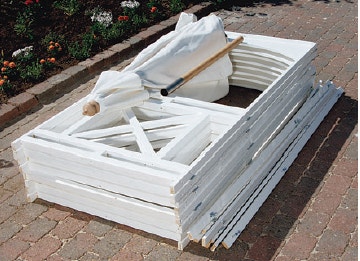
This portable gazebo is easy to set up as well as take-down and store, and makes a perfect set-up on any flat surface. Disassembled, the pieces of the gazebo don't take much space and can easily be stored in a garage or shed.
This design eliminates the fancy joinery that’s usually associated with an octagonal roof and walls. Instead, I used hinges to join the walls and a patio umbrella for the roof. As a result, my gazebo is quite easy to build for around $200 (perhaps a little less), plus the cost of the umbrella. An added bonus: it’s relatively lightweight and portable. If you want to move this gazebo to a new location or take it down for the winter, it is not difficult to do.
The finished project breaks down to four hinged pairs of wall panels and eight trim boards. The wall sections join together with 12 wingnuts, and it takes less than 30 minutes to raise or take down the gazebo. Nevertheless, the structure is very stable, even under windy conditions. To be on the safe side, I used a heavy concrete umbrella base of about 90 pounds, and I fastened the umbrella’s ribs to the hooks on the sides with elastic line as shown in the plans and photos.
Framing The Walls
The width of the wall panels should create about 4" of overhang from a 10' umbrella, keep this in mind when buying your umbrella. Building the walls is made easier because all eight sides have the same overall dimensions, and seven of them are identical. This means that for every part, you only need to measure once — and then transfer the marks to the other workpieces.
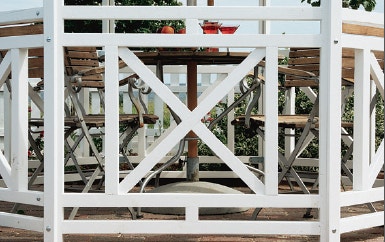
The balustrades should be laid out with a cross pattern on every side except, of course, for the entrance which will not have a panel. I used 5/4 stock for the posts (pieces 5) and the cross members (pieces 6). The arch panels (pieces 1) are cut from 3/4" exterior grade plywood. The remaining framing is from 2 x 2 lumber, which you can rip from 2 x 4s if you so choose.
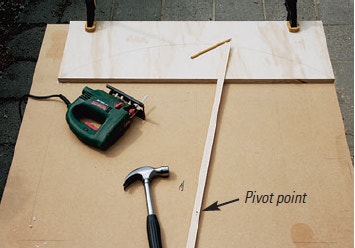
Draw out the arch panels out on a template and transfer it to your pieces, the author built a homemade compass with a 27-1/2" radius to aid in the task. Once you’re done with marking and measuring cut all the parts to size. This saves time and makes creating uniform pieces a bit easier. I marked the 27-1/2" radius on the arched panels using the simple homemade compass. I then made the curved cuts with a jigsaw, but a band saw would work as well.

Once you've marked up the rail location on one post, transfer them to the rest of your pieces using a square and pencil. All the other cuts can be made with a handsaw and miterbox, a portable circular saw, or, for best results, a table saw. Whichever you choose, you will save yourself a lot of trouble if you make certain that they are all perfectly square cuts. Assembly of the walls works best on a large worktable. Sawhorses, topped with a sheetstock panel such as plywood, work great. Just be sure to use a sheet that you have checked to make sure the factory-made corners are indeed square. Begin by screwing the blocks (pieces 4) to the rails (pieces 2).

Use a large plywood worktable to give yourself space and a straight edge so that you can clamp and align the rails before assembling them. Align one post with the edge of the work table, and then clamp the rails with the block assemblies (see the Drawings for details) in position relative to the posts and balusters (pieces 3). Screw the rails to the posts and then to the balusters. Then screw the outboard rails to the blocks and to the posts.

Align the cross members and frame and mark out the centerline, this is where you will cut out the miters for the half-lap joint. For measuring the cross members (pieces 6), it’s easiest to first draw centerlines. Then lay them under the assembled wall and mark the angles. They should, of course, be close to 45 degrees. Make the cuts and position them, one over the other, inside the square opening.

Once you've cut the angles on the crosspieces, place the wall assemblage down together and mark out where you will cut your half-lap joints. Mark the area where they overlap. Here, you’ll have to make notches in order to fashion the halflap joints. It’s easy to do this. Simply make a series of cuts halfway through each cross member.

Use a circular saw to start your half lap joints, then finish them off by using a chisel to cut out the rest of the waste. Switch to a sharp wood chisel to carefully clear out the waste. I found that I could clean these joints out by hand (no tapping with a hammer). Please take care never to have the chisel pointed toward your hand or body. It can easily slip and cause a nasty gouge if you are not careful.

To make the beginning subassembly, screw two balusters between the rails with wood screws along with the blocks on either end. Install the rails (pieces 2) at the top of the subassemblies next. Then install the arch panels (pieces 1). Use a few 3/8"- thick strips of scrap wood to support the panels in a centered position during assembly.

Finish fastening the crosspiece subassembly to the balustrade frame with two 3" galvanized screws in each corner. The entrance wall is identical in size to the others, except there is no balustrade assembly.
Install the Hinges
Before you install the hardware, take time to paint the parts. I chose to prime the wood with a good quality white primer and then filled holes and seams with latex spackle and caulk. I followed with two coats of white exterior enamel. You can choose any color that you wish — but that pure white enamel offered what I thought of as a classic look.

The author chose 6" strap hinges to join the walls, to start the attachment drill a 5/16" hole at the middle of one leaf of each hinge. With the painting done, you can move on to installing the hinges. Divide the wall panels into pairs and use 8" strap hinges (pieces 8) to join each pair of panels together. The only exception to this is for the pairing of the entrance panel and its adjacent wall panel. Here, use T-hinges (pieces 10) instead of strap hinges as shown in the Drawings. You will need to bore one hole in each of the 6" strap hinges (pieces 9).

Using the holes you drilled for the hinges, bore 5/16" pilot holes through the hinges for the carriage bolts. Install three of these hinges on the inside of one post for each pair of panels.

To complete the gazebo panel connections, insert galvanized carriage bolts and wingnuts to the hinges. You’ll use these extra holes you’ve just drilled in the hinges to join each pair of wall panels to one another with bolts and wingnuts. (You’ll also need to bore a hole in two of the T-hinges in the same manner as you just did for the 6" strap hinges, for the same reason — joining the entrance panel to a paired panel set.) Now drill a pilot hole into the edge of the same rails you attached the hinges to, to install a screw hook (pieces 11) for securing the elastic cords later. Position these screw hooks 10" down from the top end of the rails. Twist the hooks into place.
Erect the Gazebo Walls
Stand the wall panels on the gazebo site of your choice. Arrange them so the entrance wall faces in the direction you prefer and so you have a perfect octagon. A simple trick to ensure “octagon-ness” is to make sure the distance between opposite corners around the octagon’s perimeter is equal. Once you have it right, clamp the still-loose hinge leaves to their mating posts. Bore holes through the posts at the holes you previously drilled in the hinges. Tap carriage bolts through each pair of hinges and post holes (from the outside face in), and secure the connection with washers and wingnuts.
Raise the Roof

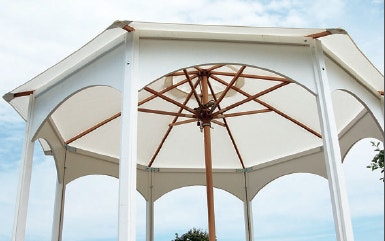
Set the base for your umbrella in the center of the gazebo, then set up your patio table and bring the umbrella down through the top of the gazebo and table. Installing the umbrella (piece 13) is simple. Place the umbrella base (piece 14), as well as the table you want to use, at the center of the gazebo. Lift the top half of the umbrella clear of the walls, open it, and secure it to the lower umbrella post.

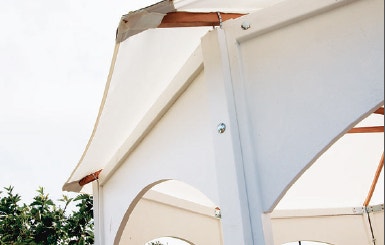
To protect the umbrella from wind, use 18" elastic cords looped through the ribs, tie them together with square knots and thread them through screw hooks. Tie off eight loops of elastic cord (pieces 12), one per umbrella rib, and hook them onto the previously installed screw hooks. Now you can proceed with installing the eight vertical trim boards (pieces 7), once again using carriage bolts, washers and wingnuts.

Use trim pieces over the gazebo joints to hide the joint and act as outside poles to stabilize the umbrella. By the way, it pays to buy a patio umbrella of good quality. The gazebo will last many years, and you’ll want an umbrella that will, too. I chose a 10-foot diameter, wood model with eight sides, making the gazebo big enough for four to six chairs and a small table.

Once the trim poles are between the wall joints, secure them in place with washers and wingnuts. The distance from inside wall to inside wall is about 9-1⁄2 feet. You can opt for an 11-foot umbrella—and a bigger gazebo—but you will have to increase the width of the wall panels accordingly.

Before you buy, make precise measurements on your umbrella, it should be 10 feet in diameter (11' if you want a larger overhang), and at least 82" tall in its stand. Here’s a note of caution: just because an umbrella has a listed diameter of 10 feet does not mean it will actually be that size. Sometimes the manufacturer uses round numbers, or measures over the peak of the umbrella. If you buy your umbrella first, you can always adjust your panels to suit. This project is a nice summer effort that doesn’t take weeks to complete. It can help you enjoy your backyard and your woodworking hobby too.
Download PDFs

Keep the inspiration coming!
Subscribe to our newsletter for more woodworking tips and tricks