How to Build a Kitchen Island with Pre-built Panels and Butcher Block
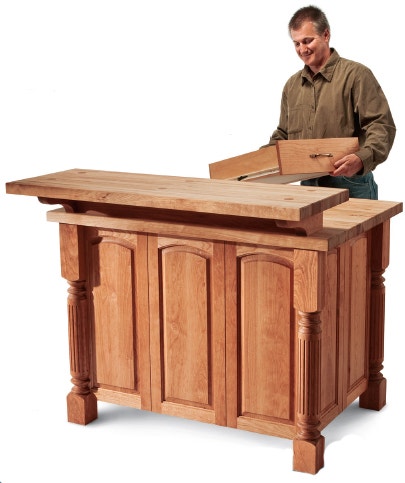
A kitchen island can make a very nice upgrade to your home, adding both utility and value. If you have the room for it, an island like the one I’ve built here can even improve the efficiency of your cooking workflow, not to mention adding a cozy place for two people to sit and enjoy a meal.
This plan has many "kitchen virtues" built into its design. Tons of roll-out storage in the lower compartment, utensil storage in the upper drawers, a spacious food preparation area on the butcher block countertop and an eating area on the raised counter section.
In addition to the practical elements, it is also very stylish, with solid cherry arched raised panels featured on the doors and walls of the cabinet and highly detailed turned and routed legs at the corners. “Whoa,” you might be thinking, “I don’t know how to make legs like that and I am not even that comfortable making raised panel doors, much less ones with arched panels and matching rails.” Well, here is some good news: you don’t actually need to know how to do any of that to proceed with this project ... and here is why.
Before You Get Started
Note: While the carcass of the project is shop assembled, the panels, legs, and butcher block top were purchased.
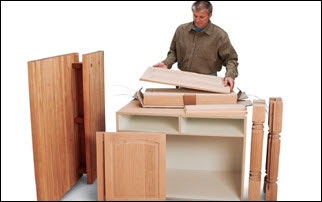
For the Kitchen Island diagrams and materials list in PDF Format, click here. Before you get started on putting the piece together, you'll need these pre-built parts.- Side Panels (4) 3/4" x 13-1⁄2" x 31-1/4"
- Back Panels (3) 3/4" x 14" x 31-1/4"
- Doors (2) 3/4" x 18-3/4" x 24-3/4"
- Drawer Faces (2) 3/4" x 6" x 18-3/4"
- Drawer Slides (3 sets)
- Door Knobs (2)
- Drawer Pulls (2)
- 35mm Cherry Plugs (3 sets)
- Cherry Legs (4)
- Door Hinges (2 sets)
- Butcher Block Tops (2)
A Builder’s Challenge
The dimensions in this article are based on the panels, doors, and legs the author purchased and should be adjusted for different sizes, custom paneling can be ordered from Rockler.com. Not long ago, Woodworker's Journal publisher Larry Stoiaken challenged me to come up with a kitchen island design that was practical and very stylish but one that even a novice woodworker could build. At first I thought it was one of those pie-in-the-sky ideas a publisher will float out there from time to time, with little to come of it later. (In my experience, our publisher has a tendency to imagine projects in his mind’s-eye that woodworkers find just about impossible to pull off in an actual shop.) But then I had a talk with editor-in-chief Rob Johnstone and we started to see some real possibilities.
After his experience last issue completing a cabinet “makeover,” Rob realized how many ways there are for woodworkers to go when it comes to completing a home project. These days you can buy a lot of items "custom-made to order" — like decorative legs, drawer faces and that sort of thing, and this approach to woodworking really got us thinking. If a person has the skill to build a simple melamine box, perhaps we could dress up the outside of it with pre-made components and come up with a fancy island that almost anyone could put together.
I was almost embarrassed at how easily the project design came together ... but I let Larry sweat for a few days before I gave him the sketch and the ideas. (Just like Scotty on Star Trek, let everyone think you can work wonders by making a task seem much harder than it actually is ... ) Now I am not going to try to fool you: this is a much more expensive way to build a cabinet than starting from raw wood and building every component yourself, but the advantages to this method are obvious. And, it is also a lot less expensive way to acquire a cabinet than hiring your local cabinetmaker. After much discussion, the approach we settled on was to purchase as many items as possible — if you have the skills, you can substitute labor for any one of those items, be it the butcher block top, the panels, the drawer fronts or even the turned legs. What I'll describe is an approach that even a raw novice can undertake. Where you go with the project is completely up to you!
Starting Right at the Top
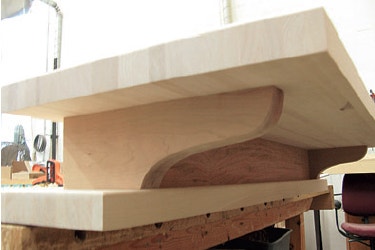
I purchased two butcher block tops to make the top and counter (pieces 1 and 2) and used all of the material up. One piece was ripped to form the counter and its leftover was glued to the other piece to form the top. Since this material comes with a slight roundover on its edges, you'll need to trim the full piece a bit before gluing it to the cutoff. That way the roundover won't show up in the middle of your glue-up. To avoid extra sanding, be very accurate as you align the pieces when you clamp them together. Once you remove the top from the clamps, chuck a 1/4" roundover bit in your router to go around the entire top and counter (both the tops and bottoms) to ensure that this detail is consistent on both pieces. Now sand the top and counter through the grits and set them aside so you can turn your attention to the pieces that will complete the top sub-assembly.
The Top Subassembly
Once you've sized and trimmed your blocks, use two long wood screws to make the connection between the outer supports and top. The counter supports and apron (pieces 3, 4 and 5) will serve to elevate the counter and bring the top pieces together as one sub-assembly. The shaping details for the outer supports are in the Drawings. Now is the time to machine them, along with the inner support and the apron. The apron fits into dadoes in the outer supports, and the inner support fits into its own dado in the middle of the apron. After test fitting the parts, glue the pieces together. Now you've arrived at one of the trickier aspects of this project.
The counter will bear a lot of weight during its lifetime, so I thought it best to bolt it right to the top. But it’s about 7" from the top of the counter to the bottom of the top, which means drilling in series.

Use ratchet wrenches to secure bolts into the the two tiers of the butcher block countertops. Here's how I did that: First, lay out the six 35mm holes on the counter's top for the large tapered plugs (pieces 6). Using a 35mm cup hinge bit, drill all six holes to a depth of 3/4" and then line up the counter, the support sub-assembly and the top. A couple of wooden handscrew clamps came in really handy here. Firmly attach one wooden handscrew clamp to each outer counter support and then use smaller bar clamps to hold them in position on the top. Carefully line up the counter on top of the supports, clamp them in position and, using a 1/2" brad point bit, drill through the center of the inner three holes until you’re slightly into the support pieces. Switch to a countersink bit for a moment and drill through the outer two holes (the outer center hole is just for looks) until you’re into the supports. Then remove the counter and switch back to the 1/2" brad point bit to extend the three inner holes, this time through the supports, just into the top.
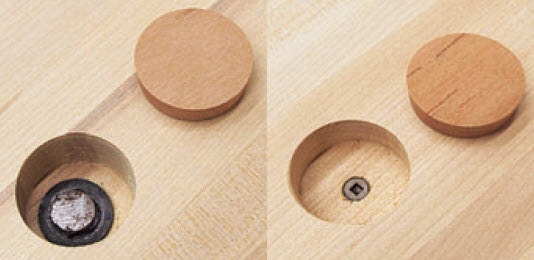
The inner countertop holes have 7" bolts with washers and nuts, while the outer three will have the 3" woodscrews, including an aesthetic center hole. Finally, loosen up the wooden handscrews, remove the support sub-assembly, and use your brad point bit one last time to complete the 1/2" hole right through the top. Once you’ve done that, you’ll have to flip the top over and use your 35mm bit to countersink the three bolt holes from the other side to keep the nuts and washers at the end of the bolts contained. Blow away the chips and bring the counter, the support sub-assembly and the top together as its own sub-assembly, using the three bolts (pieces 7) and the two long wood screws (pieces 8), as shown in the Drawing. Glue 35mm plugs (pieces 6) into all six top holes (leaving them just a bit proud) and, once the glue dries, sand them flush to the counter.
Moving on to the Casework
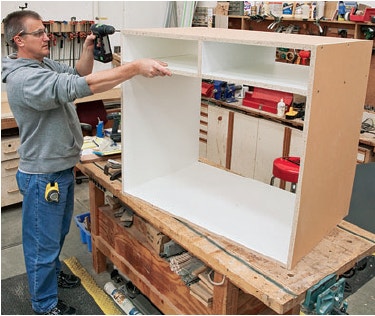
The island's casework is quite simple with two sides, a top, bottom and middle divider, a small drawer divider and the back along with spartan face framing. The next step is to make the casework and add the face frame to it. The casework itself couldn’t be easier. Two sides, a top, bottom and middle divider, a small drawer divider and the back (pieces 9 through 12) come together with a series of dadoes and rabbets; follow the details in the Drawing. Using your nail gun (or you can screw it together if you don’t own a nail gun) and glue, assemble the carcass and then attach the back, which conveniently helps to square everything up.
A Simple Face Frame
The face frame was built “in place,” which really simplified matters. Cut the stiles, rails and middle stile to width (pieces 13, 14 and 15) and then glue and nail the left side in place, followed by the top, the middle stile, the middle rail, the bottom rail and, finally, the right stile. Each piece can be positioned in place and marked as you go ... the good news is that the joinery is covered by the legs and drawers!
The Purchased Parts
Up to this point, the only real “purchased” items have been the butcher block top and counter and the large plugs. If the thought of taking on all the upcoming leg work and frame and panel work gives you pause, relax (if you can do that while simultaneously pulling out your wallet). The legs (pieces 16 and 17) and the panels, which are just raised panel doors mounted to the carcass (pieces 18 and 19), are “storebought.” The panels arrived fully assembled, ready for finishing. The legs did require a little work. That’s an extra-long fence on the table saw, which helps to keep the legs square during these cuts. Without it, the legs would want to work their way away from the fence (as the square portion at each end is disengaged or encounters the fence). With the longer auxiliary fence, that’s not a problem.

The legs require some machining, using an extra long rip fence to cut them to fit, leave a place to glue into the bottom leg rabbets to support the island. Notice in the Drawings that the rip cuts in the back legs and front legs, while the same on one plane, are different on the other. This accommodates the width of the doors, which have yet to be added to the mix. It will also affect the dimension of the leg fillers (pieces 17), which end up supporting the entire weight of the piece. Since there are two kerfs involved in creating these long rabbets, it was impossible to simply use the cutoff. Make sure your filler piece is correctly oriented for grain match and get as close as possible with your color. Clamp and glue these pieces to the legs and sand them smooth.

Test fit your legs before moving on, keeping in mind that the rabbets on the back legs are slightly different in size. With the legs ready for assembly, turn your attention to the panels. I suggest starting on one side, toward the front, and attaching the side panels (pieces 19) from the inside, with screws. Use a couple of washers to keep the panels about 1/8" apart (creating a reveal) and don’t worry if they’re short on the backside — the legs will cover that. On the back, I placed the middle panel first and then the two outer panels (pieces 18), not worrying about a larger gap at the ends because, again, the legs will cover it.

Once you have the framing and filler pieces in position, attach them to the rest of the island's carcass. Now you’re ready to install the legs. As mentioned earlier, the two back legs have different dimension rabbets than the two front legs, so make sure you have everything well marked.

To complete the island, attach your drawers and drawer, slides and doors with hinges, these pieces are all store bought for this project As was the case with the legs and panels, the doors and drawer faces (pieces 20 and 21) for this project are “store bought.” I did end up making the drawers and the pullout shelves myself, because they were really easy and, aside from the grooves for the bottoms, involved very little machining. Follow the Material List and cut all the parts to size for these sub-assemblies.
Start with the drawers (pieces 22, 23 and 24), first cutting the pieces to size and then forming the 1/4" groove for the bottom. The dimensions are such that you simply capture the bottom as you glue up the surrounding pieces. The pullout shelves are much the same story, just larger. Again, cut the front and back, sides and bottoms (pieces 25, 26 and 27) to size, mill the grooves for the bottom and glue the pieces together. You’re going to need slide supports (pieces 28) on each side, so the shelves can clear the doors and the drawer faces can extend to the full width of the doors. I installed three on each side. With the supports installed, you’re ready to attach the full-extension slides to the supports, the drawer divider and the pullout shelves and drawers. Follow the directions on the package and, when everything is moving well, attach the drawer fronts and doors. The hinges for the doors (pieces 30) were positioned strategically to miss the pullout shelves, and the drawer fronts are screwed in position from the inside of the drawer in slightly over-sized holes, which allows for adjustment.
Finishing Up

The paneling and top finished with Nordic Oil, giving them an attractive golden brown tone and designed with parts and shadow lines to hide most of the joinery. Install your pulls and knobs (pieces 31 and 32), and you are ready to move on to the finish. I used Butcher Block oil for the top and counter because it’s food safe and then I turned to Nordic Oil for the base pieces. Cherry really looks great with an oil finish, and the patina will get richer as the years march by.


Keep the inspiration coming!
Subscribe to our newsletter for more woodworking tips and tricks