Cove Cutting Techniques
You use your table saw routinely for ripping and crosscutting wood in perfectly straight lines, guided by the fence or miter gauge. Tilt the blade or adjust the gauge, and you get straight bevels or mitered cuts.
No argument, that's the table saw's bread and butter. But beyond those basic techniques are several others you should consider adding to your arsenal of skills. Let's take a look at some of the most useful ways to go beyond the basics.
Cove Cutting
Coves are common in molding, trim, picture frames, box components and more. Small coves, like simple coved trim, are easy to make with a router. But for wider, deeper coves for crown molding, box sides and other larger projects, you need either a shaper with large-scale cutters or a well-stocked trim supplier.
But you can also cut coves on your table saw. The process may seem tricky (and maybe a bit scary if you've never done it before), but it's really just a matter of simple preparatory steps and the right guidance for your workpiece. The type of blade you use doesn't matter, but a higher tooth count produces a smoother cut.
While coves are arcs, you still cut them in a straight line. The trick is orienting the workpiece at an angle so the saw cuts in a spiral to form the arc. You can do this with straight wooden guide pieces clamped to the saw at the appropriate angle, but clamping to a saw table isn't always easy; there are some places on saws that clamps just won't go.
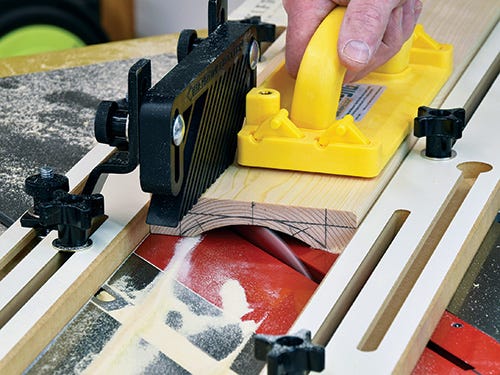
Instead, consider a miter slot-based cove-cutting jig, such as the Rockler offering seen in the opening photo, that uses expandable miter bars to lock the jig into place. Its parallelogram design makes for easy alignment, while a vertical featherboard keeps workpieces pressed down securely during the cut.
To demonstrate, I'll cut a cove measuring 5/8" deep by 3-1/2" wide, into a 1"-thick workpiece. I want the final coved workpiece to be 4-3⁄4" wide, but I'll include a bit of extra at the edges to fine-tune the piece after coving.
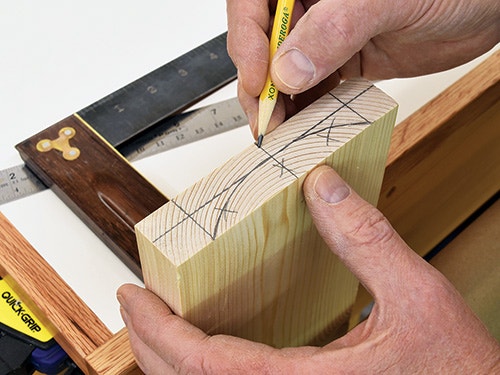
First, I mark the end of the workpiece. Here, I've not only drawn the cove but also a centerline, a horizontal line at the top of the arc and a pair of lines delineating the ends of the cove. These make it easier to set the correct angle on the saw.
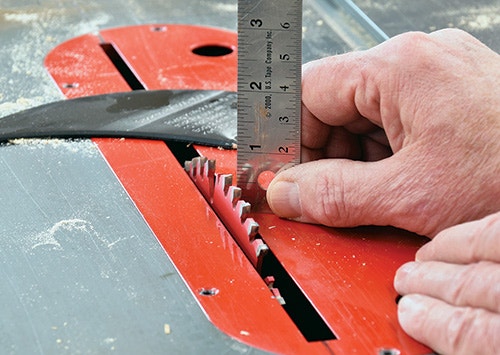
Now I set the saw blade to the cove's depth, in this case 5/8" high. By the way, you can't leave a riving knife in place when cutting coves, so that's why I've removed it.
]
With the blade height set, I mark where the teeth exit and enter the throat plate, placing masking tape at the exact points where they come up and go down — tooth tips should just graze the tape. Note that the exposed portion of the blade is actually longer than the marked cove on the workpiece.
Next, I place the workpiece in front of the blade, with the feed angle matching my saw's tilt; for my left-tilt saw, I'll angle the feed from the left. Feed direction doesn't matter for symmetrical cove cuts with the blade at 90 degrees, but it will matter for asymmetrical coves that require a tilted blade. More on that later.
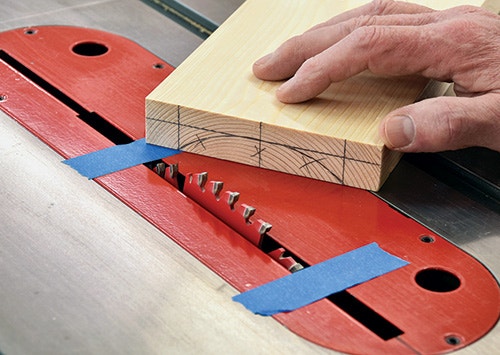
I align the workpiece where the first tooth will contact the wood and then sight from the other side of the table. (Those vertical registration marks make this easier.) Now I can angle the workpiece and sight over the blade until the cove exactly matches the blade's arc.

By the way, there are easy-to-find angle setting charts and even phone apps on the Internet that calculate the correct feed angle for you. Here, my exact calculated angle is 45.2 degrees, but I settled on an easily repeatable 45 degrees for my cove.

Without moving the workpiece (a weight, such as a pipe clamp, can keep it in place), I lay strips of tape along the workpiece edges to act as guides for jig placement. When that's done, I lower the blade.
Now I loosen all knobs and place the jig on the table saw, aligning its inner edges to the tape. The miter bars are inserted into their respective slots, and I lock them down with one side of the jig exactly on the tape edge. Then I repeat with the other side, locking the end bars to secure everything into a rigid parallelogram.
If you're following along on your saw, set the workpiece inside the jig and check that it moves freely, adjusting the jig as needed. Finally, set the featherboard to hold the workpiece workpiece through the cut. Since you're cutting across the blade, you'll get resistance; the steeper the cut angle, the harder the push will be. Keep in mind, too, that hardwood will present more resistance than softwood. So cut in blade height increments of no more than 1/16" at a time.

Now raise the blade and make the first pass. Push blocks are essential for this operation, as your hands pass right over the blade. After each cut, raise the blade 1/16" and take another pass until you've cut to your layout line and the cove is complete. Feed a bit more slowly on the final pass to create a smoother surface.
If you plan to make more coves with the same setup, cut off a small piece at the end of the finished cove molding to use as a cut-depth guide for future workpieces.

With the cove done, examine its surface and sand as necessary to remove the angled blade marks.
Cove cutting is a dusty operation. There are no scraps or offcuts produced with coves. It's all dust. Even with a good dust collection system, you can cut down on the mess by removing the bulk of the waste before actually cutting the cove.

You can see that I prepped this workpiece by making a series of straight rips in the cove's waste area. With each cut 1/8" or so apart, it was easy just to snap the waste out in strips. This not only eliminates a lot of dust, but it also speeds up the process and makes for easier feeding, especially in hardwoods.

In our example, we've cut a symmetrical cove, but as noted earlier, you can cut almost any cove shape by tilting the blade. A symmetrical cove's arc apex is in the center, but angling the blade shifts this apex to the side. The greater the angle, the farther to the side the apex will be.
Getting a specific cove profile can take a lot of calculation or some trial and error. You'll find numerous charts and calculators for the process online, but I personally prefer just trying various setups and picking the one I like best.


Keep the inspiration coming!
Subscribe to our newsletter for more woodworking tips and tricks