How to Make Wood Shutters

Learn how to make wood shutters that perfectly fit your windows. Making custom wood shutters to fit your windows is a DIY project that any woodworker can tackle. Rockler offers all the shutter materials and hardware you need to make custom-sized wood shutters. This article will show you the steps necessary to make your wood shutters.
Video: A Complete Guide to Making Wood Shutters
How to Make Wood Shutters
First consult the Measuring Guide to obtain your dimensions. Then enter the shutter dimensions into the Shutter Design Wizard to get your FREE downloadable plan. The plan includes a detailed list of all the supplies you'll need to construct your custom shutters!
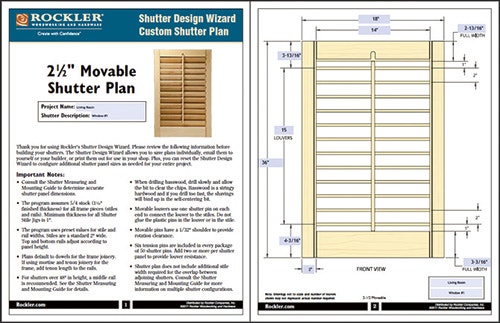
Here's a big reason to like this system: there's almost no desk time required for planning or drawing your shutter project, thanks to the free Shutter Design Wizard program Rockler offers. Once you've decided between 1-1/4"-, 2-1/2"- or 3-1/2"-width louvers (the only three options), and whether you want the louver slats to be operable or fixed, a guide provides mounting considerations to help you figure out the final width and length you'll want your shutters to be. With a couple more mouse-clicks, you enter these two dimensions into the Design Wizard and hit "Submit."
That's where the magic happens: instantly, you receive a full set of printable plans for your project that include drawings (although not to scale), a cutting list, a list of hardware with pricing and another list of optional router bits and jigs if you decide to build shutters completely from scratch. I chose this approach and built mine from cherry so I could try out Rockler's special louver-cutting and shutter beading router bits. The cutting list assumes dowel or loose tenon joints on the stile and rails, but, like me, you can adjust them for standard mortise-and-tenon joinery if you wish. The company offers premilled lengths of basswood louver slats and sells basswood rail and stile stock if you'd prefer to skip the louver routing process.
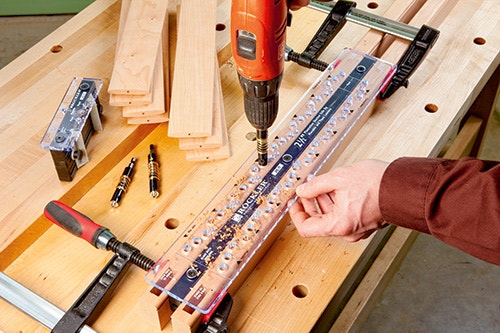
You'll also need to buy a template kit specific to the louver style you've chosen. It includes two jigs: a long one for drilling the stiles to accept plastic louver pins and metal clips that attach the louvers and control arms; and a shorter jig with adjustable stops that allows you to drill corresponding pin holes in the ends of the louvers.
Three sizes of self-centering drill bits also come with the kit. Pick the one you want and align and clamp your shutter stiles together in the stile jig. The templates are clearly marked, sturdily made and make shutter construction essentially a drilling operation. (Note: for 1-1/4" fixed-louver shutters, the stile jig is a template for routing short slots that house the ends of the louvers instead of using the pins.)
Scratch-built Routing Option
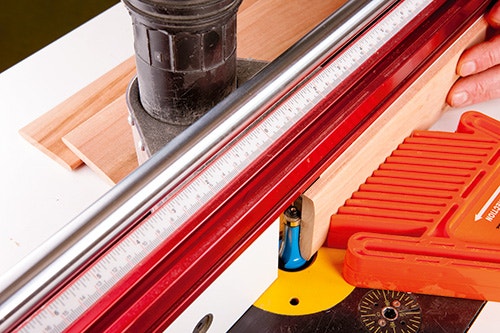
I milled my cherry louvers from resawn stock, so I ordered Rockler's louver-profiling router bit and a special beading bit for detailing the edges and ends of my stiles and rails. I was impressed with how cleanly the louver cutter shaped the cherry; I expected some tearout and burning, but the bit produced no defects. These bits enable you to make shutters from any wood species you like, to match trimwork and flooring — a nice advantage.
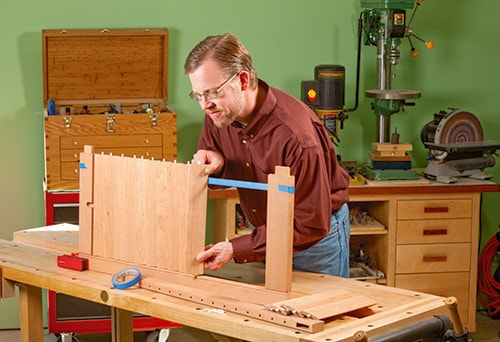
Final Assembly
I suggest drilling at a slow speed to help clear the chips. The bits did clog now and then. During assembly, installing a series of tiny metal clips to attach a control arm to each louver required patience, but the clips hold securely once pressed into their tiny holes. All in all, it proved to be a quick, fun project. The custom plans coupled with simple jigs deliver great results. I wouldn't hesitate to build more sets of shutters for my home — this new approach makes it easy.


Keep the inspiration coming!
Subscribe to our newsletter for more woodworking tips and tricks