How to Apply Plywood Veneer Edge Banding to Solid Wood with Masking Tape Hold-Downs
While other methods work well, the author suggests using masking tape to "clamp" the edging during glue up, spacing the tape pieces around 2" apart. I asked some of my woodworker friends how they went about gluing solid wood edging to plywood, and I was surprised to learn that every one of them used a different technique, and very few were completely happy with their results. Their main complaints were: how long the process took (much too long, according to them) and sanding through plywood veneer when flushing up the edge strips. On the flip side, we all agreed that solid wood edging beats the heck out of iron-on edging for looks, durability and perceived value. I’ve done more edge banding than I care to admit. The good news is that, along the way, I’ve developed better and faster ways to do the work. I’ve also made a lot of mistakes! Hopefully, my experience will save you time, money and potential headaches. If you’re new to this edge banding stuff, then I strongly suggest you practice on scrap wood until you get the hang of it.
Make the Edging Strips
Cut your solid wood edging strips 1/8" to 1/4" thick, 1/32" to 1/16" wider than your plywood stock and 1" longer than the plywood piece it will be glued to. Plywood thickness varies greatly. Measure the thickness of every piece you plan to use to determine its consistency. Also, edging strips thicker than 1/4" are best glued and clamped in place. And, except in a few very rare situations, strips thicker than 1/4" are simply not required. You will gain nothing in terms of strength or protection. The exception comes when you wish to shape the edge in some way. The closer your strip width is to your plywood thickness, the easier it will be to sand the strip edges flush with the plywood face veneers. But don’t use less than 1/32" extra. No matter how good you are at aligning the strips, you’ll never get it perfect without some overhang to work with. In my experience, the worst thing that can happen is to get a strip edge aligned below the level of the plywood face veneer. You can’t recover from that. In that case, your workpiece will need to be remade.
Apply the Edging Strip
Once you have the strips prepared, cut to length and width, clamp your plywood piece upright in a vise. Apply a thin bead of yellow glue near each side of the plywood edge where the solid edge strip will go. Place the edge strip in the glue and slide it around a bit to smear the glue over both surfaces. Align the edges of the strip so there are equal amounts of overhang on the ends and on the sides.
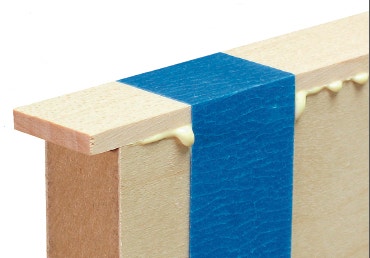
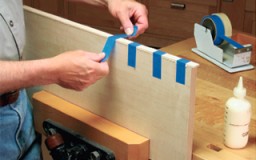
Some glue squeeze-out is acceptable, even expected, when gluing up edging, but it shouldn't create too difficult a clean-up. Next, apply 5"-long strips of 3/4"-wide masking tape over the joint at 2" intervals (photo at left). I prefer 3M brand tape for this. I use their blue painter's tape or regular masking tape. Both work fine. In my experience, I've found that other brands break too easily. You need a tape that stretches slightly without breaking. Pull the tape ends over the edge strip with equal pressure; otherwise the edge strip will show a gap in one of its glue lines. This usually happens on the back side if you're not careful. Double-check the edge strip's side-to-side alignment after applying each piece of masking tape. You can shift the edge strip a bit side-to-side at this point by hand if necessary. You've applied the correct amount of glue when there's a slight amount of glue ooze at the joint.
Clean Up and Trim
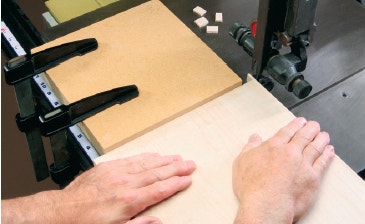
For trimming the edging ends, you can set up a simple bandsaw fence with clamps and a piece of scrap parallel and slightly right of the blade. Set the piece aside and wait 10 to 15 minutes after the tape is applied and until the glue skins over, then remove the tape and carefully scrape away the excess glue. Trim away the edge strip overhanging ends using a band saw.
Once you've trimmed the edges, use an edge sander or sanding block to sand the endings flush. Use an edge sander to sand the edging ends flush with the plywood. Use a 120-grit or finer sanding belt and just “kiss” the wood against the running belt; otherwise you will excessively reduce the length of the plywood.
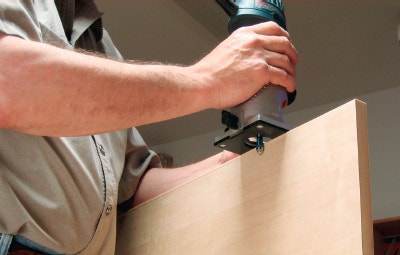
Excessive overhang can be trimmed off using a router with a flush-trim bit with slightly greater bit height than the thickness of the strip, practice this before trying it. If some of your edging strips are grossly overhanging the plywood face veneers, then it’s best to add a step of flush trimming with a router and flush trim bit. Set the router bit so the cutter is just a hair beyond the bottom edge of the glued-on strip. Some folks think this type of routing is too difficult because the router base must be balanced on the face of the 3/4"-wide edge strip. I have no trouble doing this and, with a little practice, you shouldn’t either. Use two hands to hold the trim router firmly on the edge of the workpiece, and move the router slowly.
Sanding
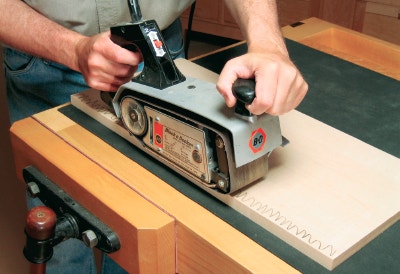
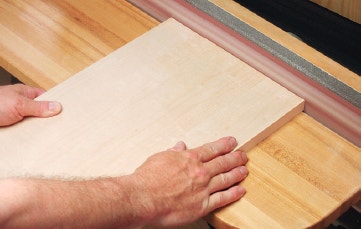
A belt sander with a 150- or 180-grit belt can sand the edging flush to the plywood base, going slowly so you don't sand through the veneer. OK ... Here's the tricky step. You get this far and now you need to belt-sand the edging flush with the paper-thin veneer. I know you’re saying "right!!!," but it can be done. To do so, you need to use a 150- or 180-grit sanding belt, and you have to be very good with your belt sander. A slow sanding speed helps, too. Don’t over sand (photo above). I suggest that you practice on scrap wood, and if you just can’t make this work, then you can flush the edges using a cabinet scraper instead. The process will take much longer, but you'll get good results at the end of the day. The last step is to finish-sand the face of the plywood and edging using an orbital sander. If you give these steps a try, I think you will have good success and get the job done in the least amount of time. Good luck and good woodworking.


Keep the inspiration coming!
Subscribe to our newsletter for more woodworking tips and tricks